Hi sehenry2000,
Here are the diagnostics.
DTC P0440: EVAPORATIVE EMISSION CONTROL SYSTEM, OR DTC P0442: EVAP LEAK DETECTED
CAUTION:If Engine Control Module (ECM) replacement is instructed in following test, always ensure ECM electrical connectors and ground circuits are okay. If either are defective, repair and repeat testing to confirm ECM malfunction. On models equipped with engine
immobilizer, if ECM is replaced, ECM must be programmed with proper ignition key code for engine immobilizer system.
NOTE:
This DTC may be caused by a loose or improperly installed fuel tank cap. If DTC P0441, P0446, P0450 or P0451 is output after DTC P0440 or DTC P0442, perform appropriate test for these DTCs first before
performing test for DTC P0440 or DTC P0442 .
Circuit Description
Vapor pressure sensor, canister closed valve Vacuum Switching Valve (VSV) and pressure switching valve Vacuum Switching Valve (VSV) are used to detect abnormalities in the EVAP system. DTC is set if a leak is detected in EVAP system or vapor pressure sensor malfunctions. Canister closed valve VSV may also be referred to as CCV VSV. Possible causes are:
"� Damaged, disconnected or restricted vacuum hose(s) or tubes.
"� Fuel tank cap is loose or improperly installed.
"� Defective fuel tank cap.
"� Damaged fuel inlet pipe or fuel tank.
"� Defective charcoal canister.
"� Vapor pressure sensor circuit is open or shorted.
"� Defective vapor pressure sensor.
"� Defective overfill check valve on fuel tank.
"� Defective ECM.
Diagnostic Aids
Verify with customer if fuel tank cap has been left off or not completely tightened recently. This may cause DTC to be set. Using Toyota hand-held tester or scan tool, read FREEZE FRAME data. Freeze frame data records engine conditions when malfunction is detected. When ENGINE RUN TIME in freeze frame data is less than 200 seconds, check vapor pressure sensor.
Diagnosis & Repair
1. Check for cracks and deformations in fuel tank, charcoal canister and fuel inlet pipe which is located between fuel tank and fuel tank cap. Fuel inlet pipe may also be referred to as fuel filler pipe. Charcoal canister is located near fuel tank. See Fig. 16 . Check for loose connections and disconnected hoses and tubes around fuel tank and charcoal canister. If no problems exist, go to next step. If any problem exists, repair as necessary. Check fuel tank cap to ensure fuel tank cap is a Original Equipment Manufacturer (OEM) fuel tank cap. If fuel tank cap is an OEM fuel tank cap, go to next step. If fuel tank cap is not an OEM fuel tank cap, replace fuel tank cap with an OEM fuel tank cap.
3. Ensure fuel tank cap is properly installed and tightened. If fuel cap is properly installed and tightened, go to next step. If fuel cap is not properly installed or tightened, reinstall and tighten as necessary.
4. Check fuel tank cap for damage and damaged gasket. If fuel tank cap is not damaged and gasket is okay, go to next step. If fuel tank cap or gasket is damaged, replace fuel tank cap with an OEM fuel tank cap.
5. Visually inspect fuel inlet pipe for damage. If fuel inlet pipe is not damaged, go to next step. If fuel inlet pipe is damaged, replace fuel inlet pipe.
6. Check vapor pressure sensor connection at fuel pump. See Fig. 16 . Check vacuum hoses to charcoal canister and pressure switching valve VSV for correct installation, loose connections, disconnected hoses and damage. See Fig. 16 . If no problems exist, go to next
step. If any problem exists, repair or replace components as necessary.
7. Check hoses and tubes between fuel tank, fuel inlet pipe and charcoal canister for correct installation, loose connections, being disconnected and damage. See
Fig. 16 . If no problems exist, go to next step. If any problem exists, repair or replace components as necessary.
8. Check charcoal canister for cracks or damage. If charcoal canister is okay, go to next step. If charcoal canister is cracked or damaged, replace charcoal canister.
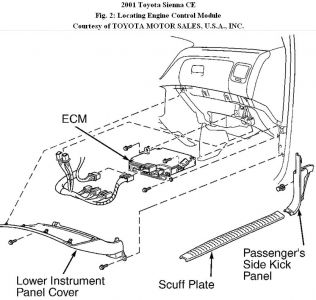
9. Remove glove box for access to ECM with electrical connectors still installed on ECM. See Fig. 2 . Turn ignition on. Using voltmeter, check voltage between terminals No. 2 (Yellow wire) and No. 18 (White wire) at ECM electrical connector E11 with all electrical
connectors installed on ECM. See Fig. 4 . This is the VC and E2 terminals on ECM. Voltage should be 4.5-5.5 volts. If voltage is within specification, go to next step. If voltage is not within specification, replace ECM.
10. Turn ignition off. Connect voltmeter between terminals No. 17 (Blue/Red wire) at ECM electrical connector E8 and No. 18 (White wire) at ECM electrical connector E11 with all electrical connectors installed on ECM. See Fig. 4 . This is the PTNK and E2 terminals on
ECM. Remove fuel tank cap. Turn ignition on and note voltage. Voltage should be 3.3 volts. If voltage is not within specification, go to next step. If voltage is within specification, go to step 12 .
11. Check for open and short in wiring harness and electrical connectors between vapor pressure sensor and ECM. If wiring harness and electrical connectors are okay, replace vapor pressure sensor. If wiring harness or electrical connector is defective, repair as necessary.
12. Inspect fuel tank and overfill check valve for cracks and damage. Overfill check valve is located on top of fuel tank. See Fig. 16 . If fuel tank or overfill valve are defective, repair or replace components as necessary. If fuel tank and overfill valve are okay, it is likely that DTC was caused by fuel tank cap not being fully tightened or was improperly installed.

For P0441 and P0446 the diagnostics are rather lengthy but one of the most common cause is a clogged vacumn hose, marked with blue paint near charcoal canister. Get it checked for clogging and retest if the problem goes away..
SPONSORED LINKS
Saturday, October 2nd, 2010 AT 9:47 AM


