Screaming screeching noise when pushing in the clutch and starting vehicle

Tiny
NEWBYKBLA
  • MEMBER
  • 1996 FORD MUSTANG
  • 4.6L
  • V8
  • 2WD
  • MANUAL
My husbands ford mustang needed a new clutch cable put on his car and he decided to install it his self, once he had installed it everything seemed to run and sound fine again until he decided to test drive it a little further down the road and into town. Once close to town it begin to make a screaming screeching noise and by the time he turned around in town and headed back he pulled back into the driveway the noise was 10X louder. Now when he starts the car and pushes on the clutch the noise is unbearable. It was not doing this until he install the new clutch cable. He has tried to adjust the clutch cable and the car continues to make this noise, what could this be and how can he his self fix this problem? He can't figure out why it is now acting like this. Is it the new clutch cable?
Friday, February 21st, 2014 AT 5:34 AM

6 Replies

Tiny
HMAC300
  • MECHANIC
  • 48,601 POSTS
Could be the release bearing is shot due to the old cable being bad. There is no adjustment to the cable as the pedal is self adjusting so maybe the pedal assy is worn out. See pic on correct installation
Was this
answer
helpful?
Yes
No
Friday, February 21st, 2014 AT 6:49 AM
Tiny
NEWBYKBLA
  • MEMBER
  • 13 POSTS
Thank you for your advice and the diagram although he did put a new pedal assy on. It has never made this noise before. When he pushes on the clutch and starts the engine the noise begins. He believes the noise is coming from the transmission. Could this mean he needs a new clutch, throw out bearing and pressure plate? Is there a diagram for that if that is even what the problem is?
Was this
answer
helpful?
Yes
No
Friday, February 21st, 2014 AT 7:49 AM
Tiny
HMAC300
  • MECHANIC
  • 48,601 POSTS
As I said in the first reply the release bearing (throw out bearing) is probably shot and this probably could use a new clutch as it was probably worn when the cable was wearing out. See pic where the arrow is pointing check fork for being bent/cracked as it cold be hitting clutch pressure plate. Also make sure the pilot bushing/bearing is lubed and not worn out. Also check input shaft of transmission for wear. See pic
Was this
answer
helpful?
Yes
No
+3
Friday, February 21st, 2014 AT 9:40 AM
Tiny
NEWBYKBLA
  • MEMBER
  • 13 POSTS
Thank you for your help. Looks like we will be buying a clutch kit soon. Is there a diagram on installing and installing this kit?
Was this
answer
helpful?
Yes
No
Friday, February 21st, 2014 AT 4:41 PM
Tiny
HMAC300
  • MECHANIC
  • 48,601 POSTS
Only the diagram I have already sent.
Removal
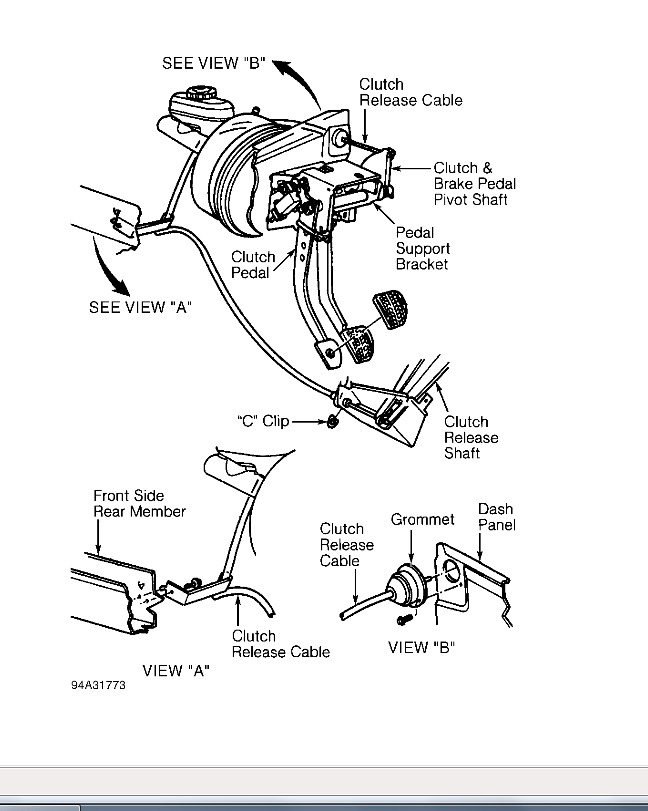
Lift clutch pedal to its uppermost position, disengage clutch and brake pedal pivot shaft. Push clutch and brake pedal pivot shaft forward. Disconnect clutch release cable from clutch and brake pedal pivot shaft. Allow clutch and brake pedal pivot shaft to slowly swing rearward. See Fig. 3.
Disconnect negative battery cable. Raise and support vehicle. Remove clutch release cable dust shield. Disconnect clutch release cable from release shaft. Remove retaining clip and remove cable from bell housing.
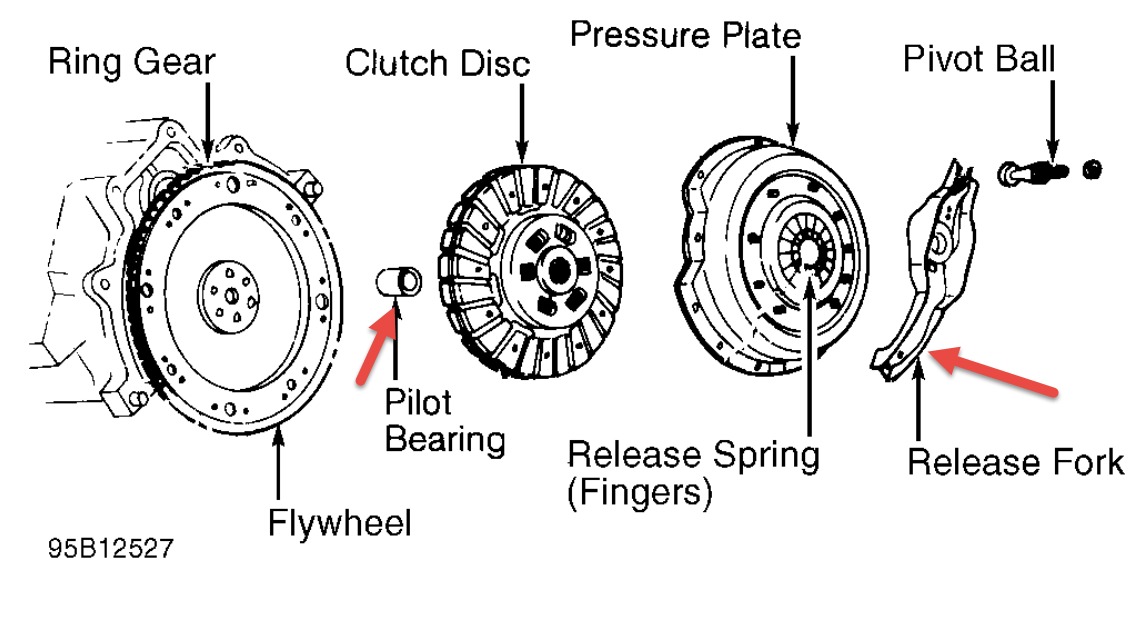
Fig. 2: Exploded View Of Clutch Assembly
Disconnect and remove starter. Loosen rear engine plate-to-bell housing bolts. Index mark rear drive shaft flange to differential. Remove drive shaft. Install transmission tail shaft seal plug. Remove exhaust "Y" pipe. Remove transmission mount nuts.
CAUTION: When positioning drive shaft, DO NOT nick, burr or contaminate drive shaft yoke or companion flange.
Support transmission with transmission jack. Remove cross member and transmission mount. Lower transmission enough to expose 2 bolts securing shift handle to transmission shift tower. Disconnect and remove shift handle. Disconnect wiring harness from back-up light switch. Disconnect speedometer cable.
Remove transmission-to-bell housing bolts, and pull transmission rearward until input shaft clears bell housing. Lower and remove transmission assembly. Remove bell housing bolts. Remove bell housing.
CAUTION:DO NOT press clutch pedal while transmission is removed or damage could result.
Remove clutch release shaft from housing by pulling on it from outside of bell housing until retainer clip is disengaged from pivot ball. Remove clutch release bearing from clutch release shaft.
If installing same pressure plate, index mark pressure plate and flywheel. See Fig. 2. Avoid pressure plate distortion by loosening attaching bolts evenly in a crisscross pattern. Remove pressure plate and clutch disc from flywheel. Mount a dial indicator so tip of indicator is against outer clutch disc-to-flywheel contact surface.
Position pry bar between rear crankshaft flywheel mounting flange and engine block. Pry crankshaft fully rearward. With crankshaft still fully rearward, rotate crankshaft one complete revolution while noting variation of reading on dial indicator which indicates runout.
If runout exceeds. 008 "(. 02 mm), remove flywheel and repeat runout reading procedure as in step 8, except place dial indicator tip against crankshaft rear flange face. If crankshaft rear flange is cause of excessive runout, resurface crankshaft flange face or replace crankshaft. If flywheel is cause of excessive runout, resurface or replace flywheel.
NOTE: Avoid touching clutch disc face. DO NOT contaminate parts with oil or grease
Was this
answer
helpful?
Yes
No
Saturday, February 22nd, 2014 AT 5:49 AM
Tiny
NEWBYKBLA
  • MEMBER
  • 13 POSTS
Thank you again for your help and advice, have a nice day!
Was this
answer
helpful?
Yes
No
Saturday, February 22nd, 2014 AT 8:27 AM

Please login or register to post a reply.

Sponsored links