Nice work, we are here to help, please use 2CarPros anytime.
I found this as well:
According to Mitchell, 95 Cutlass SUPREME's with either a 3.1 or 3.4 fuel pressure is 4-7 psi. Regular Cutlass' with 3.1 it's 41-47? Which do you have, and which engine? Here's the info on fuel control and delivery for the higher pressure systems.
FUEL DELIVERY
Fuel Pressure Regulator
1.Install fuel pressure gauge to fuel rail fuel pressure test fitting. Remove vacuum hose from fuel pressure regulator. Turn ignition on and note fuel pressure on gauge. 2.Start engine. Check for manifold vacuum at pressure regulator vacuum hose. If vacuum is not present, repair as necessary. Reconnect vacuum hose to pressure regulator and note fuel pressure on gauge. Compare first and second reading. 3.Fuel pressure reading should be 41-47 psi (2.9-3.3 kg/cm2 ) less with vacuum hose installed. Fuel pressure should decrease as vacuum increases. If results are not as specified, replace fuel pressure regulator.
NOTE: For further fuel pump circuit diagnosis, refer to appropriate FUEL SYSTEM test under NO-START DIAGNOSIS (A-3) in BASIC TESTING article in the ENGINE PERFORMANCE section.
Fuel Pump Relay (A-5)
1.Disconnect fuel pump relay connector. See COMPONENT LOCATIONS at end of article to locate fuel pump relay. Apply battery voltage and ground to fuel pump relay winding terminals. To identify fuel pump relay terminals, see appropriate wiring diagram in WIRING DIAGRAMS section. 2.Using an ohmmeter, check for continuity between fuel pump relay power supply terminal and fuel pump drive terminal. Continuity should exist ONLY with relay energized. If relay does not test as indicated, replace relay. 3.To by-pass fuel pump relay (to test fuel pump and wiring when fuel pump is not energizing), see FUEL PUMP RELAY BY-PASS PROCEDURE.
Fuel Pump Relay By-Pass Procedure
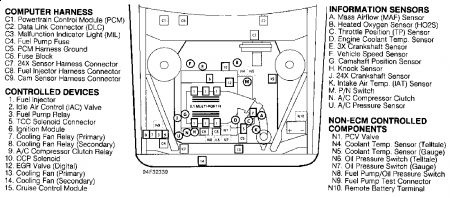
1.If fuel pump will not energize, relay may be by-passed to test fuel pump and related wiring. See Fig. 4 . Turn ignition off. Disconnect fuel pump relay connector. 2.Using a fused jumper wire, apply battery voltage to fuel pump test connector (located in engine compartment). For fuel pump test connector location, see COMPONENT LOCATIONS at end of this article. See Fig. 16 . 3.If fuel pump runs and relay tests okay, check for faulty connections at relay. If fuel pump does not run, check for faulty wiring between relay and fuel pump or replace defective fuel pump.
Fig. 4: Fuel Pump Relay Schematic (3.1L) Courtesy of GENERAL MOTORS CORP.
6/4/2009
Page 10 of 22
Oil Pressure Switch Fuel Pump Back-Up
With engine idling, disconnect fuel pump relay. Engine should continue to run through oil pressure switch back-up circuit. If engine stalls, check oil pressure switch and related wiring.
FUEL CONTROL
Fuel Injector(s)
Disconnect fuel injector harness connector. Measure resistance across injector terminals at each injector. Resistance should be as specified. See INJECTOR RESISTANCE SPECIFICATIONS table.
INJECTOR RESISTANCE SPECIFICATIONS Application 3.1L
Ohms 11.8-12.6
NOTE: If injectors are dirty, they should be cleaned using approved injector cleaning procedure before performing INJECTOR BALANCE TEST.
Injector Balance Test (C-2)
The injector balance test is used to pulse the injector for a precise amount of time, spraying a measured amount of fuel in the intake manifold. As each injector is pulsed, a drop in fuel rail pressure occurs. This pressure drop can be recorded and compared to other injectors. An injector with a pressure drop of 1.5 psi (.11 kg/cm2 ) or more, greater than or less than other injectors, should be considered faulty.
NOTE: Allow engine to cool down to avoid irregular readings due to "hot soak" fuel boiling. To prevent flooding, the INJECTOR BALANCE TEST should not be repeated more than once without starting and running engine.
CAUTION:To avoid possible vehicle fire, wrap a shop towel around fitting to absorb fuel spillage.
1.Ensure engine is at normal operating temperature. Connect Fuel Pressure Gauge (J-34730-1) to pressure test port. Energize fuel pump using fuel pump test connector or Tech 1 scan tester. 2.Bleed air from fuel gauge and hose to ensure accurate gauge reading. Repeat this procedure until all air is bled from system. Run fuel pump and note fuel pressure. Fuel pressure should be as specified. See FUEL PRESSURE RANGE chart. If fuel pressure range is not as specified, see BASIC FUEL SYSTEM CHECKS in BASIC TESTING article in the ENGINE PERFORMANCE section. 3.Turn fuel pump off. When fuel pump stops, pressure may slightly drop then should hold steady. If fuel pressure does not hold steady, refer to BASIC FUEL SYSTEM CHECKS in
6/4/2009
Page 11 of 22
BASIC TESTING article in the ENGINE PERFORMANCE section. 4.Install Fuel Injector Tester (J-39021) to an injector. Set amperage supply selector switch to "Balance Test, 0.5-2.5 amp." position. Cycle fuel pump on and off to pressurize fuel system. Record stabilized fuel pressure. 5.Depress "Push To Start Test" button on fuel injector tester to energize injector. Note fuel pressure the instant fuel gauge needle stops. Record fuel pressure reading. Perform the same test to all injectors. 6.To obtain pressure drop values, subtract second pressure reading from first pressure reading on each injector. Add all pressure drop values and divide by number of injectors to obtain an average pressure drop. 7.Retest an injector that appears faulty. Replace any injector with a 1.5 psi (.11 kg/cm2 ) difference, either greater than or less than the average pressure drop. If injectors are all okay, remove test equipment, plug in disconnected harness connectors and review SYMPTOMS in TESTS W/O CODES article in the ENGINE PERFORMANCE section.
FUEL PRESSURE RANGE CHART Application 3.1L
psi (kg/cm2 ) 41-47 (2.9-3.3)
CAUTION:To avoid possible vehicle fire, wrap shop towel around fitting to absorb fuel spillage.
Fuel Injector Leak Test
1.Turn engine off. Relieve fuel pressure. Access fuel injectors. Connect Fuel Injector Tester (J-39021) to vehicle battery and to a fuel injector. If coolant temperature is 50-95 °F (10-35 °C), go to next step. If coolant temperature is not 50-95 °F (10-35 °C), go to step 5). 2.Set fuel injector tester's amperage supply selector switch to "Coil Test 0.5 amp" position. Connect a Digital Volt-Ohmmeter (DVOM) to fuel injector tester. Set DVOM to tenths scale (0.0). 3.Ensure engine coolant temperature is 50-95 °F (10-35 °C). Press "Push To Start" tester button. Observe DVOM. Voltage reading may climb during test. Record lowest voltage displayed immediately after activation. 4.Perform voltage reading on all injectors. If voltage reading is erratic or falls out of specified range, perform injector balance test or replace faulty injector. See INJECTOR TEST VOLTAGE RANGE table or INJECTOR BALANCE TEST (C2). 5.Press "Push To Start" button on fuel injector tester. Observe DVOM. Voltage reading may climb during test. Record lowest voltage displayed immediately after activation. Perform voltage reading at least twice on all injectors. 6.If voltage reading is erratic or is greater than 9.5 volts, replace affected fuel injector. If voltage reading is not erratic or not greater than 9.5 volts, go to next step. 7.From recorded voltages (except readings greater than 9.5 volts), identify highest voltage reading and subtract from the other recorded voltages. If subtracted value is greater than 0.6 volts, replace affected fuel injector. If subtracted value is less than 0.6 volts, perform injector balance test. See INJECTOR BALANCE TEST (C2).
6/4/2009
Page 12 of 22
INJECTOR TEST VOLTAGE RANGE
Application 3.1L
Volts 5.7-6.6
Thursday, June 4th, 2009 AT 2:47 PM