Here are some procedures
The symptoms of a defective component within the DI system are exactly the same as those you would encounter in a conventional or HEI system. Some of these symptoms are:
Hard or no Starting
Rough Idle
Fuel Poor Economy
Engine misses under load or while accelerating
If you suspect a problem in the ignition system, there are certain preliminary checks which you should carry out before you begin to check the electronic portions of the system. First, it is extremely important to `make sure the vehicle battery is in a good state of charge. A defective or poorly charged battery will cause the various components of the ignition system to read incorrectly when they are being tested. Second, make sure all wiring connections are clean and tight, not only at the battery, but also at the distributor cap, ignition coil, and at the electronic control module.
Check the cap for tiny holes and carbon tracks as follows.
Remove the cap and place an ohmmeter lead on the cap terminal.
Use the other lead to probe all the other terminals and the center carbon ball.
If the readings are not infinite, the cap must be replaced.
SECONDARY SPARK TEST
It is imperative to check the secondary ignition circuit first. If the secondary circuit checks out properly, then the engine condition is probably not the fault of the ignition system. To check the secondary ignition system, perform a simple spark test.
Remove one of the plug wires and insert some sort of extension in the plug socket. An old spark plug with the ground electrode removed makes a good extension.
Hold the wire and extension about 1/4 in. (0.25mm) away from the block and crank the engine.
If a normal spark occurs, then the problem is most likely not in the ignition system. Check for fuel system problems, or fouled spark plugs.
If, however, there is no spark or a weak spark, then test the ignition coil and the camshaft and crankshaft position sensors. For testing the camshaft and crankshaft position sensors, refer to .
TESTING
See Figure 1
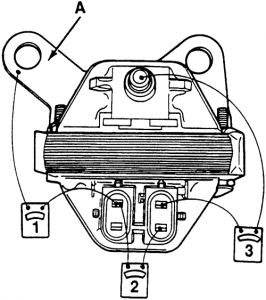
Fig. 1: Ignition coil testing-Distributor Ignition (DI) systems
Make sure the ignition switch is OFF
Tag and disconnect the wires from the ignition coil.
Using a digital ohmmeter set on the high scale, probe the ignition coil as shown in Step 1 of the accompanying illustration.
The reading should be infinite. If not replace the coil.
Using the low scale of the ohmmeter, probe the ignition coil as shown in Step 2 of the accompanying illustration. The reading should be 0.2-0.5 ohms, if not replace the coil.
Using the high scale of the ohmmeter, probe the ignition coil as shown in Step 3 of the accompanying illustration. The reading should be 5k-25k ohms, if not replace the coil.
Reconnect the wires to the ignition coil.
REMOVAL & INSTALLATION
Tag and disengage the wiring connectors from the coil and the coil wire.
Unfasten the retainers securing the coil bracket or coil to the manifold.
Remove the coil and bracket and drill out the two rivets securing the coil to the bracket.
Remove the coil from the bracket.
To install:
The replacement coil kit may come with the two screws to attach the coil to the bracket. If not, you must supply your own screws.
Fasten the coil to the bracket using two screws.
Fasten the coil bracket or to the manifold. Tighten the retainers to 20 ft. lbs. (27 Nm).
Engage the coil wire and the wiring connectors to the coil.
Wednesday, January 28th, 2009 AT 8:55 PM