REMOVAL:
Properly disable the SIR system
Drain the cooling system into a suitable container.
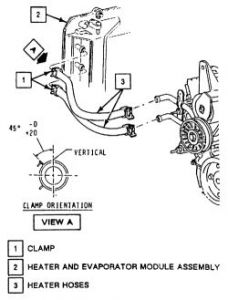
Using a suitable pair of hose clamp pliers, unfasten the clamps, then disconnect the heater hoses from the heater core.
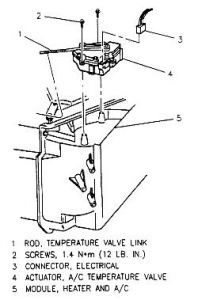
If equipped with manual climate control, remove the A/C temperature valve actuator as follows:
Remove the instrument panel assembly
Remove the temperature valve link rod from the temperature valve by snapping it out.
Detach the electrical connector from the A/C temperature valve actuator.
Unfasten the retaining screws, then remove the A/C temperature valve actuator.
If equipped with electronic climate control, remove the programmer as outlined in the following steps.
Open the glove compartment, disengage the stops and swing the door down.
Detach the electrical and vacuum connectors.
Remove the driver temperature valve link rod.
Unfasten the screws and remove the programmer from the vehicle.
Remove the heater core cover screws, then remove the cover.
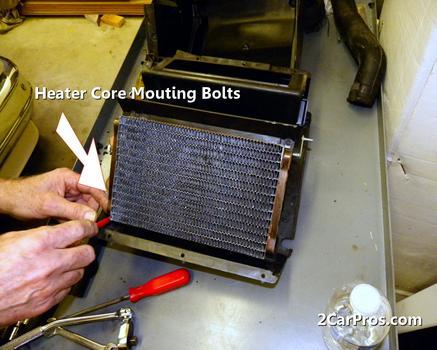
Unfasten the heater core retainers, then remove the heater core assembly.
INSTALLATION:
Position the heater core in the vehicle and install the retaining screws. Tighten the screws 12 inch lbs. (1.4 Nm).
Install the heater core cover and attaching screws. Tighten the screws to 12 inch lbs. (1.4 Nm).
For Buick and Oldsmobile, if equipped with electronic climate control, perform the following:
Place the programmer in position and secure with the retaining screws. Tighten the screws to 12 inch lbs. (1.4 Nm).
Attach the electrical and vacuum connectors.
Adjust the valve link rod by starting the vehicle, setting the temperature to 90 ° F (32 °C). Allow at least 45 seconds for the programmer motor to move the output crank to its full hot position. Move the temperature valve to the full hot position and snap the valve link into the retainer on the output crank.
Install the glove compartment door by inserting and pushing forward.
For Pontiac, if equipped with electronic climate control, perform the following:
Place the programmer in position.
Reach up through the PCM bracket and attach the temperature valve actuator connector.
Install the programmer attaching screws and tighten to 12 inch lbs. (1.4 Nm).
Attach the electrical and vacuum connectors.
Attach the temperature valve link rod to the air mix valve.
Adjust the valve link rod by starting the vehicle, setting the temperature to 90 °F (32 °C). Allow at least 45 seconds for the programmer motor to move the output crank to its full hot position. Move the temperature valve to the full hot position and snap the valve link into the retainer on the output crank.
Position the PCM to the bracket and secure with the mounting bolts.
If equipped with manual climate control, install the A/C temperature valve actuator as follows:
Position the actuator and secure with the retaining screws. Tighten the screws to 12 inch lbs. (1.4 Nm).
Attach the electrical connector to the actuator.
Before connecting the temperature valve link rod during installation, you must adjust the rod.
Adjust the temperature valve link rod by starting the vehicle, setting the fan to HIGH and the temperature to full hot. Allow at least 45 seconds for the A/C temperature valve actuator to move to the full hot position. Move the temperature valve to the full hot position, then snap the temperature valve link rod into the temperature valve.
Install the instrument panel assembly
Connect the heater hoses to the core, making sure the clamps are in the proper position.
If equipped enable the SIR system.
Connect the negative battery cable.
Fill cooling system and check for leaks. Start the engine and allow to come to normal operating temperature. Recheck for leaks and top off the coolant.
SPONSORED LINKS
Monday, June 15th, 2009 AT 7:21 PM