2000 Mitsubishi Galant Water leak - wet driver's side floor

Tiny
TOOLDAD
  • MEMBER
  • 2000 MITSUBISHI GALANT
  • 4 CYL
  • FWD
  • AUTOMATIC
  • 132,000 MILES
I have a leak causing my driver's side floorpan to be wet. It occurs when car sitting stationary in rain. The sunroof and HVAC vent drains appear to work properly (i.E. Drain water to beneath car). Any other ideas for chasing and correcting this problem?
Friday, January 2nd, 2009 AT 4:52 PM

14 Replies

Tiny
IMPALASS
  • MECHANIC
  • 3,112 POSTS
Hello -

To better assist you please let me know if your model is a DE, ES, GTZ or LS. Also the engine size in liter.
Was this
answer
helpful?
Yes
No
+2
Friday, January 2nd, 2009 AT 5:22 PM
Tiny
TOOLDAD
  • MEMBER
  • 7 POSTS
The car is an ES with a 2.4L 4cyl engine.

First using this site. Hope I do get an answer. Annoying and serious problem.
Was this
answer
helpful?
Yes
No
+1
Friday, January 2nd, 2009 AT 8:16 PM
Tiny
IMPALASS
  • MECHANIC
  • 3,112 POSTS
Hello -

Well we will do the best we can to answer your question. Thank you for trying us out.

I have reviewed the TSBs for this model and there are two describing your condition. One specifically states the drivers side, the other the passenger. However - water runs. . ..so I would check both.

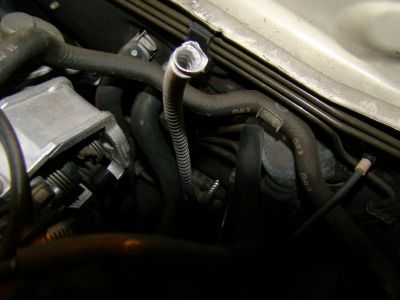
On the first one, the rain may run down and leak past the foam at the firewall. But again, I would check both.

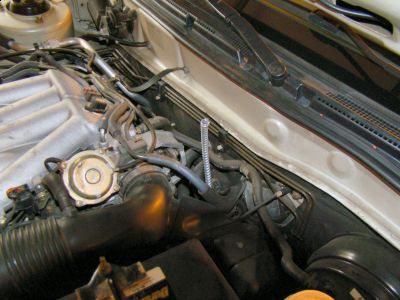
Another way to check this would be to have someone take a water hose while someone is inside the vehicle and have them allow the water to run across the closed hood area near the hinge area near the windshield. Look for the water running in.

I would then open the hood and run it down the firewall.

If still nothing then on the windshield. . .. . .. . ...

I have put both TSBs at the end of this post.

Last, it looks like you may have some recalls on your vehicle. The dealer may fix these for free. Please contact the dealer service department, give them the VIN number of your car and have them check on these to see if they apply to you.

SC-99-001
12/01/1999
Recall - Vehicle Emission Control Label Incorrect

SR-01-005
03/01/2001
Recall - A/T Cooler Line Replacement

NHTSA01V011001
01/17/2001
Recall 01V011001: Transaxle Oil Cooler Hose Defect

SR-00-004R
10/01/2000
Recall - Loose Steering Pinion Gear Lock Nut

NHTSA00V225001
08/10/2000
Recall 00V225001: Possible Steering Defect

SR-99-003
12/01/1999
Recall - Column Switches for Lights/Wiper

NHTSA99V333001
11/23/1999
Recall 99V333001: Battery Cable Harness Problem

NHTSA99V305001
10/29/1999
Recall 99V305001: Steering Column Switch Levers Defect

Thank you very much for the donation

Please let us know if what the final fix was for your car so we can better assist others. Thanks!

Find a car repair manual for your car repair questions.

A/C - Evaporator Drain Tube Water Leaks to Interior
Notes

No: TSB-02-55-006

DATE: August, 2002

MODEL
1999-2002 Galant

SUBJECT:
A/C WATER LEAKAGE AT EVAPORATOR DRAIN TUBE OPENING

PURPOSE

Customers may complain of A/C water leakage onto the driver side floor. The leakage may be more noticeable after the air conditioner or front defogger has been operated.


https://www.2carpros.com/forum/automotive_pictures/248015_1_141.jpg


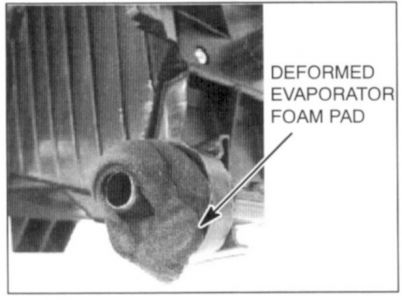
This condition may be caused by drain tube blockage, or the heater unit not being properly sealed to the bulkhead. The bulkhead silencer pad may be positioned between the evaporator foam pad and the firewall, causing an improper seal. This could cause the evaporator drain tube foam to become deformed and allow water to drain onto the floor.

To eliminate this condition, first check for drain tube blockage. If no blockage is found, install a new evaporator foam pad as described in this bulletin. Also, inspect the heater assembly for cracks or other damage that could cause leakage. If cracks or other damage are observed, replace the heater assembly.

AFFECTED VEHICLES
1999-2002 Galants built before 9/21/01

PROCEDURE

1. Remove the carpet from the driver side floor, to access the drain tube opening.

2. Inspect the drain tube for blockage (clogging). Clear any blockage found. If no blockage is found, go to Step 3.

3. Remove the heater assembly. Refer to Group 55 in the appropriate service manual for removal instructions.


https://www.2carpros.com/forum/automotive_pictures/248015_2_92.jpg


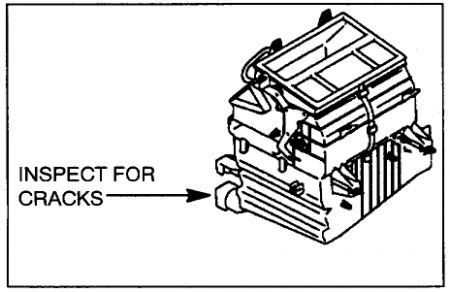
a. Remove the evaporator foam pad. Inspect the drain tube on the heater assembly for cracks or other damage that could create leakage. If cracks or other damage are observed, replace the heater assembly.

b. Replace the evaporator foam pad (listed in the PARTS INFORMATION section of this bulletin).

4. Inspect the evaporator drain opening at the bulkhead to confirm that the silencer pad does not interfere with the drain tube opening.


https://www.2carpros.com/forum/automotive_pictures/248015_3_64.jpg


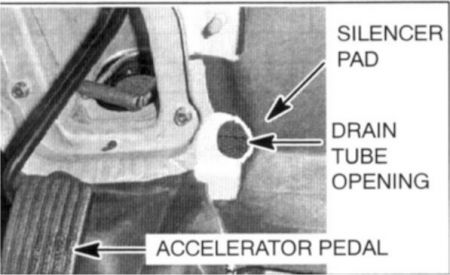
a. If necessary, trim the silencer pad to eliminate any interference with the drain tube opening. The silencer pad should be fitted as shown.

5. Reinstall the heater assembly.

PARTS INFORMATION


https://www.2carpros.com/forum/automotive_pictures/248015_4_40.jpg


Next TSB

A/C - Water Leaks to The Interior
Notes

No.: TSB-04-55-008
DATE: September, 2004
MODEL: See below

SUBJECT:
BLOWER MOTOR HOUSING FILTER

This TSB supercedes TSB-03-55-008REV, to update the affected vehicles and warranty information. New information is indicated by a shaded triangle or an arrow.

PURPOSE

Debris (such as leaves, etc.) entering the front cowl area may clog the evaporator housing drain tube. If this occurs, the evaporator housing may fill up with condensation and overflow into the passenger compartment, and into the blower motor through the cooling tube. To eliminate this condition, clean the debris from the tube and the case, then install a blower motor housing filter as described in this bulletin.

On Lancer models produced before 9/25/02, also install special wiper pivot caps onto the wiper pivot shafts as described in TSB-03-51-001.

--> Refer to TSB-04-55-007 for Endeavor and 2004 Galant repair procedures for HVAC drain blockage.

AFFECTED VEHICLES

2002-2003 Lancer
2003 Outlander
2000-2004 Eclipse, Eclipse Spyder
1999-2003 Galant

PROCEDURE

1. Confirm proper blower motor operation.

2. Clean debris from the evaporator housing drain tube and evaporator case.

3. On Eclipse, Eclipse Spyder and 1999-2003 Galant models only: Refer to TSB-01-55-002 for filter installation procedures.

4. Remove the glove box lid.

5. Install a blower motor housing filter (listed in the PARTS INFORMATION section of this bulletin) a follows:

a. Use a knife to cut a section from the top of the blower motor housing, along the perforated lines as shown.


https://www.2carpros.com/forum/automotive_pictures/248015_5_27.jpg


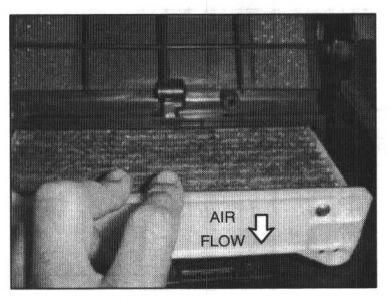
b. Install the filter with the air flow directional arrow pointing down.

c. On Lancer and Outlander models only: Secure the filter with two 5X14 self-lapping screws.
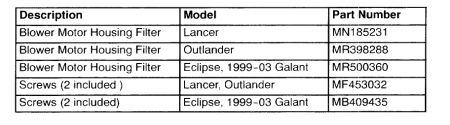
PARTS INFORMATION


https://www.2carpros.com/forum/automotive_pictures/248015_6_16.jpg

Was this
answer
helpful?
Yes
No
+2
Friday, January 2nd, 2009 AT 9:03 PM
Tiny
TOOLDAD
  • MEMBER
  • 7 POSTS
My diagnosis was that the evaporator drain tube gasket needs to be replaced. Took the car to a local dealer who came to the same conclusion. They did not have the gasket in stock, but quoted about $540 to repair (99% labor)! Deciding what to do now. Lot of money for this car. Will look at tube from underneath car to see if external caulking (RTV) ia a possible solution.
Was this
answer
helpful?
Yes
No
Thursday, January 15th, 2009 AT 1:18 PM
Tiny
IMPALASS
  • MECHANIC
  • 3,112 POSTS
Hello -

Thanks for the update. Me.....I would do it myself... Take a long weekend and just get after it.

Thanks again for the update.
Was this
answer
helpful?
Yes
No
Thursday, January 15th, 2009 AT 5:12 PM
Tiny
BLAINE1998
  • MEMBER
  • 1 POST
Im may seem that it only leaks in the rain, I thought the same, but it was a rubber elbow on the ac drain which also seals the opening in the firewall
Was this
answer
helpful?
Yes
No
Wednesday, February 18th, 2009 AT 1:17 AM
Tiny
IMPALASS
  • MECHANIC
  • 3,112 POSTS
Hello -

Great to hear from you. So if I understand you correctly you did find the leak with the water hose and it was also leaking from the AC drain hose too?

I am really happy to hear your car is fixed....... Thanks for the update for us and the readers.
Was this
answer
helpful?
Yes
No
Wednesday, February 18th, 2009 AT 9:04 AM
Tiny
TOOLDAD
  • MEMBER
  • 7 POSTS
I did find a leak with coming through the firewall via the evaporator drain tube. Since the dealer wanted $540 to do your suggested replacement of the foam gasket about the tube, I looked a little harder at the situation, then noticed I was missing the 90 degree rubber fitting on the end of the tube (saw picture in your reply). I replaced that and that leak ceased. Yea!

However, I still have a leak. I just traced it to water entering through the driver's side air intake vent below the windshield and entering the cabin somewhere in the upper driver's side behind the dash close to where all of the sheet metal is joined. The water also drains under the car, which I verifired early on in the repair process as well as again today.

Any suggestions on how to proceed from here to find and repair the root cause of the leak?
Was this
answer
helpful?
Yes
No
+1
Saturday, February 21st, 2009 AT 7:41 AM
Tiny
IMPALASS
  • MECHANIC
  • 3,112 POSTS
Hello -

Well - great you fixed the one leak..... Looks like you saved a lot of money on that.

The second leak.....I don't have a good pic of that area..... So if you can send one that may help.

Otherwise - my suggestion from here is to look all around that area. Something must be plugged or rusted through. Water is made to drain in that area so the trick is to figure out if it is backing up or draining through.

I would first do a good visual..... Look for leaves, or any other trash that may clog a drain area.

I would then take an air hose and blow around really good.

Next... Back to the water only this time..... Out of a pitcher to control better. Only do one side at a time and see the natural flow of the water..... It will tell you where it is supposed to drain at..... Follow that and maybe you can find your plugged area or the rusted through.

If the metal has separated... You can purchase body sealant at the auto paint store. It comes out of a tube like caulk then dries with some flex but no water penetration that is for sure.

I hope this helps... Let me know.....
Was this
answer
helpful?
Yes
No
Sunday, February 22nd, 2009 AT 6:20 PM
Tiny
TOOLDAD
  • MEMBER
  • 7 POSTS
Sorry for the delay in response, but I wanted to be sure the leak was fixed. The second leak I found was at a joint between the firewall and side panel about at the top of that joint. It is just above where a large wiring harness enters the side panel to the dash. I found that you cannot access the joint from outside of the passenger conpartment, so I applied silicone sealant the joint from inside. It is difficult to access even from inside the car. It is high up behind the dash and underneath the foam rubber floor insulation that is not easy to move out of the way. Seems this has fixed the problem though (fingers crossed!).

Thanks for the assistance.
Was this
answer
helpful?
Yes
No
Saturday, March 28th, 2009 AT 12:31 PM
Tiny
IMPALASS
  • MECHANIC
  • 3,112 POSTS
Hello tooldad

Nice to hear from you. Wow, you found another and got that sealed. The way things look you should be able to drive that off into a lake and go fishing with as much sealing as you have done.

My fingers are definitely crossed.......I'll even throw in a prayer..... Sounds like you are on the right track though on getting any leaks fixed.

Thanks again for the update..... The other readers will appreciate it.
Was this
answer
helpful?
Yes
No
Saturday, March 28th, 2009 AT 2:09 PM
Tiny
IMPALASS
  • MECHANIC
  • 3,112 POSTS
Hello -

Thank you Sir for the points....... Very kind of you.......

Hope you have a great weekend....... Currently.......I am heading out again to shovel some snow!

Thanks again
Was this
answer
helpful?
Yes
No
Saturday, March 28th, 2009 AT 2:12 PM
Tiny
KEITHSPLACE
  • MEMBER
  • 2 POSTS
Well it looks like have the same problem with my 2000 Galant. It was leaking condensation onto the passenger side carpet and floorboard. Upon inspection and reading these helpful tips.. I figured that the drain from the condensation pan was plugged up. I thought I would try something besides the $500 dealer fix, and the daunting task of pulling the heater box out to unclog the drain on my own.
I used a two foot long flexible (MC cable) sheath, I'm sure any tubing would do.. I could form a curve at the end that needs to go between the steering cable and firewall where the drain tube exits the firewall. It is in a very tight spot, just under the sound baffle on the firewall and above the steering


https://www.2carpros.com/forum/automotive_pictures/390694_DSC01036_1.jpg


https://www.2carpros.com/forum/automotive_pictures/390694_DSC01037_1.jpg


. The Fix, I formed the flex to go down to the drain tube as it exits the firewall, then I used my compressors air gun to blow air back into the drain., with the aid of the fkex tube.
Immediately there was a wash of water running out, I would say at least a gallon of water ran out.
So I will keep an eye on it and make sure it doesn't clog back up again. I also thought I might do the cabin filter conversion soon and at that time, spray some water through the system to wash out any possible debris that may have collected near the drain again.
Thank you for the tips you gave and for the great site.
Was this
answer
helpful?
Yes
No
Saturday, August 1st, 2009 AT 5:45 PM
Tiny
IMPALASS
  • MECHANIC
  • 3,112 POSTS
Hello -

Keithsplace - great info....... Thank you very much for your info and helpful tip. The readers will be glad to see this.

Thanks again and keep us posted!

Have a great weekend.
Was this
answer
helpful?
Yes
No
Sunday, August 2nd, 2009 AT 12:11 AM

Please login or register to post a reply.

Sponsored links