1999 Mercury Villager No spark!

Tiny
ROBERTCGS
  • MEMBER
  • 1999 MERCURY VILLAGER
Engine Mechanical problem
1999 Mercury Villager 6 cyl Front Wheel Drive Automatic

My car failed the emissions test due to the knock sensor. I replaced the knock sensor myself. Upon completion the car would not start. There is no spark at the distributor. I retraced my steps thinking I left something unplugged (other than the knock sensor there's another sensor above the crossover pipes) but they all are connected. I have done resistance and voltage tests on the distributor and the cable and all test within range. I get the battery voltage at the rotor which means the coil is not getting it's signal. At this point I was thinking the distributor just happened to die on me but find that hard to believe.

1. Am I missing something?
2. What do you suggest?
Monday, November 1st, 2010 AT 5:43 PM

12 Replies

Tiny
ROBERTCGS
  • MEMBER
  • 8 POSTS
Well thanks Raz, but as I indicated in my reply I have done those testing. I indicated what steps in testing I took. Do you have anything specific to my question that you could share with me?
Was this
answer
helpful?
Yes
No
+2
Monday, November 1st, 2010 AT 5:57 PM
Tiny
RASMATAZ
  • MECHANIC
  • 75,992 POSTS
Check the available coil input power to the coil and also check the primary and secondary winding resistances of the coil and get back with the readings and also the distributor pick-up coil-hang in there this is gonna be a tough one might end up being the computer-what kind of reading do you have on the crankshaft position sensor-
Was this
answer
helpful?
Yes
No
Monday, November 1st, 2010 AT 6:04 PM
Tiny
ROBERTCGS
  • MEMBER
  • 8 POSTS
Just to be clear, the coil is within the distributor on the 99 Villager.
Was this
answer
helpful?
Yes
No
+5
Monday, November 1st, 2010 AT 6:11 PM
Tiny
RASMATAZ
  • MECHANIC
  • 75,992 POSTS
I'm aware of it-

Have you checked the primary and secondary windings on it-if not do so and get back with the readings if so give me the readings
Was this
answer
helpful?
Yes
No
Monday, November 1st, 2010 AT 6:26 PM
Tiny
ROBERTCGS
  • MEMBER
  • 8 POSTS
Here are my readings:

I logged into my AutoZone account and got screenshots and directions of how to test and what to test. I did all these tests twice previously but once more could not hurt.

Power transistor:
1999-00 3.3L Engines

1. Disconnect the negative battery cable.

2. Disconnect the two-wire ignition coil harness connector from the distributor electrical connector.

3. Disconnect the six-wire distributor harness connector from the distributor.

4. Connect the digital ohmmeter leads to pin 2 of the six-pin distributor terminal, and to the green wire (pin 2) terminal of the two-wire distributor electrical connector. If the resistance is 0 ohms, replace the distributor. I measured infinity, or an open.

Ignition Coil:
1. Disconnect the negative battery cable.

2. Disconnect the two-wire ignition coil harness connector from the distributor electrical connector.
3. Connect ohmmeter leads to pins 1 and 2 at the distributor electrical connector. The resistance should be 0.5-1 ohm. - I measured 0.9 ohms.

If it is within specifications, continue by testing the secondary winding resistance.
4. Remove the distributor cap and position it aside.
5. Connect ohmmeter leads to distributor electrical connector pin 1 and the coil tower metal tip on the distributor. The resistance should be approximately 12,000 (12k) ohms. If it is not, replace the distributor. I measured 10.9K ohms, not much different.
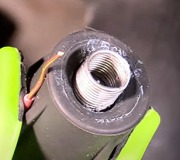
Resistor:
I am not sure about the resistor. My data says.
"The resistor is located near the distributor connector on 3.3L engines. It has a two-wire connector and is taped to the harness." Not clear to me but I have a print out of the 2 wire Ignition Coil connector and the resistor is inline on Pin 2. So I went to the female side of the coil harness connector and measured across pins 1 and 2. I received an open. There is something taped over on the cable - should I remove the tape to get to the resistor? I am not sure about where the resistor is. Is it in the distributor, if it is what does step 3 mean?
Was this
answer
helpful?
Yes
No
+1
Tuesday, November 2nd, 2010 AT 1:11 AM
Tiny
RASMATAZ
  • MECHANIC
  • 75,992 POSTS
The coil is okay-do this remove the coil wire on the distributor, ground the wire to the engine and crank engine over do you have spark if so check again at the plug wires end at the plugs -do you have it? Let me know
Was this
answer
helpful?
Yes
No
Tuesday, November 2nd, 2010 AT 1:46 AM
Tiny
ROBERTCGS
  • MEMBER
  • 8 POSTS
OK, I will be able to do this today, Wednesday 11/3/2010.

I disconnect the 2 wire coil connector and attach pin 2 (coil, resistor side) to engine ground? Just making sure I have it right.
Was this
answer
helpful?
Yes
No
+1
Wednesday, November 3rd, 2010 AT 6:56 AM
Tiny
ROBERTCGS
  • MEMBER
  • 8 POSTS
I disconnected the 2 wire connector and tried both sides to engine ground - no spark. What should I do now?
Was this
answer
helpful?
Yes
No
+1
Saturday, November 6th, 2010 AT 1:08 PM
Tiny
ROBERTCGS
  • MEMBER
  • 8 POSTS
I used the male end of this connector, the one from the distributor. Should I have used the female end?
Was this
answer
helpful?
Yes
No
+1
Saturday, November 6th, 2010 AT 2:47 PM
Tiny
RASMATAZ
  • MECHANIC
  • 75,992 POSTS
Do the spark test below

DISTRIBUTOR IGNITION SYSTEM
Spark Output Check
Check for trouble codes stored in PCM and repair if necessary. See QUICK TEST in SELF DIAGNOSTICS - EEC-V article. If no trouble codes are retrieved, check ignition system wiring harness connectors for damage, corrosion and tight fit.
If no fault codes are retrieved and vehicle will start, go to TROUBLE SHOOTING - NO CODES - EEC-V article. If no fault codes are retrieved and vehicle is a no-start, connect a high-output spark tester between ignition coil wire and engine ground. Check for spark at coil wire while cranking engine. A consistent Blue spark should be present.
If spark is present, go to step 4. If no spark is present, remove distributor cap and crank engine to ensure distributor rotor rotates. If okay, check resistance of coil secondary wire. On Villager, resistance should be less than 9100 ohms per foot. On all models except Villager, resistance should be less than 7000 ohms per foot. Service coil wire if necessary and retest. If spark is not present, go to TEST A in SELF DIAGNOSTICS - EEC-V article.
If a consistent Blue spark is present at coil wire during cranking, inspect distributor cap and rotor for cracks or carbon tracking. Service as necessary and test spark output at spark plugs. If spark is present at spark plugs and engine will not start, go to TROUBLE SHOOTING - NO CODES - EEC-V article.

Distributor Ignition coil resistances
Villager primary.5-1.0 ohms secondary: 12,000 ohms
Was this
answer
helpful?
Yes
No
+3
Saturday, November 6th, 2010 AT 4:23 PM
Tiny
ROBERTCGS
  • MEMBER
  • 8 POSTS
What I gathered from your instructions was to use a scanner to scan for trouble codes. That was done and I will do it again. Could you supply the information for performing a quick test per EEC-V?

We have already covered the coil resistances a few times which were.9 ohms and 11K ohms respectively.

Is there a diaghram that describes the connections the PCM needs before it allows the signal to ignite the coil? Does the coil always have current to expand the magnetic field or is it controlled by the PCM? Is it possible to have a bad camshaft sensor and will that cause the coil not to have current?
Was this
answer
helpful?
Yes
No
+1
Sunday, November 7th, 2010 AT 5:30 PM
Tiny
RASMATAZ
  • MECHANIC
  • 75,992 POSTS
Test the crankshaft position sensor this the one that tells the computer to fire the coil.
Was this
answer
helpful?
Yes
No
+2
Monday, November 8th, 2010 AT 2:25 AM

Please login or register to post a reply.

Sponsored links