You may have a vacuum leak, get a can of spray Throttle body cleaner, spray the vac lines and maniflod area, when the idle changes, youve found the leak! You want the engine running and spray on the outside but do direct the stream onto the hoses, if it is a vacuum leak, the engine idle will change speed, then you have detected a leak, repair the vacuum leak and see how it runs! If that doesnt do it, you may need a new idle air control valve, it's bolted to the throttlebody. Try to keep the spray off the hot exhaust manifolds, it can cause a fire.
90's had the 5.0 and pay particular attention to the PCV where it plugs into the rubber grommet, these dry out and get brittle over time, and should be replaced(grommet). 86-91 had an IAC problem and a new IAC kit to fix it, here's the Tech bulletin about it.
NEW IDLE AIR BY-PASS KIT & ECA RELEARN PROCEDURE TECHNICAL SERVICE BULLETIN Reference Number(s): 88-11-12, 88-23-10, 88-23-11, 88-24-5, 88-24-6, 89-16-5, 90-16-9, 91-10-9, 91-25-7, 91-7-4, � Date of Issue: � December 13, 1991 Superceded Bulletin(s): 91-10-9, 91-7-4, 90-16-9, 89-16-5, 88-24-6, 88-24-5, , 88-23-11, 88-23- 10, 88-11-12, 87-13-13, 86-20-6, � Date of Issue: � May 15, 1991 Related Ref Number(s): 88-11-12, 88-23-10, 88-23-11, 88-24-5, 88-24-6, 89-16-5, 90-16-9, 91-10- 9, 91-25-7, 91-7-4 ARTICLE BEGINNING CONDITIONS HARD COLD START - DURING INITIAL START-UP, IDLE OR DECEL - EFI ENGINES - SLUDGE IN THROTTLE BODY AND/OR IDLE AIR BY-PASS VALVE HESITATION/STALLS - DURING INITIAL START-UP, IDLE OR DECEL - EFI ENGINES - SLUDGE IN THROTTLE BODY AND/OR IDLE AIR BY-PASS VALVE
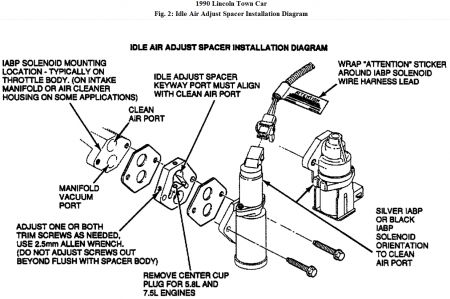
ISSUE Hard cold starts, hesitation and stalls on initial start-up or during idle or decel may be caused by sludge in the throttle body and/or idle by-pass valve. Sludge deposits or oil film on the throttle body bore and plate or the idle air by-pass valve may cause one or more of the following conditions. Hard Cold Start "� Stall On Initial Start-Up "� Stall During Idle "� Stall During Decel "� Rough Idle "� Rolling Idle "� Hesitation During Acceleration "� ACTION A new idle air by-pass service kit (F2PZ-9F939-A) is now available for service use to correct sludge contamination concerns of the throttle bore and plate only. It eliminates the need to clean the majority of past model throttle body applications. Cleaning is not required on sludge tolerant throttle body designs released for 1991 and newer model years. Install an idle air by-pass service kit (F2PZ-9F939-A) as applicable to provide a permanent correction for symptoms caused by throttle body sludge deposits. Refer to the instruction sheet included in the kit for installation details. Refer to the end of this article for a specific application list of EFI (port fuel Injection) engines involved in this TSB article. The idle air by-pass service kit (F2PZ-9F939-A) includes the following items. One (1) Idle Adjust Spacer "� Two (2) Gaskets "� Two (2) Attaching Bolts "� One (1) "Attention" Sticker "� One (1) Instruction Sheet "� Refer to Fig. 2 for a pictorial of the kits components. NOTE: Effective with this TSB, throttle body cleaning is no longer covered under 5/50 Emissions Warranty, unless as specified in the following application charts. Failure to follow the correct procedure may result in the claim being disallowed. The idle air adjust spacer incorporates sludge tolerant design features that eliminate throttle body sludge related conditions. Once installed, throttle body cleaning is not allowed and periodic adjustment of the throttle body is not required. CHECKS TO MAKE PRIOR TO SERVICE KIT INSTALLATION Confirm that the following items are not causing the idle quality concern before proceeding with the service kit installation. Contamination within the idle air by-pass solenoid "� Lack of fuel system control (excessively rich or lean) "� Ignition timing change "� Incorrect or malfunctioning EGR system "� Incorrect or malfunctioning cooling system "� Vacuum leaks (air intake manifold, vacuum hoses, vacuum reservoirs, power brake booster where applicable) "� EEC diagnostics have been performed and vehicle malfunction indicated service output codes have been resolved and cleared. "� If any of the areas listed above are found to be at fault, correct them before proceeding with the service kit installation. IDLE SPEED ADJUSTMENT WARNING: Before proceeding with the idle speed adjustment, verify that the following items are taken care of properly: The transmission is in PARK or Neutral. "� The parking brake is applied. "� The wheels are properly blocked. "� The engine is at operating temperature. "� The heater, A/C, cooling fan and other accessories are OFF. "� The EFI throttle body idle speed adjustment procedures for the various model year passenger cars and light trucks are outlined in step-by-step procedures featured in Fig. 3 , Fig. 4 and Fig. 5 . Select the appropriate procedure for the vehicle involved and adjust the throttle body idle RPM accordingly, after service kit installation. THROTTLE BODY AND IDLE AIR BY-PASS SOLENOID SERVICE PROCEDURE Detailed application charts for throttle body and idle air by-pass solenoid service procedures by engine VIN #/engine displacement/ vehicle application and model year are shown in Fig. 6 through Fig. 11 . Refer to these charts to see if the service kit is to be installed and which service cleaning procedure, if any, is to be used. SERVICE CLEANING PROCEDURES The following items should be noted prior to beginning the service cleaning procedure. Confirm that the correct service cleaning procedure is identified in the Application Charts, Fig. 6 -10, for the vehicle/engine combination being serviced. "� Do not clean throttle bodies identified to accept service kit (F2PZ-9F939-A), IDLE AIR ADJUST SPACER. "� Use a 1" (25.4mm) to 1 1/2" (38.1mm) wire stemmed horse hair or nylon bottle cleaner type brush. "� Use rubber gloves and eye protection. "� Do not clean throttle bodies identified with a yellow/black "ATTENTION" label. "� Do not clean "Black" plastic air by-pass valves. Refer to TSB 89-13-8 for service details. "� Do not run vehicles with air flow meters when the air duct is removed. "� Do not use carburetor cleaner as a cleaning solvent. Use Carburetor Tune-up Cleaner (D9AZ -19579-AA). "� PROCEDURE # 1 - THROTTLE BODY & IDLE AIR BY-PASS VALVE CLEANING CAUTION: Do not run vehicles equipped with air flow meters during the cleaning procedure. If there is a Yellow/Black ATTENTION" label on the throttle body advising not to clean, or if the vehicle is identified as accepting service kit (F2PZ-9F939-A), use procedure #2 for idle air by-pass valve cleaning only. Plug the actuator into the connector in the Rotunda Cleaner/Tester, Tool 113-00009. 1. Remove the air duct to the throttle body inlet. 2. Disconnect the idle air by-pass valve signal lead. 3. Attach the actuator harness plug to the idle air by-pass valve. 4. Start the actuator and then start the engine. Do not start engines that have air flow meters. 5. Spray just enough Carburetor Tune-up Cleaner (D9AZ-19579-AA) into the throttle bore to wet the bore and throttle plate. 6. Spray the Carburetor Tune-up Cleaner for about five (5) seconds into the idle air by-pass valve inlet passage while the actuator is operating. 7. Stop the engine and actuator. Let everything soak for fifteen (15) minutes. 8. After a fifteen (15) minute soak, saturate the cleaning brush with solvent and scrub between the throttle body bore and plate while holding the throttle wide open. 9. NOTE: It is necessary to apply some pressure on the brush while scrubbing. Repeat saturating the brush and scrubbing for one (1) to two (2) minutes, making sure to reach into the corners where the throttle shaft meets the bore wall. 10. Start the actuator and the start the engine. Do not start engines that have air flow meters. 11. Spray Carburetor Tune-up Cleaner into the throttle bore for up to one (1) minute to wash away residue. Do not spray for longer than six (6) continuous seconds on engines that have air flow meters and are not running. 12. Spray Carburetor Tune-up Cleaner into the idle by-pass valve passage leading to the inlet of the valve for up to one (1) minute. Do not spray for longer than six (6) continuous seconds on engines that have air flow meters and are not running. 13. Stop actuator and stop engine, if running. 14. NOTE: Make sure the throttle plates operate freely and close properly. Reinstall the air duct. 15. Start and run the engine for about one (1) minute to dry out the solvent residue. 16. Operate the actuator to make sure the solvent is purged from the idle by-pass valve. 17. Disconnect the actuator from the idle air by -pass valve. 18. Reattach the control signal lead to the air by-pass valve. 19.Check engine for normal operation. It may be necessary to reset the idle speed due to a previous adjustment for an idle concern. (Refer to the respective Powertrain/Emissions Diagnosis Service Manual, Throttle Body Section, for idle speed adjust procedure.) 20. PROCEDURE # 2 - IDLE AIR BY-PASS VALVE CLEANING ONLY CAUTION: This cleaning procedure may be used with sludge tolerant throttle bodies which are identified with a yellow/black "ATTENTION" label and those using service kit (F2PZ-9F939-A). No attempt should be made to clean throttle body bore/plate area by direct spraying or scrubbing. Do not run vehicles with air flow meters during cleaning procedure. Plug the actuator into the connector in the Rotunda Air By-Pass Valve Adapter 113-00009, or equivalent. 1. Remove the air duct to the throttle body inlet. 2. Disconnect the idle air by-pass valve signal lead. 3. Attach the actuator harness plug to the idle air by-pass valve. 4. Start the actuator and then start the engine. 5. NOTE: Do not start engines that have Air Flow Meters. Spray the Carburetor Tune-up Cleaner for about five (5) seconds into the idle air by-pass valve inlet passage while the actuator is operating. 6. CAUTION: Avoid direct spraying on Throttle Plate/Bore Area. Stop the engine and actuator. Let everything soak for fifteen (15) minutes. 7. Start the actuator and the start the engine. 8. CAUTION: Do not start engines that have Air Flow Meters. Spray Carburetor Tune-up Cleaner into the throttle bore for up to one (1) minute. 9. CAUTION: Do not spray for longer than six (6) continuous seconds on engines that have air flow meters and are not running. Stop actuator and stop engine if running. 10. Reinstall the air duct. 11. Start and run the engine for about one (1) minute to dry out the solvent residue. 12. Operate the actuator to make sure the solvent is purged from the idle by-pass valve. 13. Disconnect the actuator from the idle air by -pass valve. 14. Reattach the control signal lead to the air by-pass valve. 15.Check engine for normal operation. 16. NOTE: It should not be necessary to reset the Idle Speed since only the Idle Air By-Pass Valve was serviced in this procedure.
SPONSORED LINKS
Saturday, July 3rd, 2010 AT 5:42 AM