AC Trouble 1997 Taurus GL

Tiny
JUSTDON
  • MEMBER
  • 1997 FORD TAURUS
I purchased a 1997 Ford Taurus GL 3.0, 105,000 miles, automatic with a locked up ac compressor and broken belt. I replaced the compressor, dryer, and lines (filter included). I flushed the condenser and evaporator and vacuum tested them for leaks. After completing the assembly, I vacuumed the system for about an hour and began refilling. The manual ac control was on max with the blower on high.

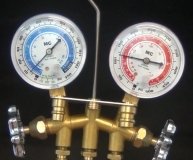
After about a pound of refrig, the system stopped accepting the re-fill and the pressure on the low side climbed WAY up. The compressor never kicked on.

I attempter to jump the cycling switch and received no clutch response. A voltage test of the cycling switch connector read less than 1 volt. Applying a direct 12 volts to the clutch coil switch does make the clutch pull in.

I am at a loss of where to check next. One suggestion was to replace the ccrm. But at $134, I would rather know how to check it first.

HELP!

Small donation to follow on pay day. :Wink:
Wednesday, May 23rd, 2007 AT 7:09 PM

14 Replies

Tiny
JUSTDON
  • MEMBER
  • 150 POSTS
Thanks for the reply justanold.

Pulled and checked fuse 6. It was blown. I now have power to the cycling and pressure switches, but not the clutch coil connector. Jumping the cycling switch still doesn't kick the compressor.

To review. I have power to the cycling switch when the interior control is set to a.C and not when the interior switch is in the off position. I hope this confirms that the problem isn't in the interior control switch.

There is full power to the pressure switch unless I disconnect the cycling switch, then the power stops to the pressure switch as well.

Still no a.C. :Cry:
Was this
answer
helpful?
Yes
No
Thursday, May 24th, 2007 AT 8:20 PM
Tiny
RUDPRO
  • MECHANIC
  • 224 POSTS
Just wondering if the compressor is not turning on because of a low pressure switch. Some cars have it on the high side, like on the receiver/ dryer. I've charged some cars where after putting a pound or so in, the compressor still didn't kick on and I had to jumper 12v directly to the clutch to finish filling. You said the pressure shot way up on the low side, what's the pressure on the high side. With the car off, the high side and low side should have equal pressure. Again, I'm not sure where the low pressure switch is on your car, just something else to consider.
Was this
answer
helpful?
Yes
No
Friday, May 25th, 2007 AT 12:23 PM
Tiny
JUSTDON
  • MEMBER
  • 150 POSTS
Justanold.

Switches connected, car running, ac on.

Raps on ccrm did nothing
There is power to the dark green/white
No power to the black/yellow

Applied power to the black/yellow and the compressor clutch engaged.

Rudpro.

I wish I had a set of manifold gauges, but I don't at this point. :Oops:
Was this
answer
helpful?
Yes
No
Friday, May 25th, 2007 AT 6:05 PM
Tiny
JUSTDON
  • MEMBER
  • 150 POSTS
I was afraid you were going to say that. :Cry:

Thanks a bunch for all the assistance. :D :D
Was this
answer
helpful?
Yes
No
Friday, May 25th, 2007 AT 9:19 PM
Tiny
RUDPRO
  • MECHANIC
  • 224 POSTS
There is another fix for the CCRM if you're interested. Let me know.
Was this
answer
helpful?
Yes
No
Saturday, May 26th, 2007 AT 5:58 PM
Tiny
JUSTDON
  • MEMBER
  • 150 POSTS
Rudpro.

I'm interested in anything that keeps me from shelling out a C note. :Lol:
Was this
answer
helpful?
Yes
No
Sunday, May 27th, 2007 AT 5:22 PM
Tiny
RUDPRO
  • MECHANIC
  • 224 POSTS
If you know how to solder connections, or if you know someone who can do it for you, you can open up the CCRM and change the relay with a like for like relay from Radio Shack, $4.50. You have to remove the CCRM. Drill out the rivets. Desolder and remove the relay, the one with the same colored wires you described. Solder the new relay in. Rivet the CCRM case back together and reinstall it. It's not that difficult as long as you know how to make a good soldered connection. To desolder the relay, you can by a desoldering tool fom Radio Shack. You push the plunger in, hold it to the connection while applying the soldering iron, push the button when solder melts and it sucks in he solder. You can try removing the relay without the desoldering tool but the tool makes it much easier. I think all the relays are the same in the CCRM but it would be best to bring it with you when you go to Radio Shack. The part # is 275-005. Most cars have a relay center that is not sealed up and the relays are plug in kind but I guess Ford wants to make it difficult to change one or wants to sell the whole CCRM to you. If you don't know how to solder, let me know and I'll walk you through it. It's easy, but you have to make sure it's done right. Let me know how it goes or if you need assistance.
Was this
answer
helpful?
Yes
No
Sunday, May 27th, 2007 AT 10:20 PM
Tiny
JUSTDON
  • MEMBER
  • 150 POSTS
Rudpro.
I have the ccrm open and have already purchased the radio shack relay you gave.

Problem is, I have no idea which damn relay is for the a.C. Lol

There is a Bosch component that looks like it would be for power, 2 larger grey Omron relays side by side, a black Omron relay #G8H-UA-007108, and a smaller black Omron component # G8SN-UA-007116. Any idea on which one may be for the A.C?

Thanks,
Don
Was this
answer
helpful?
Yes
No
Monday, June 4th, 2007 AT 3:48 PM
Tiny
RUDPRO
  • MECHANIC
  • 224 POSTS
Let me look into this. I'll get right back to you.
Was this
answer
helpful?
Yes
No
Monday, June 4th, 2007 AT 5:13 PM
Tiny
TAURUSWHEEL
  • MECHANIC
  • 718 POSTS
I did the same thing for my 87 Taurus, back when the ccrm was known as the integrated relay controller, that was a sealed box also, drilled out the rivets and replaced the fan controller relay, it would occasionally stick on, I would rap the box, it would shut off. Be gentle with the solder and heat
Was this
answer
helpful?
Yes
No
Monday, June 4th, 2007 AT 5:35 PM
Tiny
RUDPRO
  • MECHANIC
  • 224 POSTS
You'll need a digital multimeter. First, identify the black/yellow wire for the AC on the large wiring connector that connects to the CCRM. Identify the same terminal on the CCRM that the connector plugged in to. Set your multimeter to the OHMS setting. The display should read OL. Touch one probe to the connector of the CCRM that you identified as being for the black/yellow wire. Start probing the soldered terminals of the board where the relays are until you get an ohm reading. It will be like.2 or.3 ohms or something close. If you identified the right terminal on the connector of the CCRM, that should be the only soldered terminal you get a reading on. That's your AC relay. I haven't opened a CCRM up myself, I'm assuming the relays are on a printed circuit board. If there is wiring going to the relays, just look for the relay with the black/yellow wire going to it.
Was this
answer
helpful?
Yes
No
Monday, June 4th, 2007 AT 5:38 PM
Tiny
JUSTDON
  • MEMBER
  • 150 POSTS
Rudpro.

I have it fixed. Just for reference, it was the Omron G8SN-UA-007116.

They had the relay set in clear silicon with a large amount all around the relay itself. Had a hell of a time. Not the best soldering job I've done but, it works. :D

Thanks for all the help to you and Justanold!
Was this
answer
helpful?
Yes
No
Monday, June 4th, 2007 AT 9:17 PM
Tiny
RUDPRO
  • MECHANIC
  • 224 POSTS
Happy motoring.
Was this
answer
helpful?
Yes
No
Monday, June 4th, 2007 AT 11:56 PM
Tiny
NUZZ
  • MEMBER
  • 1 POST
Wow. I am so glad I found this thread. I had the same problem with my 97 Taurus (minus the compressor lockup-charging issue). Trobleshooting indicated the ccrm. Went to the local Radio Shack and they had the relay. It replaced the same Omron relay on the board. The AC is back on and COOL. The Taurus rides again-166,000 miles and going strong
:D
Was this
answer
helpful?
Yes
No
Saturday, October 6th, 2007 AT 5:43 PM

Please login or register to post a reply.

Sponsored links