thermostat replacement ?

1999 FORD TAURUS
Avatar
JOHN2925
  • MEMBER
  • 1 POST
I broke a bolt off while changing thermostat on housing, bolt is sticking out a half inch tried taking out with vise grips and no luck
Jan 19, 2010 at 5:34 PM
Advertisement
Avatar
BMRFIXIT
  • CAR REPAIR CONTRIBUTOR
  • 19,053 POSTS
Soak it with penetrating oil tap the bolts lightly with a hammer and then check out this video which shows how to remove broken bolts

https://youtu.be/py-rIWATchY

This guide will help you change out the thermostat with diagrams below to show you how on your car.

https://www.2carpros.com/articles/replace-thermostat

Check out the diagrams (Below). Please let us know what happens.
Jan 19, 2010 at 6:44 PM
Avatar
CANDACE23
  • MEMBER
  • 1 POST
where is my thermostat located on my car
Oct 21, 2020 at 10:05 AM (Merged)
Avatar
BMRFIXIT
  • CAR REPAIR CONTRIBUTOR
  • 19,053 POSTS
Here is the location for the thermostat for your car . Check out the diagrams (Below). Please let us know if you need anything else to get the problem fixed.


https://images.2carpros.com/forum/automotive_pictures/99387_Graphic_70.jpg

Oct 21, 2020 at 10:05 AM (Merged)
Avatar
DLEJ
  • MEMBER
  • 8 POSTS
Engine Cooling problem
1999 Ford Taurus 6 cyl Two Wheel Drive Automatic

I can't seem to find my thermostat on my '99 Ford Taures. My manuel shows where it is, but it's not there. Is there another location that I'm missing? Is my engine somehow different? Thanks
Oct 21, 2020 at 10:05 AM (Merged)
Avatar
BLUELIGHTNIN6
  • CAR REPAIR CONTRIBUTOR
  • 16,542 POSTS
It depends on your vehicle's engine type.

3.0 Vulcan, 12 valve engine:

Looking in from the front of the car, it is on the right side of the engine, where the radiator hose goes in - remove the housing's three bolts - the thermostat will be inside

Follow the large top radiator hose to the engine block. it connects to a little dome-shaped fitting held on by three bolts. The thermostat is under it. be sure to replace the gasket (after completely removing the old gasket) when you replace the thermostat.


3.0 Duratec, 24 valve DOHC engine:


If you have the 24 valve DOHC engine, the thermostat is on the other side (passenger) at the bottom front of the engine, accessible from underneath.
Oct 21, 2020 at 10:05 AM (Merged)
Avatar
DLEJ
  • MEMBER
  • 8 POSTS
Then that's it! I have the Duratec engine you mentioned!

Gads!! Is there anything easy to repair on this car?? LOL

Thanks!!!
Oct 21, 2020 at 10:05 AM (Merged)
Avatar
DLEJ
  • MEMBER
  • 8 POSTS
BTW, I'm replacing the thermostat as a last ditch effort to thwart off my engine over-heating problem.

It gets hot quick when I run my AC, and living in Phoenix makes AC a must.

Do you think my thermostat is the cause?

Thanks again!
Oct 21, 2020 at 10:05 AM (Merged)
Avatar
BLUELIGHTNIN6
  • CAR REPAIR CONTRIBUTOR
  • 16,542 POSTS
Most likely not. When you turn on the A/C , does the cooling fan(s) turn on for the radiator?
Oct 21, 2020 at 10:05 AM (Merged)
Avatar
DLEJ
  • MEMBER
  • 8 POSTS
Yes they do, and they seem to run constantly.

I also had a new water-pump installed recently.
Oct 21, 2020 at 10:05 AM (Merged)
Avatar
BLUELIGHTNIN6
  • CAR REPAIR CONTRIBUTOR
  • 16,542 POSTS
and it only overheats with the A/C turned on?
Oct 21, 2020 at 10:05 AM (Merged)
Avatar
DLEJ
  • MEMBER
  • 8 POSTS
Yes, otherwise it runs normal. With the exception of days that get to 115 degrees. lol
Oct 21, 2020 at 10:05 AM (Merged)
Avatar
BLUELIGHTNIN6
  • CAR REPAIR CONTRIBUTOR
  • 16,542 POSTS
Ok, honestly I wouldn't waste time checking the thermostat. If thermostat was sticking then the A/C would not have much to do with the overheating.

When was the last time you have had the radiator flushed?
Oct 21, 2020 at 10:05 AM (Merged)
Avatar
DLEJ
  • MEMBER
  • 8 POSTS
I was going to install a cooler thermostat in hopes it would do the trick. The engine coolant is up to par, also.

The only other thing I can think of is either a bad radiator, or a bad head gasket, or worse, a cracked block.

Thanks for all your help, I appreciate it!
Oct 21, 2020 at 10:05 AM (Merged)
Avatar
BLUELIGHTNIN6
  • CAR REPAIR CONTRIBUTOR
  • 16,542 POSTS
Easy way to check for bad head gasket or head is to let vehicle cool off. Open hood and remove radiator cap while cool. Get in and start vehicle (ensure noone is around front of vehicle) . If coolant shoots up out of radiator cap opening then you have backpressure caused by faulty head gasket or head. If no coolant shoots out then gasket is most likely OK. Sounds more like dirty, corroded up radiator.
Oct 21, 2020 at 10:05 AM (Merged)
Avatar
DLEJ
  • MEMBER
  • 8 POSTS
I haven't had it flushed since I've owned the car. Three and a half years.

The overheating problem has always been there, too. I could drive what was necessary before it would get too hot, but this year it's getting worse. It overheats within 5 miles of driving.
Oct 21, 2020 at 10:05 AM (Merged)
Avatar
DLEJ
  • MEMBER
  • 8 POSTS
Thanks! You may be right about the radiator being clogged up. I'll check that before I crawl under it to change the thermostat, for sure! LOL

Thanks again!
Oct 21, 2020 at 10:05 AM (Merged)
Avatar
UMPHREY MCKINNEY
  • MEMBER
  • 1 POST
of course the view is obscure but i am not sure where the thermostat is located so i can see what is envolved in a change out. I have traced out the hoses and know their routing. Could it be inbetween the rows of cylinders at the coolant inlet to the engine?
Oct 21, 2020 at 10:06 AM (Merged)
Avatar
BILLYMAC
  • CAR REPAIR CONTRIBUTOR
  • 2,204 POSTS
Hi follow the upper hose to the engine the t stat is right there
Oct 21, 2020 at 10:06 AM (Merged)
Avatar
MERLIN2021
  • CAR REPAIR CONTRIBUTOR
  • 17,250 POSTS
THERMOSTAT Removal 1. Drain the engine cooling system so that the engine coolant level is below the water thermostat. 2. Raise and support vehicle on hoist. See JACKING & HOISTING . 3. Disconnect the lower radiator hose from the water inlet connection. See Fig. 9. 4. Remove the two water inlet connection retaining bolts. Remove the water inlet connection. 5. Remove the "O" ring seal and water thermostat from the water thermostat housing. Inspect "O" ring for damage and replace if necessary. 6. If required, remove water thermostat housing retaining bolts, water thermostat housing and "O" ring from lower radiator hose tube. Inspect "O" ring for damage and replace if necessary. Installation 1. Install the water thermostat, "O" ring, water thermostat housing (if removed) as shown. 2. Install and alternately tighten the retaining bolts. Tighten bolts to specification. See TORQUE SPECIFICATIONS. 3. Connect the lower radiator hose to the water inlet connection. 4. Lower vehicle. 5. Fill the cooling system using Premium Engine Coolant (green in color), E2FZ-19549-AA or equivalent meeting Ford specification in a 50/50 mixture. Bleed system See BLEEDING . 6. Start the engine and check all hoses and connections for leaks. Allow the engine to warm up so that the water thermostat opens. 7. Stop the engine. Top off degas bottle as required to maintain minimum cold fill level. Fig. 9: Locating Water Thermostat Courtesy of FORD MOTOR CO. WARNING: NEVER REMOVE THE PRESSURE RELIEF CAP UNDER ANY CONDITIONS WHILE THE ENGINE IS OPERATING. FAILURE TO FOLLOW THESE INSTRUCTIONS COULD RESULT IN DAMAGE TO THE COOLING SYSTEM OR ENGINE AND/OR PERSONAL INJURY. TO AVOID HAVING SCALDING HOT COOLANT OR STEAM BLOW OUT OF THE COOLING SYSTEM OR DEGAS BOTTLE, USE EXTREME CARE WHEN REMOVING THE PRESSURE RELIEF CAP FROM A HOT COOLING SYSTEM OR DEGAS BOTTLE. WAIT UNTIL THE ENGINE HAS COOLED, THEN WRAP A THICK CLOTH AROUND THE PRESSURE RELIEF CAP AND TURN IT SLOWLY UNTIL PRESSURE BEGINS TO RELEASE. STEP BACK WHILE THE PRESSURE IS RELEASED FROM THE COOLING SYSTEM. WHEN CERTAIN ALL PRESSURE HAS BEEN RELEASED, PRESS DOWN ON THE PRESSURE CAP (STILL WITH A CLOTH), TURN AND REMOVE PRESSURE RELIEF CAP. 6/11/2009


https://images.2carpros.com/forum/automotive_pictures/62217_tstata_1.jpg


https://images.2carpros.com/forum/automotive_pictures/62217_tstatb_1.jpg

Yours is found by following the LOWER hose. on 3.0 2V VIN U or 2 Upper hose on 3.0 4V VIN S And lower on the SHO VIN N THERMOSTAT Removal 1. Drain the engine cooling system so that the engine coolant level is below the water thermostat. 2. Remove battery. Remove power distribution box. Remove battery tray. 3. Disconnect upper radiator hose and position out of the way. 4. Disconnect the lower radiator hose from the water inlet connection. See Fig. 2 . 5. Remove the two retaining bolts. Remove the water inlet connection. 6. Remove the "O" ring seal and water thermostat from the water pump . Inspect "O" ring for damage and replace if necessary. Installation 1. Install the water thermostat, "O" rings and water inlet connection. See Fig. 2 . 2. Install and alternately tighten the retaining bolts. Tighten bolts to specification. See TORQUE SPECIFICATIONS . 3. Connect the lower radiator hose to the water inlet connection. 4. Install upper radiator hose. Position spring clamp securely. 5. Install battery tray. Install power distribution box. Install battery. 6. Fill the cooling system using Premium Engine Coolant (green in color), E2FZ-19549-AA or equivalent meeting Ford specification in a 50/50 mixture. Bleed system. See BLEEDING . 7. Start the engine and check all hoses and connections for leaks. Allow the engine to warm up so that the water thermostat opens. Fig. 2: Locating Water Thermostat Courtesy of FORD MOTOR CO. WARNING: NEVER REMOVE THE PRESSURE RELIEF CAP UNDER ANY CONDITIONS WHILE THE ENGINE IS OPERATING. FAILURE TO FOLLOW THESE INSTRUCTIONS COULD RESULT IN DAMAGE TO THE COOLING SYSTEM OR ENGINE AND/OR PERSONAL INJURY. TO AVOID HAVING SCALDING HOT COOLANT OR STEAM BLOW OUT OF THE COOLING SYSTEM OR DEGAS BOTTLE, USE EXTREME CARE WHEN REMOVING THE PRESSURE RELIEF CAP FROM A HOT COOLING SYSTEM OR DEGAS BOTTLE. WAIT UNTIL THE ENGINE HAS COOLED, THEN WRAP A THICK CLOTH AROUND THE PRESSURE RELIEF CAP AND TURN IT SLOWLY UNTIL PRESSURE BEGINS TO RELEASE. STEP BACK WHILE THE PRESSURE IS RELEASED FROM THE COOLING SYSTEM. WHEN CERTAIN ALL PRESSURE HAS BEEN RELEASED, PRESS DOWN ON THE PRESSURE CAP (STILL WITH A CLOTH), TURN AND REMOVE PRESSURE RELIEF CAP.


https://images.2carpros.com/forum/automotive_pictures/62217_Tstatc_1.jpg


https://images.2carpros.com/forum/automotive_pictures/62217_taur_1.jpg

Oct 21, 2020 at 10:06 AM (Merged)
Avatar
JIMMY_POOSE
  • MEMBER
  • 2 POSTS
Engine Cooling problem
1998 Ford Taurus 6 cyl Front Wheel Drive

does the spring side of thermostat go in towards the motor or towards the radiator
Oct 21, 2020 at 10:06 AM (Merged)
Avatar
BLUELIGHTNIN6
  • CAR REPAIR CONTRIBUTOR
  • 16,542 POSTS


https://images.2carpros.com/forum/automotive_pictures/261618_Noname_70.jpg

Hope this helps.. Thanks for using 2carpros.com!
Oct 21, 2020 at 10:06 AM (Merged)
Avatar
JIMMY_POOSE
  • MEMBER
  • 2 POSTS
thank you so very much
Oct 21, 2020 at 10:06 AM (Merged)
Avatar
MPTECDIR
  • MEMBER
  • 1 POST
engine heats up very slow, never really gets to full temp. temp climbs when sitting still but drops down as soon as car starts moving. Is this the thermostat? If so, is it located where the upper radiator hose enters the block? is the thermostat easily accessable without special tools or moving other parts?
tia, michael
Oct 21, 2020 at 10:07 AM (Merged)
Avatar
SCHRIMPIEMAN
  • CAR REPAIR CONTRIBUTOR
  • 166 POSTS
Yes, chances are you have a stuck open thermostat. I answered a similar question in the Windstar forum section. Windstar / Tarurs share same engines... I copy/paste text from my answer to another member:

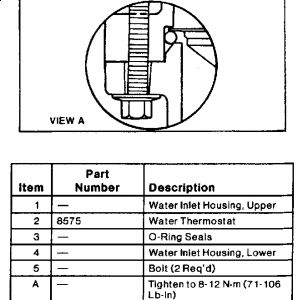
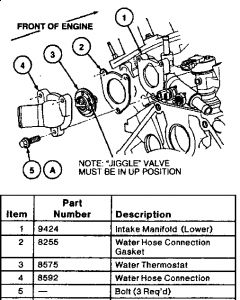
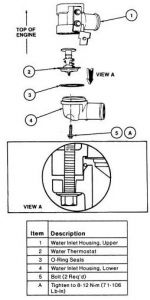
The thermostat is located below the throttle body, just above the transaxle bell housing. Follow the top radiator hose from the driver's side of the radiator towards the engine. The hose clamps onto a flange. The flange is attached to the engine via 3 bolts, and within rests the thermostat.

You'll need to remove the air cleaner, intake snorkle, various cables and move some wires around, maybe remove the battery for extra space; but it's not too complicated. Be sure to clean the old gasket material off REALLY WELL, even though it's a real pain in the a** to squeeze your hand into awkward positions, scraping off the old gasket material. Any leaks in that area will be very discouraging indeed. I always clean water-area gasket mating surfaces with a rag wet with brake cleaner, then follow up with the gasket and a bit of Grey Silicone gasket maker. The blue and red gasket maker stuff just doesn't do it. Spend the extra $2 per tube on the grey stuff; it'll be worth it.
How hard is it to replace? That depends on your level of expertise and available tools. Just make sure you have a good ratchet set with a U-Joint / Swivel and metric sockets.
While you're at it, go ahead and replace the upper radiator hose if it has more than ~40,000 miles on it. The upper hose takes the most stress because that is where the hottest water comes out from on its way to the radiator. It'll be completely exposed during your thermostat replacement. Undo the connection at the radiator and replace the hose.
Oct 21, 2020 at 10:07 AM (Merged)
Avatar
PARFE89
  • MEMBER
  • 1 POST
1997 Ford Taurus

The bottom bolt on the thermostat housing had it's head broken off and now remains stuck in place. Quite simply, what can I do to get this out?
Oct 21, 2020 at 10:07 AM (Merged)
Avatar
BILLYMAC
  • CAR REPAIR CONTRIBUTOR
  • 2,204 POSTS
Hi
if bolt is sticking out enough to get a stud extractor on it i would go that route..

if it is broken off flush with surface.. take a small bit drill a hole right in the center of the stud. step it up to a bigger bit.

now get an extractor and remove stud..
Oct 21, 2020 at 10:07 AM (Merged)
Avatar
DAVID MACK
  • MEMBER
  • 1 POST
How do you change the thermostat
Oct 21, 2020 at 10:08 AM (Merged)
Avatar
MERLIN2021
  • CAR REPAIR CONTRIBUTOR
  • 17,250 POSTS
Let the engine cool off, then drain it down about a gallon, there is a draicok on the bottom of the radiator, then follow the upper radiator hose to the engine, there you will find the thermostat at the end of the hose, unbolt the two bolts. leave the hose attached to the housing. Scrape old gasket from both mating surfaces, install new thermostat, spring towards the engine. install the gasket, snug the housing bolts! Not to tight and bring the housing down evenly. refill the coolant and that's it!
On your car, to get to the draincock on the radiator, you must remove the splash shield under the front of the car.
Oct 21, 2020 at 10:08 AM (Merged)
Avatar
CATPEZ007
  • MEMBER
  • 1 POST
how to change water thermostat
Oct 21, 2020 at 10:08 AM (Merged)
Avatar
JACOBANDNICKOLAS
  • CAR REPAIR CONTRIBUTOR
  • 110,190 POSTS
Disconnect neg battery terminal. Drain coolant from radiator. Follow the upper radiator to the engine and remove the hose where it attaches to the t-stat housing. Remove the housing paying attention to the direction the thermostat is placed. Replace it and reverse the procedure to reinstall.
Oct 21, 2020 at 10:08 AM (Merged)
Avatar
PEEKXSHO
  • MEMBER
  • 1 POST
i need help locating the thermostat on the engine... a diagram, anything would help. i thought I'd ask before tearing into the wrong side of the engine. i can provide pictures of any angle of the engine, if necessary.
Oct 21, 2020 at 10:08 AM (Merged)
Avatar
HMAC300
  • CAR REPAIR CONTRIBUTOR
  • 48,601 POSTS
first thing it's either a 3.0 or 3.8six cylinder I am sending info for 3.0 we don't have any pics available of that so follow the upper radiator hose back to engine and it should be there. there will be normally two bolts holding it.
Oct 21, 2020 at 10:08 AM (Merged)
Avatar
LINCSTER86
  • MEMBER
  • 1 POST
is the thermostat nessarary my mechanic deleted it
Oct 21, 2020 at 10:08 AM (Merged)
Avatar
RASMATAZ
  • CAR REPAIR CONTRIBUTOR
  • 75,992 POSTS
The thermostat controls the engine temperature the computer uses the coolant temperature sensor to adjust fuel demand. Without the thermostat the engine will not reach its operating temperature and the CTS will be misleading the computer
Oct 21, 2020 at 10:08 AM (Merged)
Repair Safety Notice: This information is for general instructional purposes only. Vehicle repair can be dangerous. Verify all information, follow manufacturer service procedures, use proper tools and safety equipment, and consult a qualified repair shop when needed.