SHOCK ABSORBER
Removal & Installation (Station Wagon)
Remove rear compartment access cover. Loosen, but DO NOT remove, upper shock mounting nut. Raise and support vehicle. Remove wheel and tire assembly. Support lower suspension arm with a floor jack.
Remove upper mounting nuts, washers and insulators. Lower floor jack. Remove 2 lower shock absorber mounting bolts. Compress shock absorber and remove from vehicle. To install, reverse removal procedure.
SHOCK STRUT & SPRING
Removal (Sedan)
Raise jack only enough to contact body. Remove package tray trim panel. Loosen, but DO NOT remove, 3 nuts retaining upper strut mount to body. See Fig. 3. Raise vehicle. Remove wheel and tire assembly. Remove bolt retaining brake load sensor proportioning valve to control arm.
Wire rear control arm to body to ensure proper support. Leave about 6" (152 mm) clearance to aid in strut removal. Remove clip attaching brake hose to strut bracket, and move hose aside. Disconnect electronic shock actuator, if equipped.
Remove stabilizer bar "U" bracket from body. Remove stabilizer bar link assembly from strut mounting bracket. Disconnect tension strut from spindle. Move spindle rearward enough to separate it from tension strut.
Remove pinch bolt retaining strut to spindle. Spread strut-to-spindle pinch joint (if necessary). Separate strut from spindle. From inside luggage compartment, remove 3 nuts attaching upper mount to body and remove strut.
Mark insulator to top mount position for installation reference. Compress spring with Spring Compressor (086-00029). With spring compressed, hold shaft stationary using 10-mm box wrench. Remove strut shaft-to-mount nut using 21-mm, 6-point crowfoot and ratchet. To avoid fracture of shaft at base of hex, DO NOT turn shaft. Remove spring, strut and mount from compressor.
Installation
To install, reverse removal procedure. Ensure spring is properly located in upper and lower spring seats. See Fig. 4. Use NEW tension strut-to-spindle nut. Tighten all nuts and bolts to specification. See TORQUE SPECIFICATIONS.
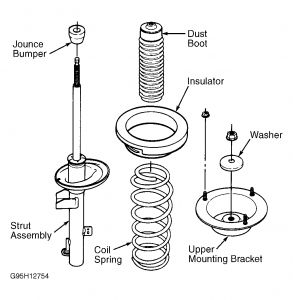
Fig. 3: Exploded View Of Strut, Spring & Upper Mount Components (Typical)
Courtesy of FORD MOTOR CO.
SPONSORED LINKS
Sunday, December 7th, 2008 AT 9:55 PM