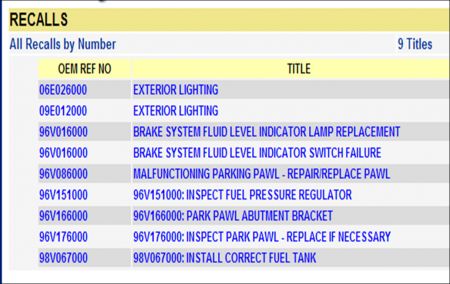
Hello -
Thanks for the info on the engine. There may be a decal or letters on the trunk of the car stating if it is a G/GL or LX. There may be some differences in the models.
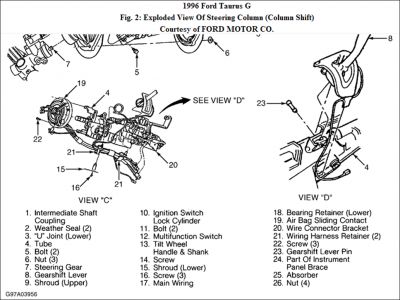
I am going to give you info for the G.
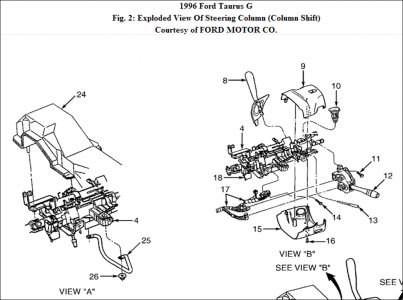
For Figure 2 I have had to divide it up so you can see it. I am assuming you have a column shift not floor.
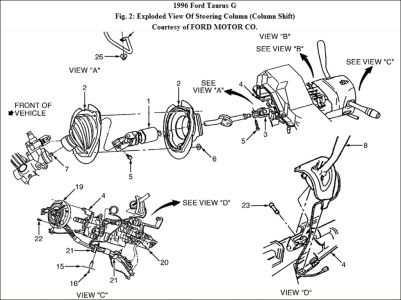
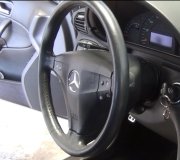
STEERING WHEEL & HORN PAD
NOTE: See DISABLING & ACTIVATING AIR BAG SYSTEM before removing steering wheel.
CAUTION: DO NOT strike steering shaft with hammer or use slide hammer to remove steering wheel. Steering shaft bearings could be damaged if appropriate puller is not used to remove steering wheel.
Removal
1. Ensure front wheels are in straight-ahead position. Disconnect negative battery cable. Disconnect positive battery cable and wait one minute for backup power supply energy to deplete. Disable air bag system.
2. Remove air bag module retaining nuts or screws from steering wheel. See Fig. 2 and Fig. 3 . Lift air bag module from steering wheel and disconnect clockspring electrical connector from module.
3. Disconnect cruise control switch electrical connector from contact assembly electrical connector. Remove steering wheel bolt.
4. Mark steering wheel position. Using Steering Wheel Puller (T67L-3600-A), remove steering wheel. As wheel is removed, route contact assembly and cruise control/horn wiring harnesses through steering wheel.
Installation
1. Ensure front wheels are in straight-ahead position. Route contact assembly and cruise control/horn wiring harnesses through steering wheel opening at 3 o'clock position. Position steering wheel onto steering shaft, ensuring steering wheel and shaft alignment marks are aligned. Install NEW steering wheel bolt. Tighten bolt to specification. See TORQUE SPECIFICATIONS .
2. Connect cruise control/horn switch electrical connector. Connect clockspring electrical connector to air bag module and install module. Connect positive battery cable. Connect negative battery cable. Check AIR BAG light for system faults.
DISABLING & ACTIVATING AIR BAG SYSTEM
CAUTION: When battery is disconnected, vehicle computer and memory systems may lose memory data. Driveability problems may exist until computer systems have completed a relearn cycle. See appropriate COMPUTER RELEARN PROCEDURES article in the GENERAL INFORMATION section before disconnecting battery:
"� COMPUTER RELEARN PROCEDURES - 1996
"� COMPUTER RELEARN PROCEDURES - 1997
WARNING: If vehicle is equipped with passenger-side air bag, BOTH the driver-side and passenger-side air bag modules MUST be disabled.
DISABLING SYSTEM
1. Disconnect negative battery cable. Disconnect positive battery cable. Wait one minute. This is the time required for back-up power supply in diagnostic monitor to deplete its stored energy.
2. Remove 4 nut assemblies retaining driver-side air bag to steering wheel. Disconnect driver-side air bag module connector. Attach Air Bag Simulator (Rotunda 105-00010) to air bag connector to simulate air bag.
3. To disable passenger-side air bag, if equipped, remove instrument panel lower right molding.
4. Open glove box door, press glove box sides inward and remove glove box. Through glove box opening, remove 2 front and 2 rear passenger-side air bag module bolts. Disconnect passenger-side air bag connector.
5. Carefully remove air bag module and place it on bench, trim cover facing up. Attach simulator to air bag terminals on wiring harness side of passenger-side air bag module connector (if equipped). If testing or vehicle operation is required, connect positive battery cable, then connect negative battery cable.
ACTIVATING SYSTEM
1. Ensure BOTH battery cables are disconnected. Wait one minute. Remove air bag simulator(s) from driver-side air bag and passenger-side air bag wiring harness connector (if equipped).
2. Reconnect driver-side air bag connector to air bag module. Install driver-side air bag module on steering wheel. Tighten nut and washer assemblies to specification.
3. Reconnect passenger-side air bag connector to air bag module (if equipped). Install passenger-side air bag module. Tighten bolts to specification. Install trim panels as necessary. Connect positive battery cable, then connect negative battery cable. Check AIR BAG light for system faults.
Please be careful with the air bag as static can set it off.
Also once you have the bag off do not turn the car on. It will do a self check and if the bag is not installed it will give you a fault and the light may only be cleared by the dealer.
SPONSORED LINKS
Thursday, May 28th, 2009 AT 9:20 PM