I'm guessing you loosend the synchroniser ? it needs setting @75 degrees .. the actual sensor itself can be removed/loosened without the problems of setting up afterwards ... it could be the sensor itself needs relacing causing the misfire codes .. let me know
Camshaft Position (CMP) Sensor
EEC-V uses 2 types of CMP sensors. A variable reluctance sensor is used.
CMP sensor is used to determine the position of the camshaft and to identify when piston No. 1 is at TDC of compression stroke. CMP sensor provides cylinder identification information during engine start-up for PCM to initiate correct firing order. Cylinder identification information signal is sent from CMP sensor to PCM through CID circuit.
CAMSHAFT POSITION SENSOR
Removal & Installation (OHV)
Disconnect negative battery cable. Unplug harness connector from Camshaft Position (CMP) sensor. Remove CMP sensor mounting screws and sensor. To install, reverse removal procedure. Tighten mounting screws to specification. See TORQUE SPECIFICATIONS . For CMP sensor synchronizer removal and installation procedure, see CMP SYNCHRONIZER .
Removal & Installation (DOHC)
Disconnect negative battery cable. Disconnect CMP sensor harness connector. Remove CMP sensor retaining screw and CMP sensor. See Fig. 5 . Ensure "O" ring is properly located and in good condition. To install, reverse removal procedure. Tighten screws to specification. See TORQUE SPECIFICATIONS .
Fig. 5: Removing CMP Sensor (DOHC)
Courtesy of FORD MOTOR CO.
CMP SYNCHRONIZER
Removal (OHV)
Note position of CMP sensor electrical connector. Remove CMP sensor. See CAMSHAFT POSITION SENSOR . Before removing synchronizer housing, set piston No. 1 to Top Dead Center (TDC).
Apply reference marks on synchronizer housing and engine. Remove synchronizer housing hold-down bolt and clamp. Remove synchronizer assembly with intermediate shaft.
Installation
Install Synchro Positioner (T95T-12200-A) on synchronizer assembly (CMP sensor removed). Turn synchronizer shaft clockwise until tool boss engages with notch in synchronizer housing. Tool should fit squarely in top of synchronizer housing.
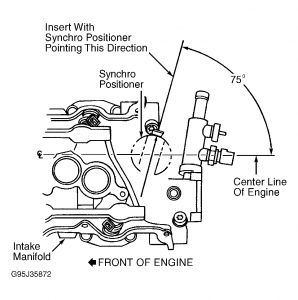
Install intermediate shaft in synchronizer assembly. Lubricate synchronizer drive gear with engine oil. Insert synchronizer assembly into engine. While inserting, synchronizer assembly will rotate. When installed, synchro positioner should point 75 degrees from engine centerline. See Fig. 6 .
If synchro positioner is not pointing in correct direction, remove synchronizer assembly and start again from step 1). If installed correctly, install and tighten hold-down clamp and remove synchro positioner.
Install CMP sensor and tighten screws to specification. See TORQUE SPECIFICATIONS . Connect CMP sensor harness connector and negative battery cable.
Fig. 6: Positioning Synchronizer For Installation (OHV)
SPONSORED LINKS
Sunday, December 28th, 2008 AT 6:33 PM


