I would suspect the noise is from the axle
and since the boot is torn that would put it on the 1st things to do .
as if u can do it in the drive way .
its all depend on your ability and tools
I will include the steps and let you make your decision on that
if you need more let me know
FRONT DRIVE HALFSHAFTS -2005 Ford Explorer
Removal and Installation
CAUTION: Do not loosen the front axle wheel end nut until after the wheel and tire assembly are removed from the vehicle. Wheel bearing damage will occur if the wheel bearing is unloaded with the weight of the vehicle applied.
1.With the vehicle in NEUTRAL, position it on a hoist. For additional information, refer to JACKING AND LIFTING .
2.Remove the front wheel and tire assembly
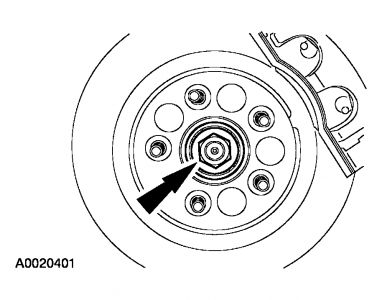
3.Remove and discard the front axle wheel end nut.
To install, tighten to 250 Nm (184 lb-ft).
CAUTION: To prevent damage to the brake hose, do not allow the disc brake caliper to hang suspended from the hose.
4.Remove the 2 disc brake caliper guide pin bolts and position the disc brake caliper aside.
To install, tighten to 33 Nm (24 lb-ft).
Using mechanic's wire, position the disc brake caliper aside.
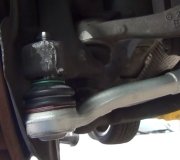
CAUTION: Do not use a hammer to separate the outboard CV joint from the hub. Damage to the threads and internal CV joint components can result.
5.Using the special tool, press the outboard CV joint until it is loose in the hub.
6.Remove the tie-rod nut.
To install, tighten to 70 Nm (52 lb-ft). 7.Using the special tool, separate the tie-rod from the knuckle.
8.Remove the stabilizer bar link nut.
To install, tighten to 25 Nm (18 lb-ft).
9.Remove the upper ball joint nut.
To install, tighten to 69 Nm (51 lb-ft).
CAUTION: Do not allow the knuckle to hang freely. It is possible to overextend and internally separate each inner CV joint from its housing.
10.Using the special tool, disconnect the upper ball joint from the knuckle.
CAUTION: Do not damage the axle shaft oil seal or the machined sealing surface on the inboard CV joint housing.
NOTE: A circlip retains the inboard CV joint housing to the differential side gear in the axle.
11.Using the special tool, disengage the LH CV joint housing from the side gear.
12.Remove the LH halfshaft.
CAUTION: Do not damage the axle shaft oil seal, the machined sealing surface on the inboard CV joint housing or the axle shaft splines.
CAUTION:I nstall a new retainer circlip on the outboard spline end of the axle shaft before reseating the axle shaft in the differential side gear.
13.Pull the RH halfshaft and the axle shaft away from the axle tube, and separate the inboard CV joint housing from the axle shaft.
14.Remove the RH halfshaft.
CAUTION: Install and tighten the new axle wheel end nut to specification in a continuous rotation. Stopping the rotation during installation will cause the nylon lock to seat incorrectly. This will cause incorrect torque readings while tightening the axle wheel end nut and lead to bearing failure. Always install a new
axle wheel end nut after loosening or when not tightened to specifications in a continuous rotation.
CAUTION: Install a new circlip every time the halfshaft is removed.
NOTE: Start one end of the circlip in the groove and work the circlip over the halfshaft and into the groove to prevent the circlip from overexpanding.
15.To install, reverse the removal procedure.

Thursday, November 6th, 2008 AT 6:53 AM