Hi, you didn't reply back and so I wrote up everthing for scissor type including checking the motor.
If you didn't buy the manual you could access autozone had mine online... It wasn't any different than the hard copy I owned though.
1) Verify if it is your motor.
It may still run, but the bushings may be bad. After removing the trim panel and water shield, You don't have to remove the regulator.
A)To Access the motor and remove the motor---
b)Raise the front door window glass to the full up position."”I used duct tape to make certain it wouldn't drop when the motor was removed.
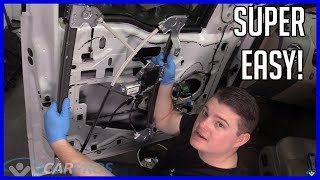
C)Remove the front door trim panel.
D)Remove the door speaker.
E)Remove the plastic carefully.
F)locate motor bolts-- there are hidden ones under the dimples in the door metal near the window motor (Depending on the model you have you may have to drill the door to access one or more bolt). To access the power window motor bolts, I made 3/4-in hole at the existing drill dimples on the door.
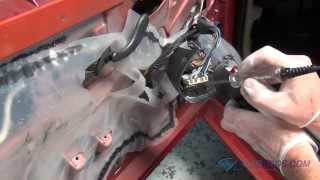
G)Disconnect the front door window motor electrical connector.
H)Remove the bolts and then the motor.
I)To install, reverse the removal procedure.
To fix the motor if it is the bushings--
BE PREPARED--To open the motor you will need a Torx type screwdriver head---( head characterized by a 6-point star-shaped pattern.
You may or may not have to remove the "c" clip from the gear shaft"”if you can remove the cover to access the internal gears without it save the step. See if the bushings (plugs) are intact, if they are broken or worn replace them, if not you will probably need to remove the regulator. Thanks to the posts on another site I located the nylon plugs (bushings) @Napa part # 665-1524.
2.) Verify if the regulator is restricted or teeth are worn to determine if it needs to be removed.
I also used a small mirror to see if the teeth on it were ok or not"”mine were ok.
I carefully removed the tape to verify if the regulator moved unrestricted by holding the glass and seeing if it moved up and down ok. (Mine was restricted and I knew I had to remove it after my attempts to lube it while in the door were unsuccessful).
3.) If it needs to be removed.
A)Remove window:
Close window to the point where you can use the access holes in the door and tape in place again or find an alternate method to have the glass remain stable. Drill out aluminum rivets attaching the window mounting bracket to the slide. Carefully drill out the rivets on the window using 1/4" bit or several small (1/16) drill bits where you can drill a series of holes in the aluminum material of the rivet (the center is a relatively hard steel shank used to expand the rivet on the inside). Punch out the stem, break apart the rivet remnants and extract pieces. Once the window rivets were out I released it from the slide bar moved the window to closed position and taped with duct tape to hold it in place again.
B)Remove the regulator.
IT IS PROBABLY SPRING LOADED AND NEEDS EXTREME CAUTION TO REMOVE"”If you do not feel comfortable that you can stabilize it based on how I did it please do not proceed. Even the Chiltons has A HUGE CAUTION regarding personal injury and making certain the bars are stabilized ! I made certain to wear thick leather gloves also...I couldn't find any info on any forum or book on how to do it, so here's what I did.
B1). Remove the bottom bar holding the regulator in place 1st by unbolting it and removing the slide from the regulator.
B2.) I collapsed the bars together (the tighter the better as you will need to slide it out the larger hole)-- I again used duct tape to secure the bars together.
B3). I drilled out the 3 rivets that held it in place, and then removed nut to the long bolt on the regulator and pushed it back into the door and then carefully removed it from the door.
B4. ) Inspect it to see if you can fix it, in my case the tracts for the slides (the slides were in good shape) were extremely gummed up and the bars rusty, once I cleaned it up and lubed it I realized that since it was much better quality than the replacement I located I decided to reinstall it. If you purchase one you will have to spring load it, and by being able to reuse mine I didn't have to figure that part out.
B5.) Make sure you lubricate the slides and all moving parts with non-hardening grease.
C). Installing the regulator. Either have rivets or � 20 by � inch machine screw and lock nuts ready. Most of it is the reverse of the removal.
C1.) I again collapsed the bars and taped them.
C2.(LOAD THE SPRING ---AGAIN YOU WILL NEED TO USE EXTREME CAUTION HERE WITH THE C-spring. This was tricky. I found my smallest vice grip and pulled the spring till I had it set so that the bolt was in the top and used the vice to hold it (it took a few tries doing it by myself, if you have someone available to hold it for you I would recommend
that).
C3.) I carefully slipped it in the door and got the attached bolt in place first and loosely connected it. I then carefully reached in through the speaker access and put in the next screws that were easily reachable.
C4.) I then removed the vice grip and added the last screw (it had been blocked by the vice and I didn't want to accidentally release it until it was secure) and tightened all screws.
4) Reinstall everything in the reverse.
Test everything, align if necessary before closing it all up.
SPONSORED LINKS
Friday, July 4th, 2008 AT 1:47 PM