Camshaft timing marks?

Tiny
CSULTZER
  • MEMBER
  • 2002 FORD ESCORT
The timing went out on a friends 2002 ford escort zx2.
My husband is trying to fix it but can't find the timing marks on the cam shafts.
He has looked and looked and looked and swears that they aren't there.
They have to be there in order for it to have worked before the timing went out right?
How do we find these marks?
Sunday, November 8th, 2009 AT 2:39 PM

32 Replies

Tiny
DOCFIXIT
  • MECHANIC
  • 18,828 POSTS
See diagram


https://www.2carpros.com/forum/automotive_pictures/198357_Graphic_229.jpg


Warning may have bent valves also good time to hang a water pump on it
Was this
answer
helpful?
Yes
No
Sunday, November 8th, 2009 AT 2:50 PM
Tiny
JAEDENS
  • MEMBER
  • 2 POSTS
  • 2001 FORD ESCORT
  • 4 CYL
  • 2WD
  • AUTOMATIC
  • 82,000 MILES
How can I know that I am timing the cams to TDC on the "compression" stroke. Does it make a difference since the pistons are in the same position on compression and exhaust strokes?
Was this
answer
helpful?
Yes
No
Monday, September 28th, 2020 AT 10:37 AM (Merged)
Tiny
BILLYMAC
  • MECHANIC
  • 2,204 POSTS
HI
wow that is an excellent question and you are right. The eng is always at tdc when number 1 piston is up. BUT the valves are not but when the valves are both closed this makes compression. The easiest way is remove the number one plug put your finger at the hole bump the eng over when the pressure blows your finger away from the hole you are on comp. Now by hand or wrench turn eng until timeing marks align on cam and crank. You are exactly on tdc comp stroke.

Good luck billymac
Was this
answer
helpful?
Yes
No
-1
Monday, September 28th, 2020 AT 10:37 AM (Merged)
Tiny
JAEDENS
  • MEMBER
  • 2 POSTS
Thanks, Billymac. But this is an engine with a variable Exhaust cam. The Crank is postioned and then both cams can be freespun (no keys or pins between sprocket and camshafts) So, both cams are ONLY held by clamping force. Once the crank is positioned, the cams are aligned with guides in the rear of the shafts. The cams can be torqued anywhere. Most people say that since it is electronical ignition, TDC on either stroke will work.
Was this
answer
helpful?
Yes
No
Monday, September 28th, 2020 AT 10:37 AM (Merged)
Tiny
LADY K
  • MEMBER
  • 2 POSTS
  • 2001 FORD ESCORT
2001 Ford Escort Four Wheel Drive Automatic

I need to know timing marks for ford escort 2.0 2001 model
Was this
answer
helpful?
Yes
No
Monday, September 28th, 2020 AT 10:38 AM (Merged)
Tiny
BMRFIXIT
  • MECHANIC
  • 19,053 POSTS
Click @ the link below should have all you are looking for
https://www.2carpros.com/car_repair_information/year/2001/make/ford/model/escort/2001_ford_escort_timing_belt_diagram_marks.htm
Was this
answer
helpful?
Yes
No
Monday, September 28th, 2020 AT 10:38 AM (Merged)
Tiny
DAVE5150
  • MEMBER
  • 2 POSTS
  • 2001 FORD ESCORT
  • 4 CYL
  • FWD
  • AUTOMATIC
  • 70,000 MILES
How do you change a timing belt in a 2001 escort zx2
Was this
answer
helpful?
Yes
No
+1
Monday, September 28th, 2020 AT 10:38 AM (Merged)
Tiny
BMRFIXIT
  • MECHANIC
  • 19,053 POSTS
1.Disconnect negative battery cable. Remove spark plugs. Raise and support vehicle. Remove catalytic converter. Remove splash shield. Rotate crankshaft to TDC of No. 1 cylinder. Install TDC Timing Peg (T97P-6000-A) in hole at lower right of block. See Fig. 1 .


https://www.2carpros.com/forum/automotive_pictures/99387_Graphic1_50.jpg


Rotate crankshaft clockwise against timing peg. See Fig. 2 . Lower vehicle.


https://www.2carpros.com/forum/automotive_pictures/99387_Graphic2_28.jpg


2.Drain cooling system. Loosen water pump pulley bolts. Remove accessory drive belt. Remove drive belt idler pulley from generator mounting bracket. Remove bolts and position A/C compressor out of the way. Remove water pump pulley.
3.. Disconnect wiring connector at Variable Camshaft Timing (VCT) solenoid. Disconnect crankcase ventilation hose from fitting on valve cover. Position accelerator and speed control cables aside. Disconnect spark plug wires from spark plug wire brackets on valve covers. Remove bolt, nut and front support isolator damper. Remove upper timing belt cover. Remove valve cover bolts in a diagonal pattern working inward. Remove valve cover and gasket.
4.Raise and support vehicle. Remove center timing belt cover. Remove crankshaft pulley. Remove lower timing belt cover. Use Camshaft Alignment Timing Tool (T94P-6256-CH) to align camshafts. Install tool in slots on camshafts at rear of engine. See Fig. 3 .


https://www.2carpros.com/forum/automotive_pictures/99387_Graphic3_13.jpg


5.Loosen timing belt tensioning pulley bolt. Disconnect tensioner tab from timing cover back plate to relieve tension on timing belt. If reusing timing belt, mark direction of rotation before removal. Remove timing belt.
6.Remove camshaft alignment tool. Remove bolt and intake camshaft timing sprocket. Remove VCT oil plug, bolt and exhaust camshaft sprocket.
Installation

1.Ensure crankshaft pulley timing marks are aligned. Use Camshaft Alignment Timing Tool (T94P-6256-CH) to align camshafts. Install tool in slots on camshafts at rear of engine. Ensure camshafts are aligned. Install intake timing sprocket and loosely install bolt. Rotate oil control bushing one complete turn and check for binding. Position bushing with single hole in 12 o'clock position.

CAUTION:
The VCT sprocket has a rectangular tab on the backside of the sprocket which must align with the hole on the front face of the thrust bushing. Failure to align may result in poor engine performance.

2.Install NEW exhaust sprocket "O" ring. Install exhaust sprocket. Ensure tab on sprocket engages hole in oil control bushing. Loosely install sprocket bolt. Loosely install timing belt tensioner. Install timing belt. See Fig. 4 .


https://www.2carpros.com/forum/automotive_pictures/99387_Graphic4_6.jpg


Engage timing belt tensioner tab into upper timing cover backplate. Using 6-mm Allen wrench, adjust timing belt tensioner until marks are aligned. See Fig. 5 .


https://www.2carpros.com/forum/automotive_pictures/99387_Graphic5_2.jpg


Tighten bolt to 17-20 ft. lbs. (22-28 N.m).
NOTE: Camshaft must be held stationary with an open end wrench. DO NOT use alignment tool to hold camshaft in position, as damage to camshaft may occur.
3.Tighten intake camshaft sprocket bolt to 50 ft. lbs. (68 N.m). Tighten exhaust camshaft sprocket bolt to 36 ft. lbs. (50 N.m). Remove camshaft alignment tool and timing peg. Retighten exhaust camshaft sprocket bolt to 85-92 ft. lbs. (115-125 N.m). Install Variable Cam Timing (VCT) oil plug, if necessary.
4.Ensure second crankshaft timing mark is aligned with raised mark on oil pan. Position crankshaft just prior to TDC. Install TDC timing peg. Rotate crankshaft clockwise against peg. Ensure camshafts are aligned. If crankshaft and camshaft are misaligned, repeat procedure until alignment is correct.
5.When alignment is correct, complete installation by reversing removal procedure. When installing valve cover, clean gasket mating surfaces before installing NEW gasket. Install and tighten valve cover bolts in a diagonal pattern starting from the inside working outward. Tighten all nuts and bolts to specification.
Was this
answer
helpful?
Yes
No
Monday, September 28th, 2020 AT 10:38 AM (Merged)
Tiny
ECRICKET77
  • MEMBER
  • 1 POST
  • 2001 FORD ESCORT
  • 4 CYL
  • FWD
  • AUTOMATIC
  • 111,000 MILES
I need to replace the tiiming belt. There are two fasteners on the lower timing belt cover that I can not get a wrench on. One nearest the firewall is so tight that I can not get a wrench or flex socket near it. Any suggestions?
Was this
answer
helpful?
Yes
No
Monday, September 28th, 2020 AT 10:38 AM (Merged)
Tiny
DAVE H
  • MECHANIC
  • 13,383 POSTS
Removal (Escort & Tracer)
Disconnect negative battery cable. Place cylinder No. 1 to TDC of compression stroke. Remove accessory drive belt and tensioner. Remove timing belt cover. Raise and support vehicle. Remove right hand splash shield. Remove crankshaft pulley. Align timing marks. See Fig. 1.
Loosen timing belt tensioner. Using an 8-mm hex wrench, turn tensioner 1/4 turn counterclockwise. Insert 1/8 drill bit to lock tensioner in place. See Fig. 2. If reusing old belt, mark belt with arrow to indicate original direction of rotation. Remove timing belt.
Fig. 1: Aligning Crankshaft & Camshaft Timing Marks
Courtesy of FORD MOTOR CO.
Fig. 2: Identifying Timing Belt Tensioner
Courtesy of FORD MOTOR CO.
Installation
Ensure timing marks are still aligned. Install timing belt in a counterclockwise direction starting at the crankshaft. If reusing old belt, ensure it is installed in original direction of rotation. Keep belt span between crankshaft and camshaft tight while installing timing belt over camshaft.
Remove drill bit and tighten tensioner bolt. Rotate crankshaft clockwise 2 revolutions. Recheck timing mark alignment. To complete installation, reverse removal procedure.


https://www.2carpros.com/forum/automotive_pictures/266999_cam_1.jpg


Fig. 2: Identifying Timing Belt Tensioner
Courtesy of FORD MOTOR CO.


https://www.2carpros.com/forum/automotive_pictures/266999_cam2_2.jpg


Installation
Ensure timing marks are still aligned. Install timing belt in a counterclockwise direction starting at the crankshaft. If reusing old belt, ensure it is installed in original direction of rotation. Keep belt span between crankshaft and camshaft tight while installing timing belt over camshaft.
Remove drill bit and tighten tensioner bolt. Rotate crankshaft clockwise 2 revolutions. Recheck timing mark alignment. To complete installation, reverse removal procedure.
Was this
answer
helpful?
Yes
No
Monday, September 28th, 2020 AT 10:38 AM (Merged)
Tiny
BEN3AMK
  • MEMBER
  • 1 POST
  • 2001 FORD ESCORT
2001 Ford Escort 4 cyl Front Wheel Drive 115000 miles

How do we set the timing on a Zx2 ford escort and is there markings to note how to set it?
Was this
answer
helpful?
Yes
No
Monday, September 28th, 2020 AT 10:38 AM (Merged)
Tiny
BMRFIXIT
  • MECHANIC
  • 19,053 POSTS
You need to remove the valve cover cover


https://www.2carpros.com/forum/automotive_pictures/99387_zx2_1.jpg


https://www.2carpros.com/forum/automotive_pictures/99387_zx21_1.jpg


https://www.2carpros.com/forum/automotive_pictures/99387_zx23_1.jpg

Was this
answer
helpful?
Yes
No
Monday, September 28th, 2020 AT 10:38 AM (Merged)
Tiny
KBK5
  • MEMBER
  • 1 POST
  • 2001 FORD ESCORT
  • 4 CYL
  • FWD
  • AUTOMATIC
  • 121,000 MILES
Whats the likelyhood that a timing belt faliure while driving will result in valve damage?
Was this
answer
helpful?
Yes
No
Monday, September 28th, 2020 AT 10:38 AM (Merged)
Tiny
BLUELIGHTNIN6
  • MECHANIC
  • 16,542 POSTS
Depends on the engine type really. For example, if it has the Ford 2.0L DOHC engine than there is a very good chance that there is internal damage because this is an interference designed motor. If it is the 1.8L or 1.9L then it should be fine because these are non-interference engines.
Was this
answer
helpful?
Yes
No
Monday, September 28th, 2020 AT 10:38 AM (Merged)
Tiny
VARELITA
  • MEMBER
  • 2 POSTS
  • 2001 FORD ESCORT
  • 4 CYL
  • FWD
  • AUTOMATIC
  • 760,000 MILES
Timing mark for a ford escort 2.0l
Was this
answer
helpful?
Yes
No
Monday, September 28th, 2020 AT 10:39 AM (Merged)
Tiny
RASMATAZ
  • MECHANIC
  • 75,992 POSTS
Check out the diagrams (Below). Please let us know if you need anything else to get the problem fixed.


https://www.2carpros.com/forum/automotive_pictures/12900_t1_17.jpg

Was this
answer
helpful?
Yes
No
Monday, September 28th, 2020 AT 10:39 AM (Merged)
Tiny
MRSBLANES
  • MEMBER
  • 1 POST
  • 2000 FORD ESCORT
  • 4 CYL
  • FWD
  • MANUAL
  • 155,000 MILES
I am replacing the head gasket on my 2000 Ford Escort ZX2 myself. I got to the part where I have to take the Camshafts off. I can not do it. Can you please tell me how? Also, my room mate is helping. Like a dummy, he took the timing belt off without knowing what he was doing. Now that it is off, I know nothing about resetting it. Can you tell me how? There are no marks, it wasn't made with them. Thanks!
Was this
answer
helpful?
Yes
No
Monday, September 28th, 2020 AT 10:39 AM (Merged)
Tiny
BMRFIXIT
  • MECHANIC
  • 19,053 POSTS
Engine †2.0L Zetec 2000 Escort
IN-VEHICLE REPAIR

Cylinder Head

Special Tool(s) Disconnect Tool †3/8 Inch Fuel Line
310-D004 (D87L-9280-A) or equivalent
Disconnect Tool †1/2 Inch Fuel Line
310-D005 (D87L-9280-B) or equivalent

Removal

Disconnect the battery ground cable (14301).

WARNING: Fuel supply lines will remain pressurized for long periods of time after engine shut down. This pressure must be relieved before disconnecting any fuel lines or fuel system components.

Relieve the fuel system pressure.
Remove the engine air cleaner outlet tube.
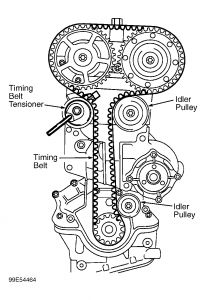
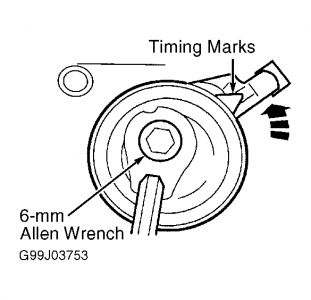
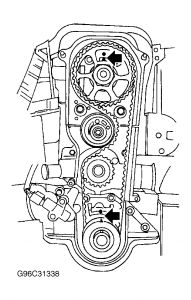
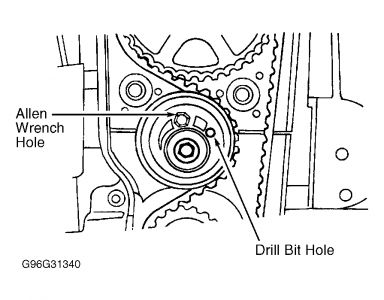
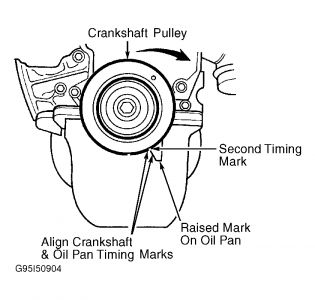
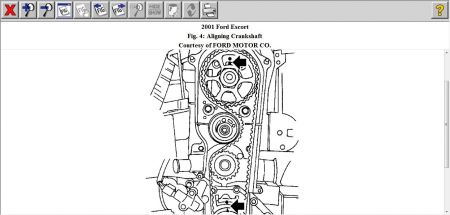
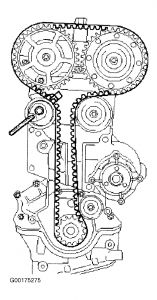
Remove the timing belt.
Remove the vacuum hoses at the:
positive crankcase ventilation (PCV) valve (6A666).
Throttle body (9E926).
Intake manifold (9424).
Fuel pressure sensor.
Disconnect the fuel charging wiring (9D930) electrical connectors at main engine connector.

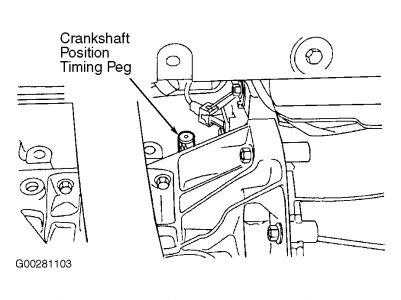
Disconnect the crankshaft position (CKP) sensor electrical connector.

Disconnect the fuel line.
Remove the power steering pump (3A674) and bracket as an assembly.
Remove the generator (GEN).
Remove the oil level indicator tube (6754).
Disconnect the heater hoses.
Lower the vehicle.
Disconnect the upper radiator hose (8260) from the thermostat housing water hose connection.
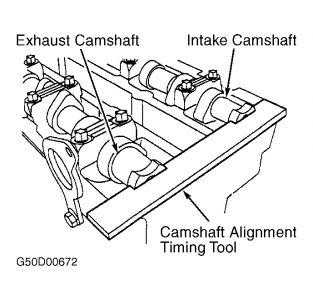
Remove the camshafts (6250).
Remove the ignition coil (12029) and bracket.
Remove the water thermostat housing.
Disconnect the knock sensor electrical connector.
Remove the generator bracket-to-cylinder head bolt.
Remove the bolts and the cylinder head (6049).
Remove the cylinder head gasket and discard.
Installation

WARNING: Do not smoke or carry lighted tobacco or open flame of any type when working on or near any fuel related components. Highly flammable mixtures are always present and may be ignited, resulting in possible personal injury.

CAUTION: Do not use abrasive grinding discs to remove gasket material; use only plastic manual scrapers. Do not scratch or gouge the aluminum sealing surfaces.

Clean all gasket material from the mating surfaces on the cylinder head and cylinder block. Clean out the bolt holes in the cylinder block. Inspect the cylinder head for flatness. For additional information, refer to Section 303-00.
Install a new head gasket on the cylinder block.
CAUTION: Do not attempt to install the cylinder head assembly without assistance. Installation of the cylinder head assembly requires two people or possible injury may occur.

CAUTION: The bolts are torque-to-yield and must be replaced or engine damage may occur.

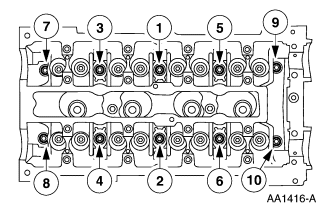
Tighten the bolts in three stages in the sequence shown.
Stage 1: Tighten the bolts to 15-25 Nm (12-18 lb-ft).
Stage 2: Tighten the bolts to 35-45 Nm (26-33 lb-ft).
Stage 3: Tighten the bolts an additional 105 degrees.

Install the generator bracket-to-cylinder head bolt.
Tighten to 20 Nm (15 lb-ft).
Connect the knock sensor electrical connector.
Install the thermostat housing.
Install the ignition coil and bracket.
Install the camshafts.
Connect the upper radiator hose.
Raise and support the vehicle.
Install the heater hoses.
Install the generator and bracket assembly.
Install the power steering pump and bracket assembly.
Connect the fuel lines.
Connect the crankshaft sensor electrical connector.

Connect the fuel charging wiring connectors.

Connect the vacuum hoses at the positive crankcase ventilation (PCV) valve, throttle body, intake manifold and fuel pressure sensor.
Install the engine oil level indicator tube and bolt.

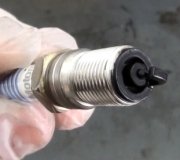
Install new spark plugs.
Install the air cleaner outlet tube.
Drain the engine oil and install a new oil filter.
Fill the crankcase with Super Premium 5W30 SAE Motor Oil XO-5W30-QSP or equivalent meeting Ford specification WSS-M2C158-G.
Connect the negative battery cable.
Fill and bleed the power steering system.
Fill the engine cooling system.
Charge the A/C system.
Run the engine and inspect for leaks.
Was this
answer
helpful?
Yes
No
Monday, September 28th, 2020 AT 10:39 AM (Merged)
Tiny
KRISHAS
  • MEMBER
  • 1 POST
  • 2000 FORD ESCORT
Engine Mechanical problem
2000 Ford Escort 4 cyl Front Wheel Drive Automatic 144k miles

where are the timing marks on the escort zx2 DOHC? We cannot seem to see them where should we be looking?
Was this
answer
helpful?
Yes
No
Monday, September 28th, 2020 AT 10:39 AM (Merged)
Tiny
BMRFIXIT
  • MECHANIC
  • 19,053 POSTS
Check it also at
https://www.2carpros.com/car_repair_information/tec_info/2000/ford/escort/2000_ford_escort_timing_belt_diagram_marks.htm


https://www.2carpros.com/forum/automotive_pictures/99387_Graphic1_133.jpg


https://www.2carpros.com/forum/automotive_pictures/99387_Graphic2_69.jpg


https://www.2carpros.com/forum/automotive_pictures/99387_Graphic3_32.jpg


https://www.2carpros.com/forum/automotive_pictures/99387_Graphic4_16.jpg


https://www.2carpros.com/forum/automotive_pictures/99387_Graphic5_6.jpg


TOOLS NEEDED


https://www.2carpros.com/forum/automotive_pictures/99387_Untitled1_5.jpg

Was this
answer
helpful?
Yes
No
+5
Monday, September 28th, 2020 AT 10:39 AM (Merged)

Please login or register to post a reply.

Sponsored links