This is an old question. You really should start a new question specific to your vehicle, engine size, and concern, but since you're already here, I strongly recommend you do not mess with the petcock on the radiator. In the 1990s we had a rash of failures after they were opened. It seems the rubber o-ring on the petcock gets pushed up against a part of the plastic tank when it is closed and that part can crack, leading to a leak. The drip occurs about once every five seconds. The fix is to replace the radiator. I don't know if that is still a problem, but I haven't opened a petcock in over 20 years. Pull the lower radiator hose off on one end instead.
JACOBANDNICKOLAS's comment about sticking to a 50 / 50 mix of water and antifreeze is correct. Straight water freezes at 32 degrees. Straight antifreeze freezes at around minus 10 to 15 degrees. The lowest freeze point is achieved when the two are mixed to a 70 percent antifreeze mixture. That is good for minus 50 degrees, but there's a catch. Coolant is supposed to absorb heat and carry it to the radiator. Antifreeze is very inefficient at doing that, so too much antifreeze can lead to overheating, even on a cold day. Also, do you really plan on driving anywhere if it's minus 50 degrees? Water is very efficient at moving heat to the radiator, so you want as much as possible in the mixture.
Antifreeze also contains additives specific to the needs of various engines. One of those is water pump lubricant, but the most important one is corrosion inhibitors. Acids naturally form in the coolant. Two different metals and an acid is a basically a battery, and the "galvanic action" that takes place is corrosion. There's brass, tin, aluminum, and iron in the cooling system. The additives that fight that corrosion wear out in about two years. That's why we replace the antifreeze.
In the original question, the use of tap water was brought up. Distilled water is best for a car battery because some chemicals could reduce the effectiveness of the acid, but in the radiator there is no such concern. I have never seen anyone put in anything other than water from a garden hose.
The question about the water left in the block after a flush is a legitimate question, and one I always had at the dealership. Also, the job can be done without installing the "tee" mentioned. I prefer to remove one heater hose at the engine, not at the heater core. Those hoses stick and need some serious wrestling to get them loose. I worry about breaking the solder connection on the pipe on the heater core. Also, some heater core nipples are plastic, especially on GM vehicles. If you break one of those, you're in for a day-long repair to remove the dash assembly and heater box to replace the heater core. The other problem with the "tee" is you have no control over which way the flushing water is going to go.
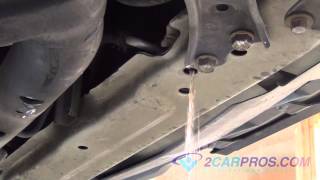
Remove the lower radiator hose first but leave the radiator cap on tight. If you're lucky, the coolant will siphon out of the reservoir. I used a pressure washer at the dealership to clean as much as possible of the reservoir. Once done, disconnect the small hose from the radiator, hold it down as far as possible, then force a little compressed air or water from the hose into the reservoir. Once the water is flowing through the hose, it will siphon the reservoir empty.
Remove the cap from the radiator, then use the garden hose to run water into the heater hose you disconnected. That will wash any sediment out of the heater core. Next, run water into the port on the engine where you removed the hose from.
Reconnect the radiator hose but don't bother with the clamp yet. Run water in those same two places until it overflows at the top of the radiator. You'll probably need to hold your finger over the end of the hose when pushing water into the port on the engine, and the same when pushing water into the hose. If you see debris popping up at the radiator in the water that's running out, keep on alternating where you're putting water in until you only get clear water. At this point the cooling system is a real lot cleaner than when the vehicle was new. Casting sand from when the engine block was made always gets stuck in a few places, and that will be washing out now.
I like to stuff a rag into the port on the engine, then remove the lower radiator hose again. The water rushing out of the engine will tend to pull the water out of the heater core to. If you're really fussy, you can blow compressed air into the heater hose, but don't form a tight seal to the hose. I prefer to hold the hose with my hand so some air can escape through my fingers. You don't want to put more than 15 pounds of pressure in there.
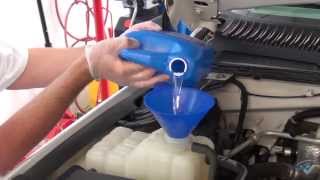
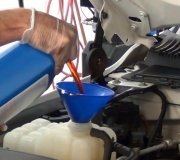
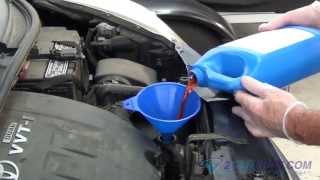
The only way to get all the water out of the system is to stand the vehicle up on the front bumper! (Not very practical). No need to worry about getting every last drop out when you're about to put water back in. Reattach the lower radiator hose, reservoir hose, and the heater hose. Start by adding one full gallon of straight antifreeze. Don't fall for that pre-mixed stuff. You're paying almost full price but getting a half gallon of water. That will be counter-productive to the next steps.
Now add a full gallon of straight water. Chances are with a V-8 engine you won't get it all in. For sure you won't with a four-cylinder engine. At this point burping the air out becomes a concern. Typically you don't have to do anything to V-6 and V-8 engines, but if this is required on a certain engine, you can expect to find a bleeder screw on the thermostat housing. This was definitely required on the older Chrysler 2.2L and 2.5L engines. For that purpose there was a Allen-head threaded plug, and sometimes two of them, right by the thermostat housing. If they were too difficult to remove, there was also one or two thermostaic switches and / or temperature sensors that could be unscrewed. If you do have something to remove to bleed the system, keep filling until coolant runs out of that hole. At that point liquid has reached the thermoistat and the plug can be reinstalled. If you do manage to get the whole gallon of water into the system, continue on with a half gallon of antifreeze, then a half gallon of water. The secret to my madness is to not put anything in the reservoir, ... Yet.
Start the engine and let it warm up. Watch the temperature gauge for signs of overheating. If you see that, you do indeed need to open something by the thermostat to bleed the air out. Thermostats need to be hit with hot liquid to open. Hot air won't do it. If the upper radiator hose gets hot, coolant is circulating. If no coolant is overflowing at the radiator, add water and antifreeze alternately until it's nearly full. More commonly you'll find the coolant is expanding and overflowing. Place a piece of cardboard, such as the flap from an oil filter box, on the neck of the radiator and hold it down with a small weight, or, ... If you're in a hurry, hold it down with one hand, and squeeze the upper hose with your other hand. That will push the excess coolant into the reservoir.
At this point, if it's my car or a dealer's trade-in, I prefer to drive it for a day or two. Obviously we can't do that with customers' cars. That insures the coolant is well-mixed. The last step is to measure the freeze point. Typically you'll find it to be close to minus 20 to 25 degrees due to the water in the block you started with. Now you have the empty reservoir to add antifreze or water, as necessary, to bring the freeze point down to minus 35 degrees. Don't bother measuring the freeze point for a few days. The engine will need to go through multiple warm-up / cool-down cycles to draw in whatever you put in the reservoir.
For my final comment of great value, be aware that antifreeze is heavier than water, and the common freeze-point testers we use measure the weight of the mixture in relation to the weight of water to determine that freeze point. Once you go beyond roughly 60 percent antifreeze, the actual freeze temperature starts to go back up closer to minus 10 degrees, but the weight being measured shows the freeze point is going colder, toward minus 70 degrees. You can verify that by measuring straight antifreeze and finding a REALLY low freeze point the lowest the tester will read, yet that bucket of antifreeze will freeze into a slush by minus 10 or 15 degrees. Those testers are not accurate beyond minus 50 degrees. If you really want to know the true freeze point, you need a tool called a "refractometer". That has a sight glass that must be perfectly clean with no contaminants, then you place one drop of mixture on the glass, close the lid, then you sight through it. Part of the window will be bright, and part will be dark. Read the freeze point on the scale right next to that dividing line between the light and dark sections. Very few shops use these because of the cost, complexity, and time it takes to use it properly. For our needs, the hardware store testers are more than adequate.
Monday, April 16th, 2018 AT 6:21 PM