Aiming the head lamps

Tiny
MARCSORENSON
  • MEMBER
  • 2001 CHEVROLET VENTURE
  • 6 CYL
  • FWD
  • AUTOMATIC
  • 122,000 MILES
Aiming the head lamps properly is not hard using the adjusting screws, but one must have a plane of reference to do this correctly. A flat surface in front of the bumper at distance X (some 5' to 10') and the height above the floor at that point to calebrate the low beam. Also the distance left or right of straight ahead for each lamp at low beam. Presumably, once the low beam is set, the high beam takes care of itself.

Thanks a lot, Marc Sorenson
Saturday, May 30th, 2009 AT 3:58 PM

5 Replies

Tiny
BRIAN 1
  • MECHANIC
  • 1,030 POSTS


https://www.2carpros.com/forum/automotive_pictures/147643_aimer_1.jpg

Locate the vehicle so that it is square with the screen and the front of the headlamps, directly over a reference line which has been painted on the floor.
Locate the center line on the aiming screen so that the aiming screen is in line with the center of the vehicle.
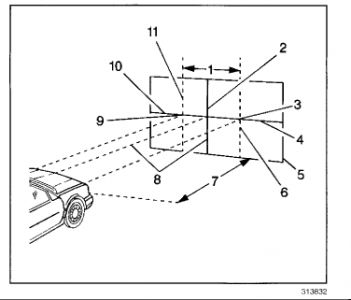
2.1. Mark the center of the front and rear windows with narrow strips of masking tape.
2.2. Use the masking tape strips in order to locate the center line (2) of the aiming screen directly in line with the vehicle axis (8).

Equipment Needed

A marked screen
An adequate test area
Aiming Area Required

A specific aiming area in a darkened location is desired. Ensure that the room is sufficient for the vehicle and for an additional 7.6 m (25 ft) measured from the face of the lamps to the front of the screen.
Ensure that the floor on which the vehicle rests is flat and level with the bottom of the screen. If the floor is not level, compensate. Aiming Screen
Ensure that the screen includes the following provisions:
Is 1.5 m (5 ft) high and 3.6 m (12 ft) wide
Has a matte white surface well shaded from extraneous light
Is properly adjusted to the floor on which the vehicle stands
Make provisions for moving the screen so that it can be aligned parallel with the rear axle.
Make provisions for moving the screen so that a horizontal line drawn perpendicularly from the centerline of the screen will pass an equal distance midway between the two headlamps.
The screen is provided with the following components:
A fixed vertical centerline
Two laterally adjustable vertical tapes
One vertically adjustable horizontal tape
If a regular commercial aiming screen is not available, the screen may consist of a vertical wall having a clear uninterrupted area of approximately 1.8 m (6 ft) high and 3.6 m (12 ft) wide. Finish the surface with a washable non-gloss white paint.
After the aiming screen has been set up, paint a reference line on the floor directly under the lens of the lamps in order to indicate the proper location of the headlamps when they are being aimed.
Was this
answer
helpful?
Yes
No
-1
Saturday, May 30th, 2009 AT 5:58 PM
Tiny
MARCSORENSON
  • MEMBER
  • 3 POSTS
Your reply was a good discusion for setting up the aiming screen, but no mention of the correct aiming for MY car. Is it STRAIGHT AHEAD for high beams and low beams fall where they may (low and to the left)? Does one aim the low beam low and to the left first? If the high (or low) beam is not aimed STRAIGHT AHEAD how much is the offset from dead center on the aiming screen?
Was this
answer
helpful?
Yes
No
-1
Saturday, May 30th, 2009 AT 11:02 PM
Tiny
BRIAN 1
  • MECHANIC
  • 1,030 POSTS
Sorry, this might help. With the vehicle properly located and loaded, switch the headlamps to low beam.
Observe the left and the top edges of the high intensity zone on the screen.
The edges of the high intensity zone should fall within the specifications.

If any adjustments are needed, perform the adjustment in the following manner:
"Â For horizontal adjustments, make the adjustment with the inner adjustment screw.

"Â For vertical adjustments, make the adjustment with the upper adjustment screw
Was this
answer
helpful?
Yes
No
-1
Sunday, May 31st, 2009 AT 9:13 AM
Tiny
MARCSORENSON
  • MEMBER
  • 3 POSTS
OK, I had hoped for something more specific than "fall within specs". I tried you guys because I did not want to spend $20 or $30 on the repair manual to find out this one dimension. I was forced to drive to the local "Advanced Auto Parts" to sneak a peak at the Chevy Van repair manual on the display rack to find out that on low beams, the center of the high intensity zone (25 feet from the lense) should be 2" below and 2" to the right of straight ahead.
Was this
answer
helpful?
Yes
No
+1
Sunday, May 31st, 2009 AT 1:53 PM
Tiny
BRIAN 1
  • MECHANIC
  • 1,030 POSTS
Sorry marc but without a headlight aimer this is all the info that is out there, the other procedure requires the headlight aimer kit. When you use the info I gave you the low beam needs to be in the intensity zone, on the picture that I posted, if there out of adjustment, adjust acordingly. All the info is straight from the manufacturer, I dont think you will find an info more specific. Post back with anymore questions.
Was this
answer
helpful?
Yes
No
Sunday, May 31st, 2009 AT 2:18 PM

Please login or register to post a reply.

Sponsored links