Removal Procedure
1.Remove the oil level indicator.
2.Raise and support the vehicle. Refer to Vehicle Lifting.
3.Remove the front skid plate from the vehicle (if equipped).
4.Remove the front axle assembly from the chassis (4WD only). Refer to Front Axle Housing Replacement.
5.Remove the steering gear. Refer to Power Steering Gear Replacement.
6.Drain the engine oil.
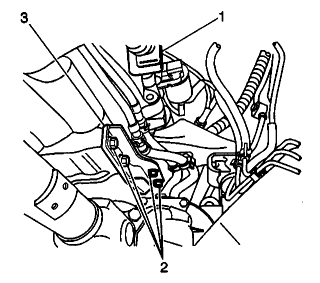
7.Remove the 4 bolts and the right side engine block-to-transmission support bracket (3).
8.Remove the flywheel cover.
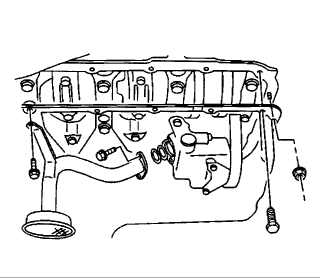
9.Remove the 16 bolts and the 2 nuts from the lower cylinder block: Notice: Do not damage the oil pan contact surface of the lower cylinder block when removing the oil pan.
10.Carefully remove the engine oil pan.
11.Remove the 3 bolts and the oil pump strainer.
12.Clean the following components:
**The inside of the engine oil pan
**The oil pump strainer screen
**The mating surfaces of the engine oil pan and the lower cylinder block
Installation Procedure
1.Install new O-rings and install the oil pump strainer to the oil pump. Notice: Refer to Fastener Notice in Service Precautions.
2.Install and tighten the 2 strainer bolts first and then the bracket bolt.
**Tighten the 3 bolts to 11 Nm (97 inch lbs.).
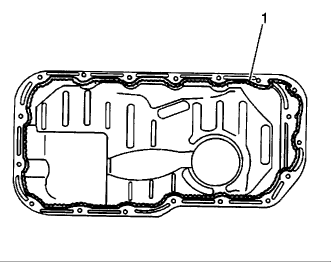
3.Apply a continuous bead of silicon sealant (1) GM P/N 12345997, or an equivalent, to the engine oil pan mating surface.
4.Install the engine oil pan. Secure with the 16 bolts and 2 nuts.
**Tighten the engine oil pan bolts and nuts to 11 Nm (97 inch lbs.) .
5.Install the engine oil gasket and drain plug.
**Tighten the engine oil drain plug to 35 Nm (26 ft. lbs.) .
6.Install the flywheel cover.
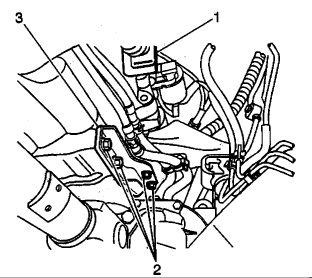
7.Install the right side engine block-to-transmission support bracket (3).
**Tighten the engine block-to-transmission support bracket bolts to 50 Nm (37 ft. lbs.) .
8.Install the front axle assembly to the chassis on four wheel drive vehicles. Refer to Front Axle Housing Replacement.
9.Fill the differential on four wheel drive vehicles. Refer to Lubricant Level Check.
10.Install the steering gear. Refer to Power Steering Gear Replacement in Steering and Suspension.
11.Bleed the power steering system. Refer to Bleeding Power Steering System.
12.Install the front skid plate to the vehicle (if equipped).
13.Install the oil level indicator.
14.Lower the vehicle.
15.Fill the crankcase with engine oil.
16.Inspect for correct engine oil level and pressure, and for fluid leaks. Adjust the front toe-in. Refer to Front Toe Adjustment.
https://www.2carpros.com/kpages/auto_repair_manuals_alldata.htm
SPONSORED LINKS
Sunday, May 23rd, 2010 AT 5:28 PM