1997 Chevy 7.4L 454 Vortec Rebuilt will not start

Tiny
LEWISAHALE
  • MEMBER
  • 1997 CHEVROLET SILVERADO
  • V8
  • 4WD
  • AUTOMATIC
  • 109,000 MILES
I just rebuilt a 1997 Chevy 7.4L 454 Vortec and when I placed it back in the truck I was unable to start the truck. It ran when I pulled it out, it had a spun bearing. I noticed that when I turned the key that I don’t get any response on the dash board other than the light indicator for the automatic transmission gear. The check engine light does not come on and the gauges don’t move.

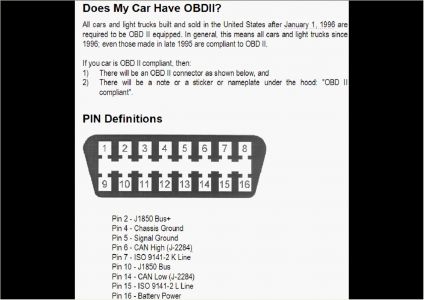
I used my ODB II Scanner and there are no codes, however when I check the “I/M" status I get O2S Not RDY, HO2S Not RDY, and EGR Not RDY.

I verified that I have 12Volts to the Fuse Panel next to the ECM. Traced every wire and found each wire connected. I did have to crimp a new ground connector near the lefts side of the water inlet on the intake.

Any thoughts?

I do have spark at the plugs, I also noticed that the tach nor any of the other guages appear to be working. I woudl think it aws the ECM causing the problem. However I had the truck running before I took it apart.

There is an aftermarket remote starter on the truck. Not sure if this woul dhave anything to do with it or not but nothing was touched other than pulling the engine for a rebuild.

6/7/10 Update:
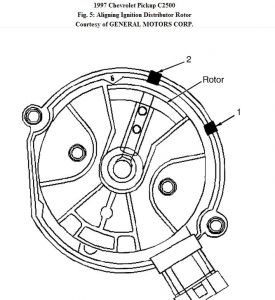
I verified TDC today. I still think the root problem will be solved once I find what would cause the dash lights from coming on when the ignition is in the ON position. Does anyone know what would cause the lights and the guages not to respond when you turn the key on?
Saturday, June 5th, 2010 AT 12:13 PM

16 Replies

Tiny
MERLIN2021
  • MECHANIC
  • 17,250 POSTS
Check for power at pin 16 on the DLC, and pins 4 and 5 for ground.


https://www.2carpros.com/forum/automotive_pictures/62217_OBD_II_Connector_2.jpg

Was this
answer
helpful?
Yes
No
+5
Wednesday, September 2nd, 2020 AT 5:45 PM
Tiny
LEWISAHALE
  • MEMBER
  • 9 POSTS
I checked Pin 16 with my volt meter and it shows just over 12Volts using the e-brake as a ground.

Checked Pins 4 and 5 as ground and get 0 volts grounding to e-brake and 12V connected to Pin 16

I have a spare wiring harnes and I traced every connector to be sure everything was connected. There are 3 grounds coming off the Wire harness to the engine compartment. All have been verified to be good grounds.

I checked spark to plug #1 and I am getting spark. The motor seems to be hard turning, I did a complete motor refresh so its possible that there is just that much compression.

Thanks for the quick reply.
Lewis
Was this
answer
helpful?
Yes
No
+1
Wednesday, September 2nd, 2020 AT 5:45 PM
Tiny
MERLIN2021
  • MECHANIC
  • 17,250 POSTS
Slow crank? Timing advanced too far. Or maybe a bad crank sensor. Main and connecting rod caps put back on right?
Was this
answer
helpful?
Yes
No
Wednesday, September 2nd, 2020 AT 5:45 PM
Tiny
LEWISAHALE
  • MEMBER
  • 9 POSTS
My thought is to correct the problem that I have no check engine light when I turn the key to the on position.

I can replace the crank sensor, the one that is on it now was from a motor that I did not hear run.

The main and connecting rod caps are on correctly.
Was this
answer
helpful?
Yes
No
Wednesday, September 2nd, 2020 AT 5:45 PM
Tiny
MERLIN2021
  • MECHANIC
  • 17,250 POSTS
Start by checking all fuses under the hood and in the cab marked ign or cigar.
Was this
answer
helpful?
Yes
No
Wednesday, September 2nd, 2020 AT 5:45 PM
Tiny
LEWISAHALE
  • MEMBER
  • 9 POSTS
I checked all the fuses and all are good. I did not search for any fuzable links. Is that a possible problem area? If anyone can help me identify any fusable links and how to test them I would be veryu greatfull.

Should my ODB II Tester be giving me the status of Not RDY (Assume Not Ready) for the O2S and EGR?

How could I tell if the distributor is 180deg out? My thought is that it is something electrical not with the rebuild.

Thanks for helping me walk through this;
Lewis
Was this
answer
helpful?
Yes
No
+2
Wednesday, September 2nd, 2020 AT 5:45 PM
Tiny
MERLIN2021
  • MECHANIC
  • 17,250 POSTS
Put #1 at TDC and check position of rotor, should be firing #1
Was this
answer
helpful?
Yes
No
Wednesday, September 2nd, 2020 AT 5:45 PM
Tiny
LEWISAHALE
  • MEMBER
  • 9 POSTS
Do you have any thought on what would cause the Check Engine Light and the Guages not to respond when the Ignition key is turned to the On Position?

I think this is the root of my troubles.

Thanks; Lewis
Was this
answer
helpful?
Yes
No
-1
Wednesday, September 2nd, 2020 AT 5:45 PM
Tiny
MERLIN2021
  • MECHANIC
  • 17,250 POSTS
It would be most likley a pinched wire, or an un attached ground.
Was this
answer
helpful?
Yes
No
Wednesday, September 2nd, 2020 AT 5:45 PM
Tiny
LEWISAHALE
  • MEMBER
  • 9 POSTS
I have an wireing harness that I got with another 454 Vortec however it was a 2x4 not a 4x4. There is an extra connector on my ECM. I did however try to plug the one from the 2x4 truck into my truck. The electric fan on the front of the radiator came on as soon as it was plugged in.

I checked the spare wire harness and there are 3 grounds on it. I verified all 3 grounds are connected. 1 on each side of the water inlet and one at the bottom of the engine near the balancer.

I was very careful placing the engine into the truck and didn't pinch any wires. All wires have been checked and are free of any binding.

Will the GM Dealer be able to test the ECM if I hand deliver it? Or will they need the truck to connect?

I changed the Crank Position Sensor with a known working one and still get no lights on the guages.

Lewis
Was this
answer
helpful?
Yes
No
+1
Wednesday, September 2nd, 2020 AT 5:45 PM
Tiny
LEWISAHALE
  • MEMBER
  • 9 POSTS
Well, the root problem was discovered. I went to a local salvage lot and purchased an ECM to test. It didn't work either. So I started all over again with starting at the fuze box inside. I pulled the trusty manual out of the glove box and found the fuze box layout. And sure enough the fuze for the gauges was missing. So I placed a fuze in block #4 and sure enough I have idiot lights. I bought the truck on eBay, I guess I didn't notice the guages when I drove the truck into the garage.

So now that I found that problem, I discovered the real problem. I used the Hayes Manual to set TDC bu aligning the dots on the Cam and Crank. Turns out I was 180 deg out on the timing.

It's running now. However I have a new question. I've had this distributor in/out so many times today that its getting to easy to do. I can seem to get it right. With my timing light I'm about 3" retarded in timing.

I figured I was 1 tooth out on the distributor but I've tried movign it each direction and can't get it to line up on the timing light.

The rotor button shoudl point to Cylendar# 1 correct. The distributor has what looks like an 8 where #1 plug connects. I assume this is a symbol for TDC not cylendar# 8.

I installed a billit distributor and it came with a lock plate that didn't alow for an adjustment. Should I set it where the rotor points to Cyl#1 and the 8 on the Distributor and let the computer adjust to it?

Thanks for giving me a place to type this out.

Lewis
Was this
answer
helpful?
Yes
No
Wednesday, September 2nd, 2020 AT 5:45 PM
Tiny
MERLIN2021
  • MECHANIC
  • 17,250 POSTS
All you can do is set it timing is not adjustable, and is controlled by the PCM-VCM
IGNITION DISTRIBUTOR Removal 1. Turn ignition off. Disconnect harness connectors from distributor. Remove distributor cap. Use a grease pencil to note position of rotor in relation to the distributor housing. Identify the mark with the number "1". See Fig. 5 . Mark distributor housing and intake manifold with a grease pencil for proper alignment when reinstalling. Remove mounting clamp hold down bolt. 2. As distributor is being removed from engine, you will notice the rotor will move in a counterclockwise direction about 42 degrees. This will appear as slightly more than 1 o'clock position. Note position of rotor segment by placing a second mark on the distributor base. This will aid in achieving proper rotor alignment during distributor installation. Identify the second mark on the distributor housing as number "2". Remove distributor assembly. Fig. 5: Aligning Ignition Distributor Rotor Courtesy of GENERAL MOTORS CORP. Installation 1. Align rotor with mark made at location 2. See Fig. 5 . 2. Guide distributor into place, making sure the mounting hole in the distributor hold down base is aligned over the mounting hole in the intake manifold. 3. As distributor is being installed, you will notice the rotor will move in a clockwise direction about 42 degrees. 4. Once distributor is completely seated, the rotor segment should be aligned with mark on the base in location number "1". If rotor is not aligned with the number "1" mark, the gear teeth of the distributor and camshaft have meshed one or more teeth out of time. Remove distributor and reinstall it. 5. Install distributor cap and mounting screws. DO NOT overtighten, as they may strip. Reconnect electrical harness connectors. NOTE: When installing a new distributor assembly, transfer the 2 marks on the new distributor housing in the same location as the 2 marks on the original housing.


https://www.2carpros.com/forum/automotive_pictures/62217_Noname_6.jpg

Was this
answer
helpful?
Yes
No
-1
Wednesday, September 2nd, 2020 AT 5:45 PM
Tiny
LEWISAHALE
  • MEMBER
  • 9 POSTS
You description would be fine if I just pulled the distributor out of a running motor. However this was a refreshed motor.

I have been reading about this "Spout" Connector that I can disconnect and set the timing manually then reconnect.

Can anyone tell me where to find this spout connector. I have a wire harness that came out of a 7.4 vortec 2x4 A/T and I found what looks like may be the spout connector (It has what the computer nerd in me woudl call a terminator - a peice of plastic that can be unclipped and removed). However I can not find this on my 7.4 vortec 4x4 A/T.

The one I found on the spare harness was located near the Wire Block(Center Screw) that connects to the firewall.

Getting closer !
Was this
answer
helpful?
Yes
No
Wednesday, September 2nd, 2020 AT 5:45 PM
Tiny
MERLIN2021
  • MECHANIC
  • 17,250 POSTS
95 and older maybe, all you can do is check the timing chain marks and distrib location, putting a timming light on a PCM controlled engine is useless.
Was this
answer
helpful?
Yes
No
Wednesday, September 2nd, 2020 AT 5:45 PM
Tiny
LEWISAHALE
  • MEMBER
  • 9 POSTS
Is there a "Spout" Connector on the 97 chevy K3500 7.4L Vortec?

I've found vehicles both Ford and Chevy that have this "Spout" connector that can disconnect the computer timing and allow for manual timing to be set.

The procedure as I understand it to be is to remove the Spout connector and set the timing then reconnect the spout connector.

A GM Manual for Cars and Light Duty Trucks for 1997 calls it an "IC Disconnect".

I'm going to call the GM Dealer on Monday to see what the cost of setting the timing will be.

Lewis
Was this
answer
helpful?
Yes
No
Wednesday, September 2nd, 2020 AT 5:45 PM
Tiny
MERLIN2021
  • MECHANIC
  • 17,250 POSTS
Lewis, as long as the cam and crank are set right, install the distrib with engine at TDC and point the rotor to #1 cylinder firing position, this is all you can do. PCM controls the timing, DO NOT use a timing light. Wont help.
Was this
answer
helpful?
Yes
No
+1
Wednesday, September 2nd, 2020 AT 5:45 PM

Please login or register to post a reply.

Sponsored links