CLUTCH REMOVAL:
Disconnect the negative battery cable.
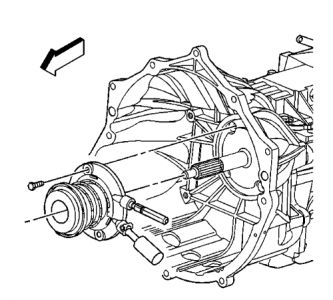
Remove the transmission.
Remove the 2 bolts securing the concentric actuator cylinder to the clutch housing.
Remove the actuator cylinder from the transmission input shaft. If required, the bearing can be removed from the actuator cylinder for replacement.
(((Concentric actuator cylinder location on the transmission )))
INSTALLATION:
Position the actuator cylinder to the transmission input shaft. Ensure that the bleed screw and the coupling are positioned toward the transmission ports.
Secure the concentric actuator cylinder to the clutch housing with 2 bolts and tighten to 71 inch lbs. (8 Nm).
Install the transmission.
Connect the negative battery cable.
TRANSMISSION REMOVAL:
Shift the transmission into 3rd or 4th gear position.
Remove or disconnect the following:
Negative battery cable
Shift lever and the if necessary, the shift housing
Parking brake cable for clearance
Propeller shaft
Side plate, if equipped
Transfer case and shift lever, on 4WD models
All wiring harness that would interfere with transmission removal
Fuel line retainers from the rear crossmember
Muffler from the catalytic converter
Exhaust pipes from the exhaust manifold
Catalytic converter hangar, if necessary
Exhaust section
Bolts and nuts attaching any transmission braces to the engine and transmission
Disconnect the hydraulic clutch quick-connect from the concentric slave cylinder following 1 of the 2 steps:
Use 2 small prytools at 180 degrees from each other to depress the white plastic sleeve on the quick connect to separate the clutch line from the concentric slave cylinder quick connect.
Use special tool J-36221 to depress the white plastic sleeve on the quick connect to separate the clutch line end from the concentric slave cylinder quick connect.
Remove or disconnect the following:
Bolts securing the clutch housing cover to the transmission, if equipped
Clutch plate and clutch cover, if necessary
Support the transmission with a suitable jack.
Rear crossmember from the frame rail
Wiring harness from the front crossmember, if equipped. Move the wiring harness away from the transmission oil pan. Lower the transmission enough to gain access to the top of the transmission.
Fuel line retainers or wiring harnesses from the top of the transmission
Bolt, washer, and nut securing the wiring harness ground wires to the engine block
Bolts retaining the transmission to the engine. Pull the transmission straight back on the clutch hub splines.
Lower the transmission using the transmission jack.
INSTALLATION:
Installation is the reverse of removal, but please note the following important steps.
Place a THIN coat of high-temperature grease on the main drive gear (input shaft) splines.
Secure the transmission to the floor jack and raise the transmission into position.NOTE
On some models, it may be necessary to rotate the transmission clockwise while inserting it into the clutch hub.
Slowly insert the input shaft through the clutch. Rotate the output shaft slowly to engage the splines of the input shaft into the clutch while pushing the transmission forward into place. Do not force the transmission into position, the transmission should easily fall into place once everything is properly aligned.
Tighten the transmission mounting bolts to 35 ft. lbs. (47 Nm).
Do not remove the transmission jack until the crossmembers have been installed.
Check the transmission fluid level and replenish as necessary.
Thanks for using 2CarPros.com!
SPONSORED LINKS
Tuesday, March 3rd, 2009 AT 10:40 PM


