Timing chain replacement instructions please?

Tiny
ANONYMOUS
  • MEMBER
  • 2005 CHEVROLET MALIBU
  • 99,700 MILES
Was idling, put in reverse, engine died, won't start. Engine spins but won't start. Timing chain jumped. Was low on oil 3 days earlier, then loud clanking noise, help
Saturday, November 10th, 2012 AT 5:55 PM

21 Replies

Tiny
ASEMASTER6371
  • MECHANIC
  • 52,797 POSTS
Good morning,

I would start by doing a compression test to verify if the timing chain has failed. If the compression is low, it would indicate the timing chain has failed.

https://www.2carpros.com/articles/car-cranks-but-wont-start

https://www.2carpros.com/articles/how-to-test-engine-compression

https://www.2carpros.com/articles/the-reasons-for-low-compression

Roy

Timing Chain and Tensioner Removal

imageOpen In New TabZoom/Print

1. Remove the upper timing chain guide bolts.
2. Remove the upper timing chain guide.

imageOpen In New TabZoom/Print

3. Important: The timing chain tensioner must be removed to unload chain tension before the timing chain is removed. If it is not, the timing chain will become cocked and it will be difficult to remove.

Remove the timing chain tensioner plunger.

imageOpen In New TabZoom/Print

4. Locate hex on the exhaust camshaft and hold with a wrench.
5. Remove the exhaust cam bolt and the exhaust cam sprocket.Discard the bolt.

imageOpen In New TabZoom/Print

6. Remove the adjustable timing chain guide bolt.
7. Remove the adjustable timing chain guide.

imageOpen In New TabZoom/Print

8. Remove the plug to gain access to the fixed timing chain guide bolt.

imageOpen In New TabZoom/Print

9. Remove the fixed timing chain guide bolts.
10. Remove the fixed timing chain guide.

imageOpen In New TabZoom/Print

11. Locate hex on the intake camshaft and hold with a wrench.
12. Remove the intake cam sprocket bolt, the intake cam sprocket and the timing chain through the top of the cylinder head.Discard the bolt.

imageOpen In New TabZoom/Print

13. Remove the crankshaft sprocket.

imageOpen In New TabZoom/Print

14. Remove the oil nozzle and bolt.
Was this
answer
helpful?
Yes
No
Tuesday, February 2nd, 2021 AT 1:57 AM
Tiny
R.FERNANDEZ
  • MEMBER
  • 1 POST
  • 2000 CHEVROLET MALIBU
I need a diagram that shows me the correct marks to replace the timing chain. Please.

Thank you,
Rosie
Was this
answer
helpful?
Yes
No
Friday, February 12th, 2021 AT 1:30 PM (Merged)
Tiny
KHLOW2008
  • MECHANIC
  • 41,815 POSTS
Hi Rosie,

You must start the timing chain replacement by disconnecting the battery and draining the coolant. Here is some additional information with instructions in the diagram below to show you how on your car.

INTERFERENCE ENGINE

GM does not specify if this engine is an interference engine or not.

To be safe, always observe the following precautions.

If cylinder head is installed on the cylinder block:
- DO NOT turn the crankshaft or camshaft if the timing belt/chain is not installed or if the camshaft timing has not been confirmed to be correct.
- DO NOT rotate engine backwards.
- If a broken or "jumped" timing belt/chain is suspected, DO NOT use the starter to crank the engine.
- If a "catch" is felt when rotating the engine by hand, DO NOT attempt force the engine to rotate past the "catch".

If cylinder head is removed (overhead cam engines):
- Do not set cylinder head on a flat surface with combustion chamber down.

When re-installing a cylinder head:
- Confirm that the crankshaft AND camshaft gears align with their respective timing marks or confirm that all shafts are set to TDC for cylinder # 1 BEFORE placing the cylinder head onto the cylinder block.

If the timing chain/belt has broken of "jumped time" with the engine running, always check for bent valves by pressurizing each cylinder with air with it's valves in the closed position.

Check out the diagrams (Below). Please let us know if you need anything else to get the problem fixed.
Was this
answer
helpful?
Yes
No
Friday, February 12th, 2021 AT 1:30 PM (Merged)
Tiny
GRWILLIAMSIII
  • MEMBER
  • 11 POSTS
  • 1998 CHEVROLET MALIBU
  • 6 CYL
  • FWD
  • AUTOMATIC
  • 159,000 MILES
I need instructions for fixing the timing chain. I have everything apart and the the new chain in hand. I need instructions for reinstalling the chain correctly.
Was this
answer
helpful?
Yes
No
Friday, February 12th, 2021 AT 1:31 PM (Merged)
Tiny
F4I_GUY
  • MECHANIC
  • 3,302 POSTS


https://www.2carpros.com/forum/automotive_pictures/276698_malibu_marks_1.jpg


Line up the marks before removal. Make sure they are lined up after install as well.
Was this
answer
helpful?
Yes
No
-1
Friday, February 12th, 2021 AT 1:31 PM (Merged)
Tiny
2CP-ARCHIVES
  • MEMBER
  • 4,542 POSTS
  • 1998 CHEVROLET MALIBU
How do I change the timing chain on a 1998 Chevy Malibu 3.1L V6?
Was this
answer
helpful?
Yes
No
Friday, February 12th, 2021 AT 1:31 PM (Merged)
Tiny
HMAC300
  • MECHANIC
  • 48,601 POSTS
Drain coolant, remove timing cover replace chain making sure ot line up correctly. Reassemble. You may have to pull motor mounts/and shielding off to get to timing chain
Was this
answer
helpful?
Yes
No
+1
Friday, February 12th, 2021 AT 1:31 PM (Merged)
Tiny
GRWILLIAMSIII
  • MEMBER
  • 11 POSTS
  • 1998 CHEVROLET MALIBU
  • 4 CYL
  • FWD
  • AUTOMATIC
  • 160,000 MILES
Once the timing chain is reached, how do you adjust the chain properly.
Was this
answer
helpful?
Yes
No
Friday, February 12th, 2021 AT 1:31 PM (Merged)
Tiny
DOCFIXIT
  • MECHANIC
  • 18,828 POSTS
Timing chains don't adjust they are replaced along with gears. Balance shaft has adjustment see diagram


https://www.2carpros.com/forum/automotive_pictures/198357_Graphic_215.jpg


If chain is noisy you maybe able to replace tensioner and block.


https://www.2carpros.com/forum/automotive_pictures/198357_Grafic_3_65.jpg

Was this
answer
helpful?
Yes
No
Friday, February 12th, 2021 AT 1:31 PM (Merged)
Tiny
FLARESIDE942000
  • MEMBER
  • 1 POST
  • 1998 CHEVROLET MALIBU
  • 4 CYL
  • FWD
  • AUTOMATIC
  • 117,000 MILES
My sister's friend just installed a water pump in her 98 Malibu 2.4 4 cyl. He somehow got the timing off and the engine was running rough and giving a PO300 code. I had to remove the timing cover and redo the timing, once done it fired up and ran perfect and quiet. When it warmed up, it started making a pecking noise that sounds like it is coming from the top end of the engine. It runs perfect and the noise goes away once the engine is above idle speed or under load from the power steering. I installed new spark plugs and it didn't feel like the CDI unit seated on the plugs properly, could the plugs be arcing against the cdi unit. I performed all of these things per the instructions of a haynes repair manual. Any idea what the noise could be?
Was this
answer
helpful?
Yes
No
Friday, February 12th, 2021 AT 1:31 PM (Merged)
Tiny
JACOBANDNICKOLAS
  • MECHANIC
  • 108,117 POSTS
It could be an arcing, but you say the engine runs well. I would think if there was an arc problem, the enging would have a miss. Are you sure that you're not hearing the injectors or a minor rocker tap?
Was this
answer
helpful?
Yes
No
Friday, February 12th, 2021 AT 1:31 PM (Merged)
Tiny
BOOMER5435
  • MEMBER
  • 2 POSTS
  • 1997 CHEVROLET MALIBU
Engine Mechanical problem
1997 Chevy Malibu 4 cyl Front Wheel Drive Automatic

how to do the timing on a new timing chain
Was this
answer
helpful?
Yes
No
Friday, February 12th, 2021 AT 1:31 PM (Merged)
Tiny
DAVE H
  • MECHANIC
  • 13,383 POSTS
Hello .. thanks for the doantion .. much appreciated

TIMING CHAIN
Removal
NOTE:If camshaft sprocket does not come off easily, lightly strike lower edge of sprocket with a plastic mallet.

Disconnect negative battery cable. Remove front cover. See FRONT COVER. Place No.1 piston at top dead center (No. 4 in firing position). Align mark on camshaft sprocket with timing mark on bottom of timing chain dampener. Remove camshaft sprocket bolt. Remove camshaft sprocket and timing chain. Remove crankshaft sprocket with Crankshaft Sprocket Remover (J-5825-A).
Installation
Install crankshaft sprocket (if removed) using Installer (J-38612). If camshaft or crankshaft was rotated during removal of chain or sprockets, rotate camshaft and/or crankshaft as necessary to align timing marks. See Fig. 4.
Install timing chain onto camshaft sprocket. Hold camshaft sprocket vertically with chain hanging down. Install timing chain onto crankshaft sprocket, then camshaft sprocket onto camshaft. Install and tighten camshaft sprocket bolt to specification. See TORQUE SPECIFICATIONS. Lubricate timing chain with engine oil. To complete installation, reverse removal procedure.
Fig. 4: Aligning Timing Marks


https://www.2carpros.com/forum/automotive_pictures/266999_mal_1.jpg


hope this helps


https://www.2carpros.com/forum/automotive_pictures/266999_AAA2_155.png

Was this
answer
helpful?
Yes
No
Friday, February 12th, 2021 AT 1:31 PM (Merged)
Tiny
BOOMER5435
  • MEMBER
  • 2 POSTS
This is a 4cy twincam engine, Okay folks here's the number two problem with this whole deal is finding a complete gasket set for the timing cover the front seal and the lower and the front of the oil pan you know that little half Moon gasket well
Was this
answer
helpful?
Yes
No
+1
Friday, February 12th, 2021 AT 1:31 PM (Merged)
Tiny
DAVE H
  • MECHANIC
  • 13,383 POSTS
TIMING CHAIN, SPROCKETS & TENSIONER
Tips Click a link to view tip
Tech1Tip: timing chain tensioner

NOTE:This procedure has been revised due to GM service manual update (SMU) # 00-06-01-002 dated Feb, 2000

Removal
CAUTION:To prevent severe engine damage, carefully follow procedure.

Disconnect negative battery cable. Remove front cover. See FRONT COVER . See . Rotate crankshaft in normal direction of rotation (clockwise, as viewed from front of engine) until cylinder No. 1 is at TDC of compression stroke.
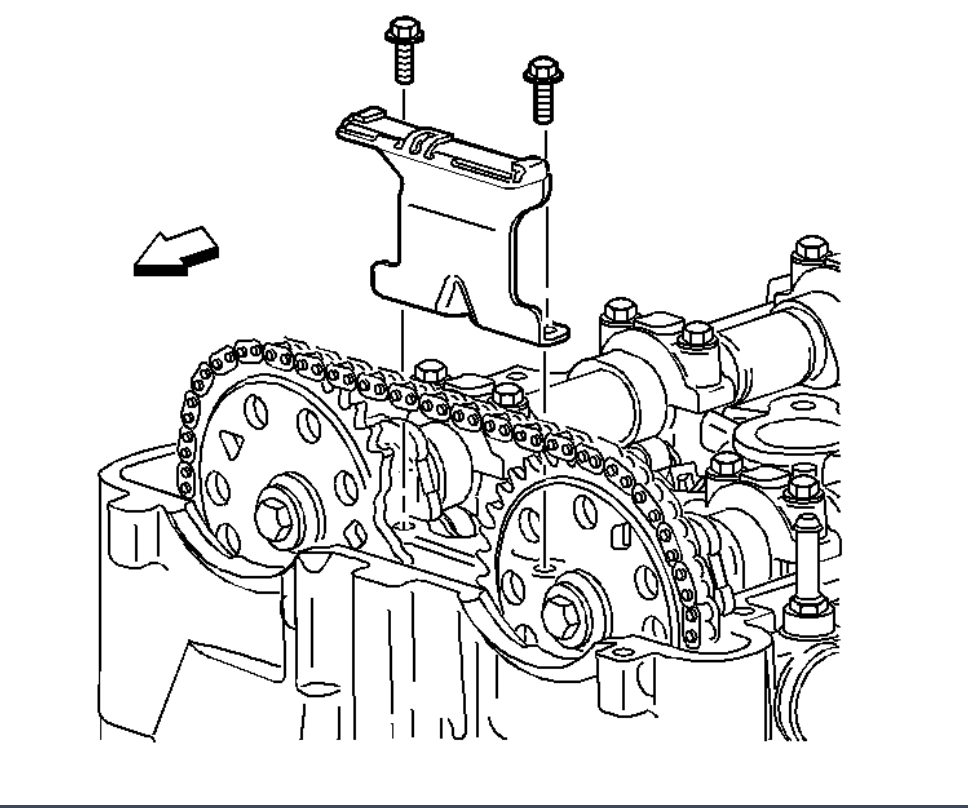
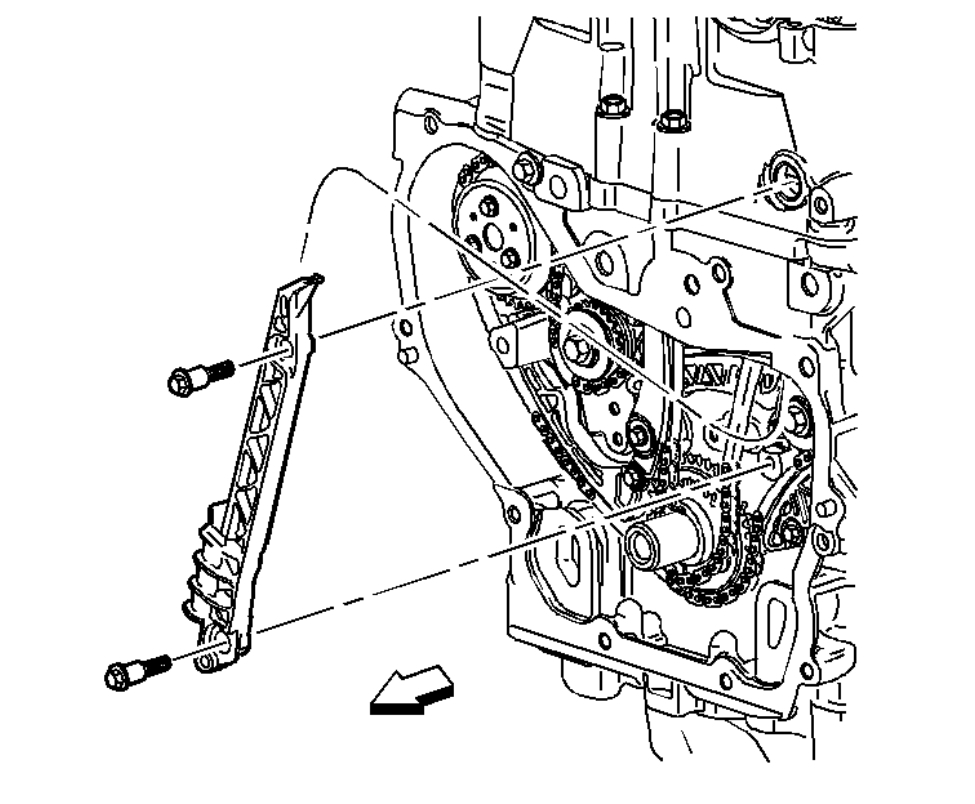
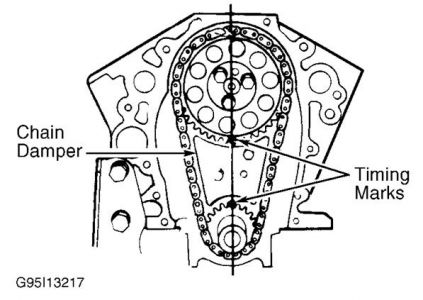
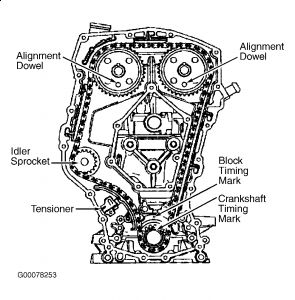
The camshaft sprocket dowel pin hole should line up with holes on timing chain housing. The crankshaft sprocket keyway should point upwards. See Fig. 7 . Remove timing chain guides. Raise and support vehicle. Make sure slack in chain is above tensioner assembly, then remove chain tensioner.
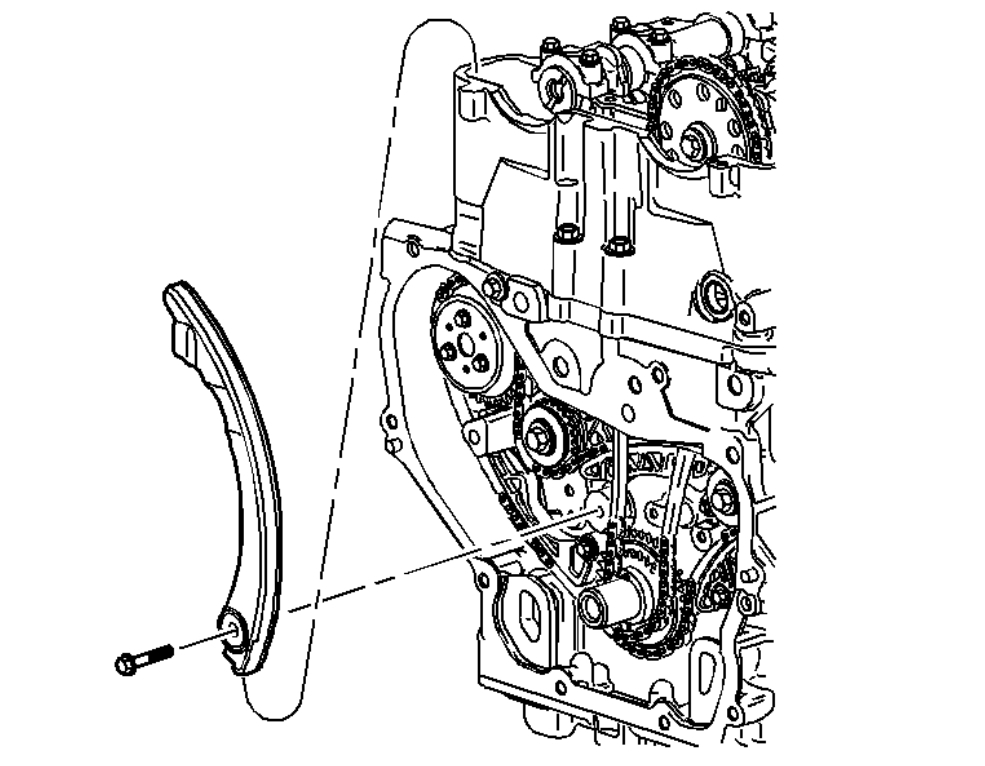
Note that timing chain must be disengaged from any wear grooves in tensioner shoe before removing shoe. Slide a screwdriver blade between chain and tensioner shoe, while pulling shoe outward (this should disengage chain from wear grooves in shoe). If timing chain is not difficult to remove, go to step 5). If it is difficult to remove timing chain shoe, go to next step.
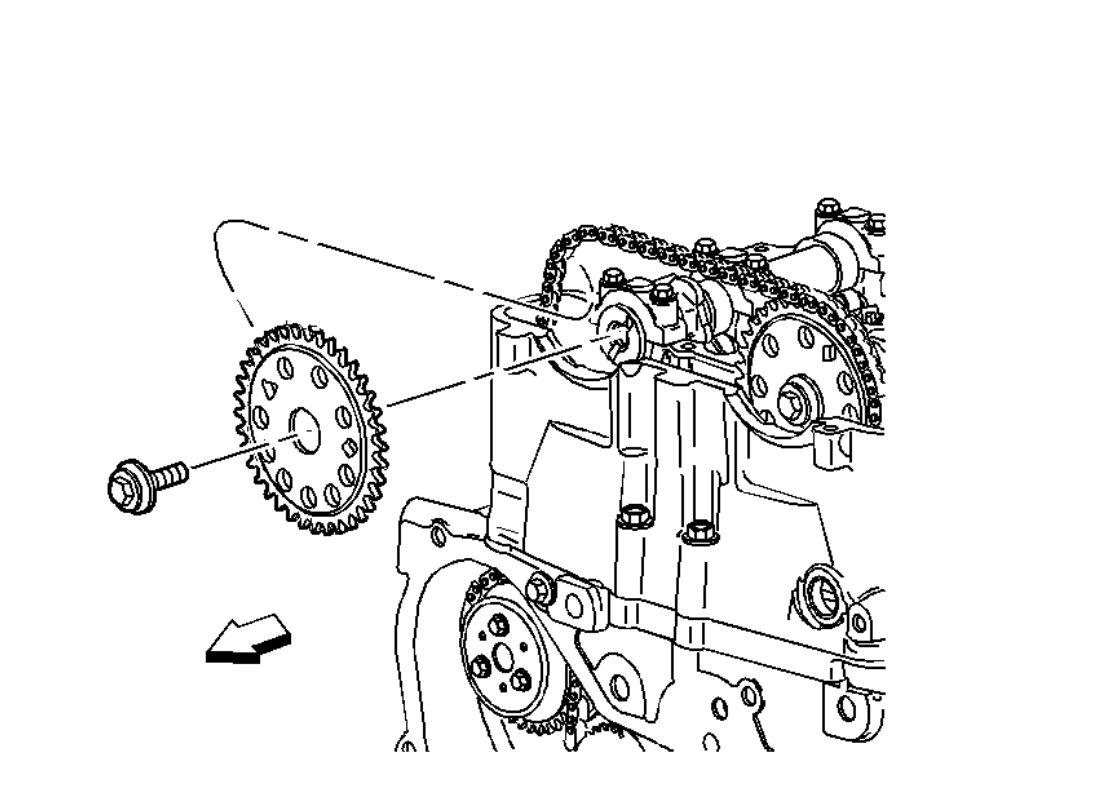
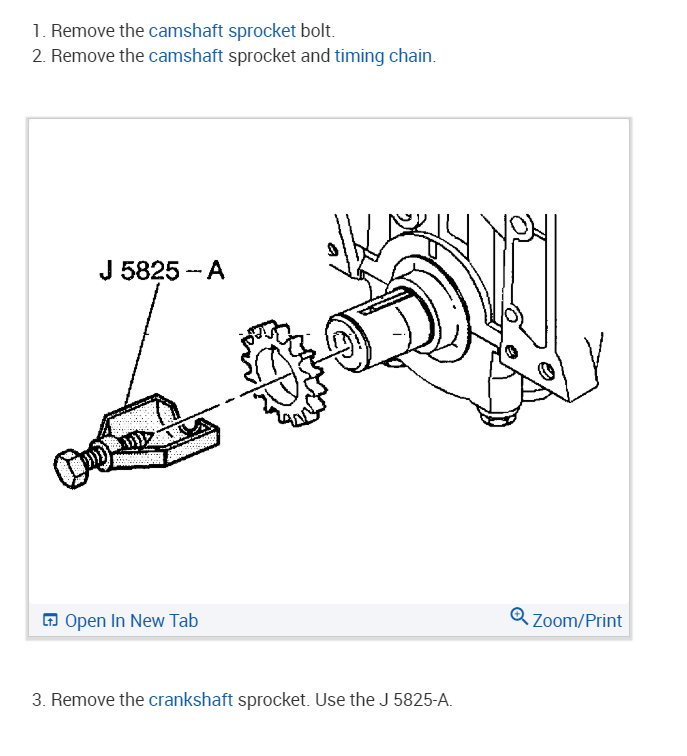
CAUTION:To prevent damage to sprocket or timing chain housing, use a puller to remove sprocket from camshaft. DO NOT pry sprocket from camshaft.

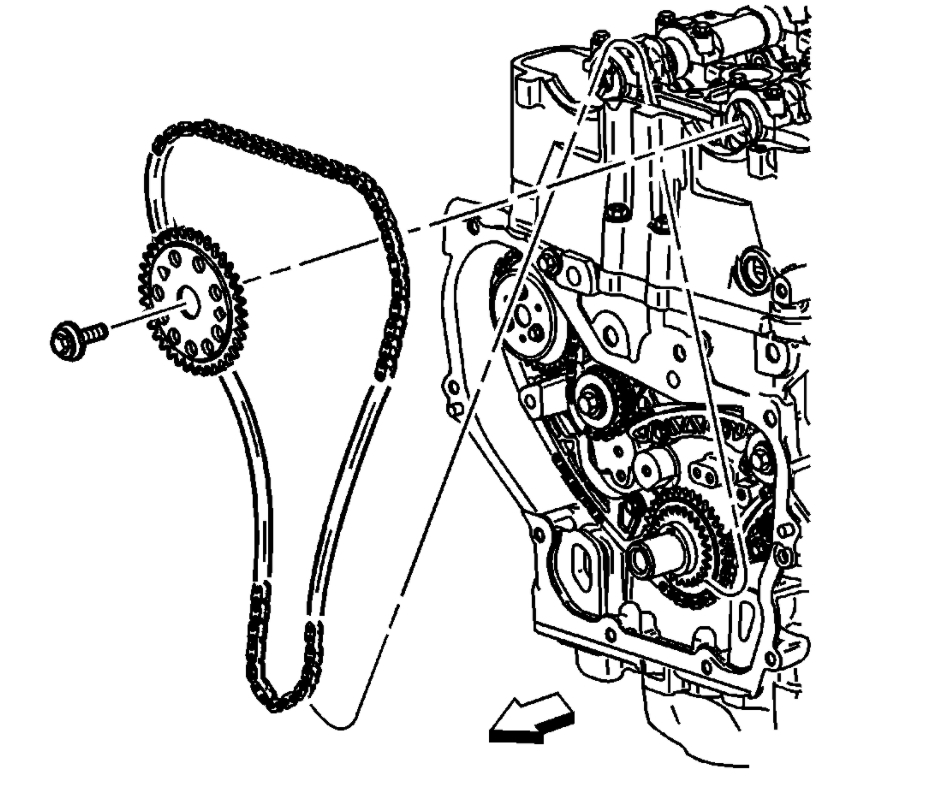
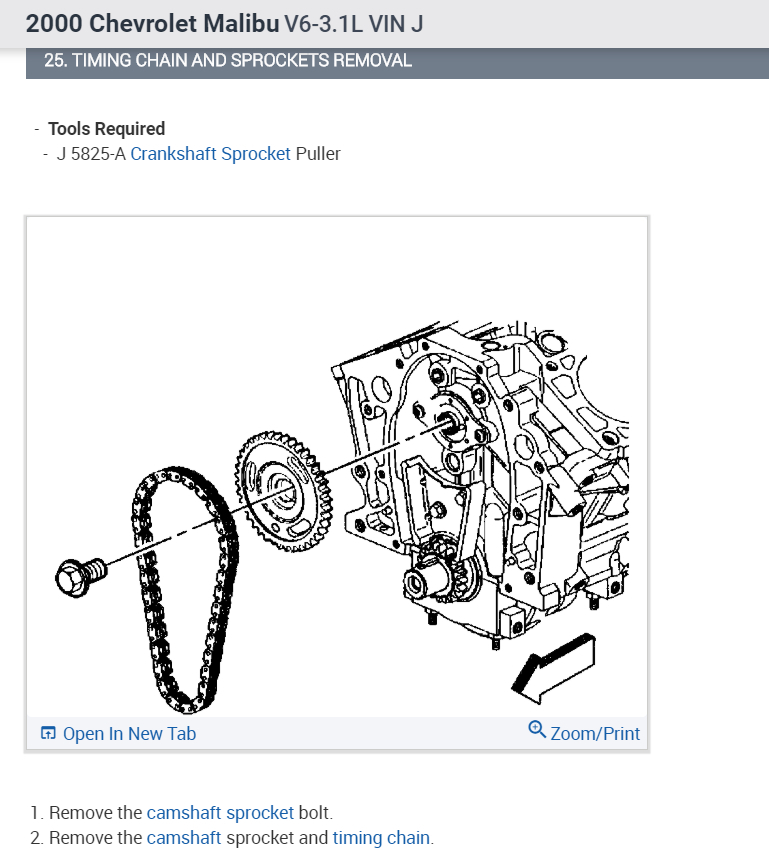
Lower vehicle. Hold intake camshaft sprocket with Sprocket Wrench (J-39579) and remove sprocket bolt. Remove washer from bolt and rethread bolt into camshaft by hand. Remove camshaft sprocket using a 3-jawed puller. DO NOT attempt to pry sprocket off or damage will result.
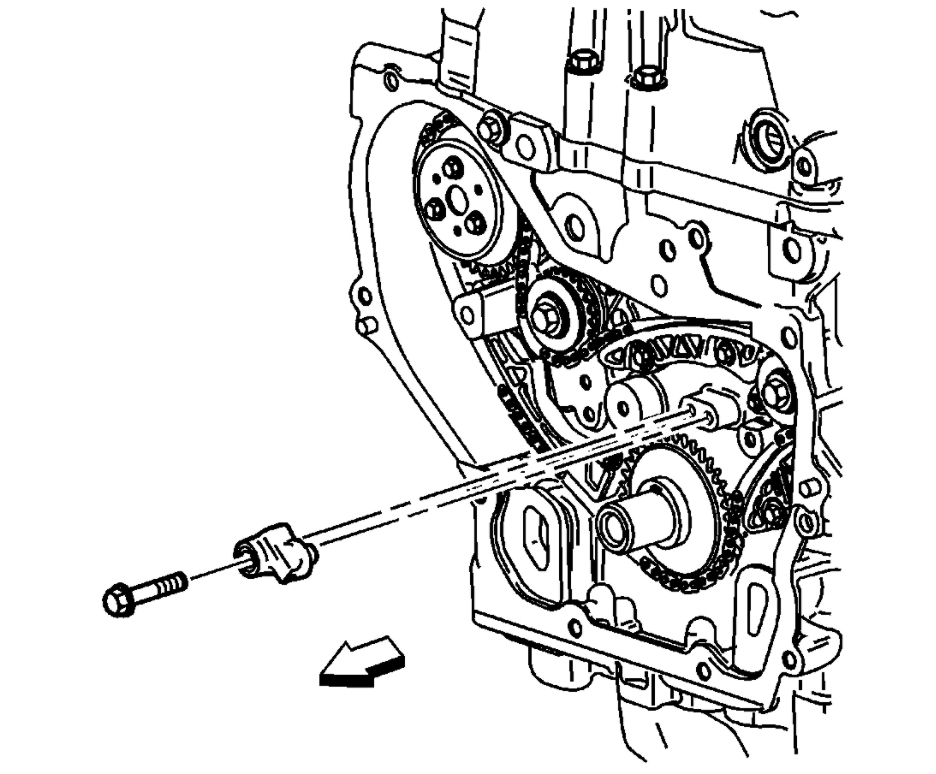
Remove tensioner assembly bolts and tensioner. Mark outer surface of timing chain and crankshaft sprocket for reassembly reference. Remove timing chain.
Fig. 7: Aligning Timing Marks
Courtesy of GENERAL MOTORS CORP.


https://www.2carpros.com/forum/automotive_pictures/266999_mal_2.jpg


Installation
Install the camshaft sprockets. The sprockets are identical and interchangeable. Clean the old sealer off of the bolts with a wire brush. Clean the threaded hole in the camshaft with a nylon bristle brush. Coat the camshaft bolts with Adhesive/Sealant Compound (GM 1234593) or equivalent. See Fig. 8 .
Install the camshaft sprocket bolts and washers while holding the sprockets with Tool (J- 39579). Tighten the bolts to 52 ft. lbs. (70 N.m).
NOTE:Ensure camshaft sprocket alignment pins are in the cylinder block and the timing chain housing, prior to installing the timing chain housing. The camshaft sprocket alignment pins ensure proper chain housing and front cover location for correct front oil seat to crankshaft alignment.

Install Tool (J-36008-A) through the holes in the camshaft sprockets and into the holes in the timing chain housing. This will position the camshaft for correct timing. Use the following steps if the camshafts are out of position and must be rotated more than 1/8 turn in order to install the alignment dowel pins:
The crankshaft must be rotated 90 degrees clockwise from TDC to give the valves adequate clearance to open.
Once the camshafts are in position and the dowels are installed, rotate the crankshaft counter clockwise back to TDC.
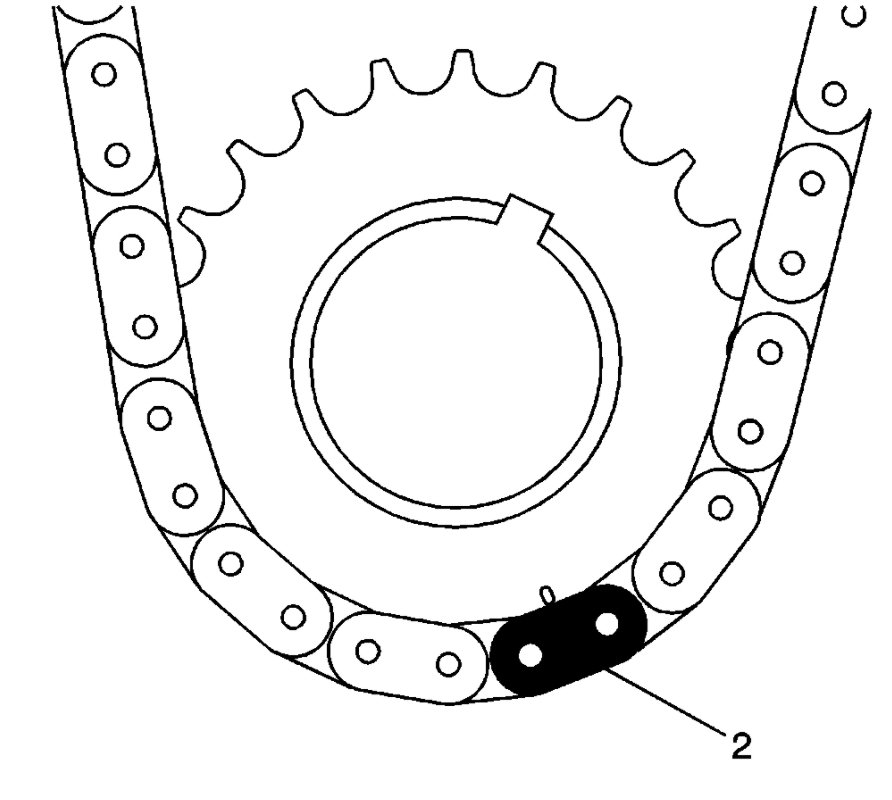
CAUTION:DO NOT rotate the crankshaft clockwise to TDC. Valve or piston damage could occur. The timing chain and crankshaft sprocket must be put in a specific direction for chain noise and wear considerations. The surfaces that were marked during removal should be showing when the chain and crankshaft sprocket are installed.

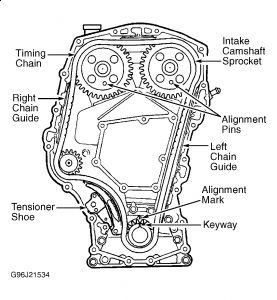
Install the timing chain over the exhaust camshaft sprocket around the coolant pump sprocket and around the crankshaft sprocket. Remove the alignment dowel pin from the intake camshaft. Use Tool (J-39579) in order to rotate the intake camshaft sprocket counter clockwise enough to allow the timing chain to slide over the intake camshaft sprocket. Release Tool (J-39579). The length of the chain between the two camshaft sprockets will tighten.
If properly timed, the intake camshaft alignment dowel pin will slide in easily. If the dowel pin does not fully index, the camshafts are not timed correctly and the procedure must be repeated. Leave the alignment dowel pins installed. The keyway on the crankshaft and the mark on the cylinder block should be aligned when the slack is removed from the chain between the intake camshaft sprocket and the crankshaft sprocket. If the mark and the keyway are not aligned, move the chain one tooth forward or rearward. Remove the slack and recheck the marks.
NOTE:Use the following steps in order to reset the timing chain tensioner assembly to the zero position:
Reset the timing chain tensioner assembly.
Insert the tensioner plunger assembly into the tensioner housing.
With the tensioner plunger fully extended, turn the complete assembly upside down on a bench or other flat surface. See Fig. 9 .
With the plunger face against the workbench, press firmly on the bottom of the tensioner housing.
Compress the plunger until the plunger is seated flush in the tensioner. See Fig. 10 .

Check the plunger to ensure the plunger is out of the cylinder at the correct dimension. The correct dimension for the plunger to extend out of the cylinder is .070" (1.7 mm) maximum. See Fig. 10 . Loosely install the tensioner assembly and bolts to the timing chain housing. See Fig. 11 . Install the timing chain tensioner shoe on the stud. Apply hand pressure to the timing chain tensioner shoe until the locking tab seats in the groove in the stud. Tighten the timing chain tensioner bolts. DO NOT over tighten. Tighten the bolts to 89 INCH lbs. (10 N.m).
CAUTION:If the timing chain tensioner plunger is not released from the installation position, engine damage will occur when the engine is started.

Release the timing chain tensioner plunger using the following procedure:
Using a flat blade screwdriver, cotter pin remover, or a similar tool, press firmly against the face of the timing chain tensioner plunger. See Fig. 12 .
NOTE:If the timing chain tensioner plunger cannot be depressed, the plunger is not properly reset and the procedure for resetting the timing chain tensioner should be repeated.

Depress the timing chain tensioner plunger until the plunger is bottomed out in the bore of the timing chain tensioner. See Fig. 10 .
Release the tensioner plunger. See Fig. 12 . The plunger should press firmly against the back of the timing chain tensioner shoe. Remove Tool (J- 36008-A) from the camshaft sprockets.
CAUTION:Beginning with the 1998 model year, the timing chain on the LD9 (VIN T) Twin Cam Engine is different from the chain found on earlier versions of this engine, and is not to be replaced with a timing chain from earlier model year engines. The timing sprockets were also changed beginning in 1998, and the shape of the chain links matches the sprockets. Engine damage may result if the wrong timing chain is used. The timing chain and the crankshaft sprocket must be marked so that they are reinstalled in the same side facing out at the time of assembly.

Rotate the crankshaft clockwise two full rotations. Align the crankshaft keyway with the mark on the cylinder block and reinstall the alignment dowel pins. The alignment dowel pins will slide in easily if the engine is timed correctly. Install the timing chain guides.
Was this
answer
helpful?
Yes
No
+1
Friday, February 12th, 2021 AT 1:31 PM (Merged)
Tiny
CHARMINGBILLY
  • MEMBER
  • 1 POST
  • 1997 CHEVROLET MALIBU
  • 6 CYL
  • 2WD
  • AUTOMATIC
  • 150,000 MILES
When replacing the timing chain, is it absolutely necessary to remove the oil pan, etc? If so, do you recommend popping in a set of rod bearings, water pump? Where does wisdom lie?

Also, can you get away without removing the hood and supporting the engine from above?
Was this
answer
helpful?
Yes
No
Friday, February 12th, 2021 AT 1:31 PM (Merged)
Tiny
JACOBANDNICKOLAS
  • MECHANIC
  • 108,117 POSTS
Hi:
You should be able to support the engine from the harmonic ballancer / crank pulley. Yes, you do need to lower the pan. If the bearings are quiet, let them alone. However, I do recommend replacing the water pump once you have gotten that far.
Was this
answer
helpful?
Yes
No
Friday, February 12th, 2021 AT 1:31 PM (Merged)
Tiny
TRAV25
  • MEMBER
  • 1 POST
  • 1997 CHEVROLET MALIBU
Engine Mechanical problem
1997 Chevy Malibu 4 cyl Front Wheel Drive Automatic

i need to know how to time this vehicle and where the timing marks are located
Was this
answer
helpful?
Yes
No
Friday, February 12th, 2021 AT 1:32 PM (Merged)
Tiny
BLUELIGHTNIN6
  • MECHANIC
  • 16,542 POSTS
The arrows indicate the camshaft sprocket timing dowel pin holes, and the crankshaft sprocket lined up with the centerline of the cylinder bores. This is the "timed" position.


https://www.2carpros.com/forum/automotive_pictures/261618_0900c1528009156b_1.jpg


Your vehicle is equipped with an ignition control module which does not require timing adjustment.

Thanks for using 2CarPros.com!
Was this
answer
helpful?
Yes
No
Friday, February 12th, 2021 AT 1:32 PM (Merged)
Tiny
HOWIE123
  • MEMBER
  • 2 POSTS
  • 1997 CHEVROLET MALIBU
Engine Performance problem
1997 Chevy Malibu 4 cyl Front Wheel Drive Automatic

how do you remove the water pump from the timing gear and how do you time the timing chain afterwards
Was this
answer
helpful?
Yes
No
Friday, February 12th, 2021 AT 1:32 PM (Merged)

Please login or register to post a reply.

Sponsored links