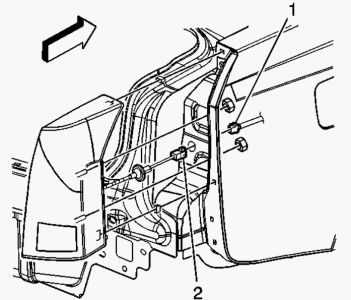
TAIL LAMP REPLACEMENT Removal Procedure Open the rear compartment. 1. Remove the rear compartment sill plate. Refer to Compartment Sill Plate Replacement - Rear . 2. Pull back on the rear compartment trim panel. 3. Fig. 108: Identifying Tail Lamp Connector & Body Main Harness Connector Courtesy of GENERAL MOTORS CORP. Disconnect the tail lamp connector (2) from the body main harness connector (1). 4. Fig. 109: Removing & Installing Tail Lamp-To-Body Fasteners Courtesy of GENERAL MOTORS CORP. Remove the fasteners (1) that secure the tail lamp (2) to the body. 5. Fig. 110: Identifying Clips Retainer Tail Lamp Assembly To Body Courtesy of GENERAL MOTORS CORP. Pull on the tail lamp assembly (3) in order to disengage the clips (1, 2) that retain it to the body. 6. Fig. 111: Removing & Installing Tail Lamp Assembly Courtesy of GENERAL MOTORS CORP. Pull on the tail lamp harness (1) in order to disengage the tail lamp harness grommet (2) from the body. 7. Remove the tail lamp assembly (3) from the vehicle. 8. Installation Procedure Fig. 112: Removing & Installing Tail Lamp Assembly Courtesy of GENERAL MOTORS CORP. Position the tail lamp (3) to the body. 1. Insert the tail lamp harness (1) to the body. 2. Push the tail lamp harness grommet (2) into the body until it is fully seated. 3. Fig. 113: Identifying Clips Retainer Tail Lamp Assembly To Body Courtesy of GENERAL MOTORS CORP. Install the tail lamp locators into the body until the tail lamp retainers (1, 2) are fully seated. 4. Fig. 114: Removing & Installing Tail Lamp-To-Body Fasteners Courtesy of GENERAL MOTORS CORP. NOTE: Refer to Fastener Notice in Cautions and Notices. Install the tail lamp fasteners (1) in order to secure the tail lamp (2) to the body. 5. Tighten: Tighten the tail lamp fasteners to 6 N.m (53 lb in). Fig. 115: Identifying Tail Lamp Connector & Body Main Harness Connector Courtesy of GENERAL MOTORS CORP. Connect the tail lamp harness connector (2) to the body main harness connector (1). 6. Pull back on the rear compartment trim panel in order to reposition it in its original location. 7. Install the rear compartment sill plate. Refer to Compartment Sill Plate Replacement - Rear . 8. Close the rear compartment. 9.
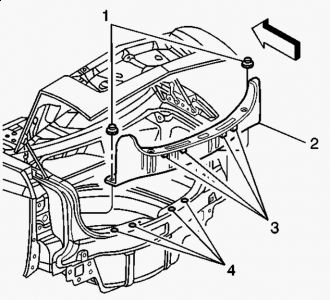
COMPARTMENT SILL PLATE REPLACEMENT - REAR Removal Procedure Remove the sill plate retainers (1). 1. Fig. 5: Removing & Installing Rear Compartment Sill Plate Courtesy of GENERAL MOTORS CORP. Pull upward on the sill plate (2) to release the spring clips (3) and remove the sill plate from the vehicle. 2. Installation Procedure Position the rear compartment sill plate (2) to the vehicle. 1. Align the sill plate spring clips (3) with their slots. 1. Fig. 6: Removing & Installing Compartment Sill Plate Courtesy of GENERAL MOTORS CORP. Push downward and snap the sill plate (2) into place. 2. Install the sill plate retainers (1). 2.
SPONSORED LINKS
Tuesday, May 26th, 2009 AT 4:40 PM
