Hi,
if the brake pedal goes to the floor, first make sure there are no hydraulic leaks in the brake system. make sure the brake fluid reservoir is full. if it is, chances are the brake master cylinder is bad.
take a look through this link:
https://www.2carpros.com/articles/brake-pedal-goes-to-the-floor
if you find the master cylinder is bad, replacing it isn't too hard of a job. when you get the replacement part, make sure it has a lifetime warranty. that way, you'll never have to pay for it again.
first, here is a link that shows how in general one is replaced. you can use this as a guide.
https://www.2carpros.com/articles/how-to-replace-a-brake-master-cylinder
the new brake master cylinder will need bench bled before install. here is a video that shows how that is done:
https://youtu.be/wdxveqrmkbg
here are directions specific to your vehicle. the attached pics below correlate with the directions.
_______________________________
2010 toyota corolla l4-1.8l (2zr-fe)
brake master cylinder - removal [01/2009 - ]
vehicle brakes and traction control hydraulic system brake master cylinder service and repair removal and replacement brake master cylinder - removal [01/2009 - ]
brake master cylinder - removal [01/2009 - ]
brake system (other): brake master cylinder: removal; 2010 my corolla [01/2009 - ]
notice:
make sure to release the vacuum from the brake booster before removing the master cylinder from the brake booster.
remove no. 2 cylinder head cover (for 2zr-fe) [ 2zr-fe engine mechanical: engine assembly: removal+ ]
remove air cleaner cap sub-assembly (for 2zr-fe) [ 2zr-fe engine control: throttle body: removal+ ]
remove air cleaner case (for 2zr-fe) [ 2zr-fe engine mechanical: engine assembly: removal+ ]
remove no. 1 engine cover sub-assembly (for 2az-fe) [ 2az-fe engine mechanical: engine assembly: removal+ ]
remove air cleaner cap sub-assembly with hose (for 2az-fe) [ 2az-fe engine control: throttle body: removal+ ]
remove air cleaner case (for 2az-fe) [ 2az-fe engine mechanical: engine assembly: removal+ ]
remove front wiper arm head cap [ wiper / washer: front wiper motor: removal+ ]
remove front wiper arm and blade assembly lh [ wiper / washer: front wiper motor: removal+ ]
remove front wiper arm and blade assembly rh [ wiper / washer: front wiper motor: removal+ ]
remove hood to cowl top seal [ wiper / washer: front wiper motor: removal+ ]
remove center no. 1 cowl top ventilator louver [ wiper / washer: front wiper motor: removal+ ]
remove cowl top ventilator louver lh [ wiper / washer: front wiper motor: removal+ ]
remove windshield wiper motor and link assembly [ wiper / washer: front wiper motor: removal+ ]
remove outer cowl top panel (for tmc made)
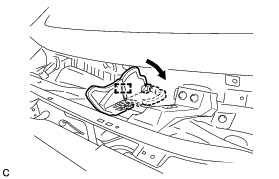
disengage the clamp and bend the water guard plate rh as shown in the illustration.
pic 1
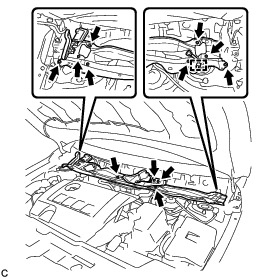
disengage the clamp.
pic 2
remove the 12 bolts and outer cowl top panel.
remove outer cowl top panel (except tmc made)
disengage the clamp and bend the water guard plate rh as shown in the illustration.
pic 3
disengage the clamp and bend the no. 1 heater air duct splash shield seal.
pic 4
disengage the clamp.
pic 5
remove the 12 bolts and outer cowl top panel.
remove suspension tower damper assembly (w/ front strut bar) [ front suspension: front strut bar: removal+ ]
drain brake fluid
disconnect clutch tube (for manual transaxle)
move the clip and disconnect the clutch tube.
pic 6
remove brake master cylinder sub-assembly
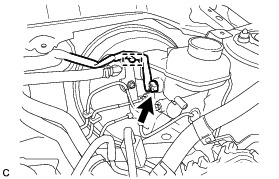
disconnect the connector and disengage the clamp.
pic 7
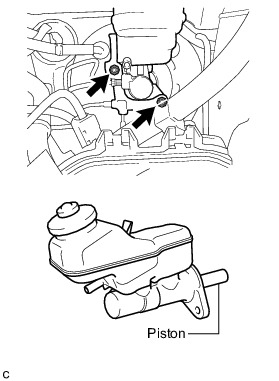
using a union nut wrench (10 mm or 12 mm), disconnect the 4 brake lines from the brake master cylinder sub-assembly.
pic 8
remove the 2 nuts, brake tube way and brake master cylinder sub-assembly.
pic 9
notice:
the master cylinder requires careful handling. do not allow the master cylinder to receive any impact, such as from being dropped. do not reuse a master cylinder that has been dropped.
do not strike or pinch the master cylinder piston, and do not cause any damage to the master cylinder piston by any other means.
make sure to release the vacuum from the brake booster before removing the master cylinder from the brake booster.
when installing the master cylinder to the brake booster, or when removing the master cylinder from the brake booster, make sure that the master cylinder is kept horizontal or its tip faces downward (the piston faces upward) to prevent the master cylinder piston from falling off.
do not allow any foreign objects to contaminate the master cylinder piston. if a foreign object gets on the piston, remove it by using a piece of cloth and then apply an even layer of lithium soap base glycol grease around the circumference (sliding part) of the piston.
do not use any other type of grease or fluid.
remove the o-ring from the brake master cylinder sub-assembly.
Check out the diagrams (Below). Let us know what happens and please upload pictures or videos of the problem.
Images (Click to make bigger)
SPONSORED LINKS
Friday, March 12th, 2021 AT 10:22 PM