Hi,
Replacing rear brake pads and rotors really isn't too hard. Also, you can expect them to last approximately 30,000 miles, but that is based on driving habits and terrain.
First, here is a link that shows in general how it is done. You can use this as a guide.
https://www.2carpros.com/articles/how-to-replace-rear-brake-pads-and-rotors
Here are the directions specific to your vehicle. The attached directions correlate with the directions.
_______________________________________________
2006 Land Rover LR3 (LA) V6-4.0L
Rear Disc Brake Pads
Vehicle Brakes and Traction Control Disc Brake System Brake Pad Service and Repair Removal and Replacement Rear Disc Brake Pads
REAR DISC BRAKE PADS
Brake Pads
Removal
WARNING: Brake pads must be renewed in axle sets only, otherwise braking efficiency may be impaired.
WARNING: If the brake pad wear warning light has been activated, the pad wear sensor must be replaced.
CAUTION: To avoid accidental operation of the Electric Parking Brake (EPB) and possible damage to the EPB actuator, remove Fusible link 8, located in the engine compartment fuse box before commencing work.
1
WARNING: Do not work on or under a vehicle supported only by a jack. Always support the vehicle on safety stands.
Raise and support the vehicle.
2 Remove the wheel and tire.
3
CAUTION: The brake pad wear indicator sensor is easily damaged. Do not use a lever to remove the sensor. Use fingers only.
RH side only: Disconnect the brake pad wear indicator sensor.
pic 1
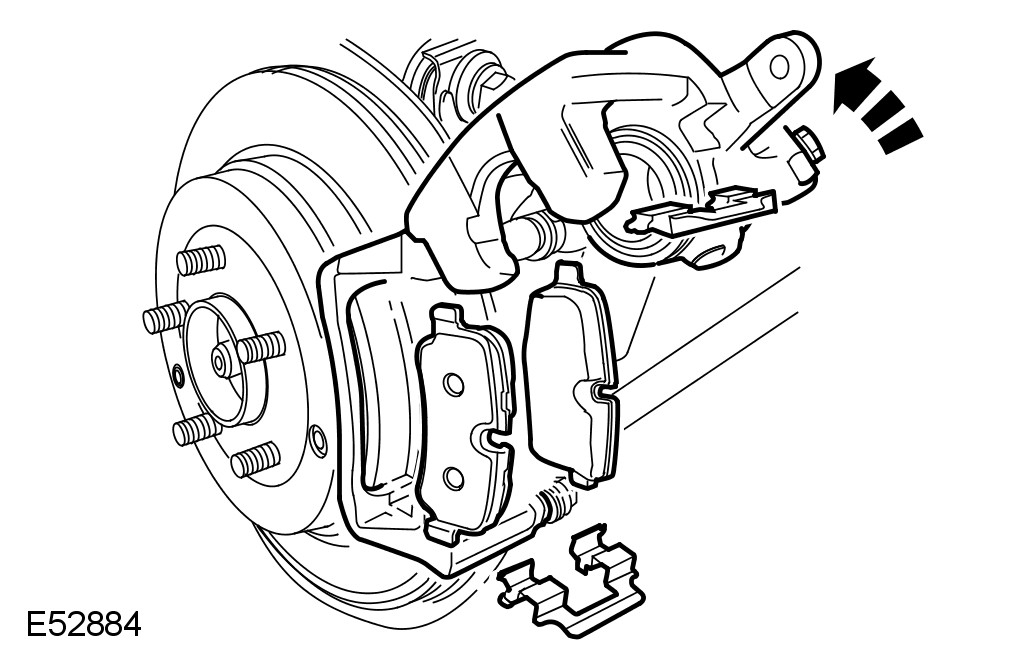
4 Remove the brake caliper lower bolt.
pic 2
5 Remove the brake pads.
- Rotate the brake caliper upwards.
- Remove the 2 clips.
Installation
1
WARNING: Do not use compressed air to clean brake components. Dust from friction materials can be harmful if inhaled.
Clean the caliper housing and anchor plate using brake cleaning fluid.
2 Inspect the caliper piston and slide pin seals for damage.
3 Position a bleed jar containing a small quantity of approved brake fluid. Connect the bleed tube to the bleed screw and loosen the screw.
4 Press the piston into the caliper housing.
- Tighten the bleed screw to 14 Nm (10 lb.ft).
5 Disconnect the bleed tube and remove the jar.
6 Install the brake pads.
- Install the 2 clips.
7 Rotate the brake caliper downwards.
- Tighten the bolt to 35 Nm (26 lb.ft).
8 Connect the brake pad wear indicator sensor.
9 Repeat the above procedure for the other side.
10 Install the wheels and tires.
- Tighten the wheel nuts to 140 Nm (103 lb.ft).
11 Depress the brake pedal several times, check the fluid level in the brake fluid reservoir and top up with brake fluid if necessary.
_____________________________
Rotor Replacement
2006 Land Rover LR3 (LA) V6-4.0L
Rear Brake Disc
Vehicle Brakes and Traction Control Disc Brake System Brake Rotor/Disc Service and Repair Removal and Replacement Rear Brake Disc
REAR BRAKE DISC
Brake Disc
Removal
NOTE:
If the parking brake shoes or the brake discs have been removed for access to other components then DO NOT carry out the bedding in procedure.
1
CAUTION: Do not turn the ignition on when the parking brake service mode has been set, this will result in the parking brake being released from the service mode.
Enter the parking brake into the service mode.
- Turn the ignition key to position II.
- Apply, and hold, the footbrake.
- Apply, and hold, the parking brake switch to the RELEASE position.
- Turn the ignition key to position '0' and remove the key.
- Release the footbrake.
- Release the parking brake switch.
2 Isolate the parking brake electrical circuit.
- Remove fuse number 8 from the BJB.
3
WARNING: Do not work on or under a vehicle supported only by a jack. Always support the vehicle on safety stands.
Raise and support the vehicle.
4 Remove the wheel and tire.
5 Remove the brake caliper anchor plate. For additional information, refer to Brake Caliper Anchor Plate See: Brake Caliper > Removal and Replacement > Rear Brake Caliper Anchor Plate
pic 3
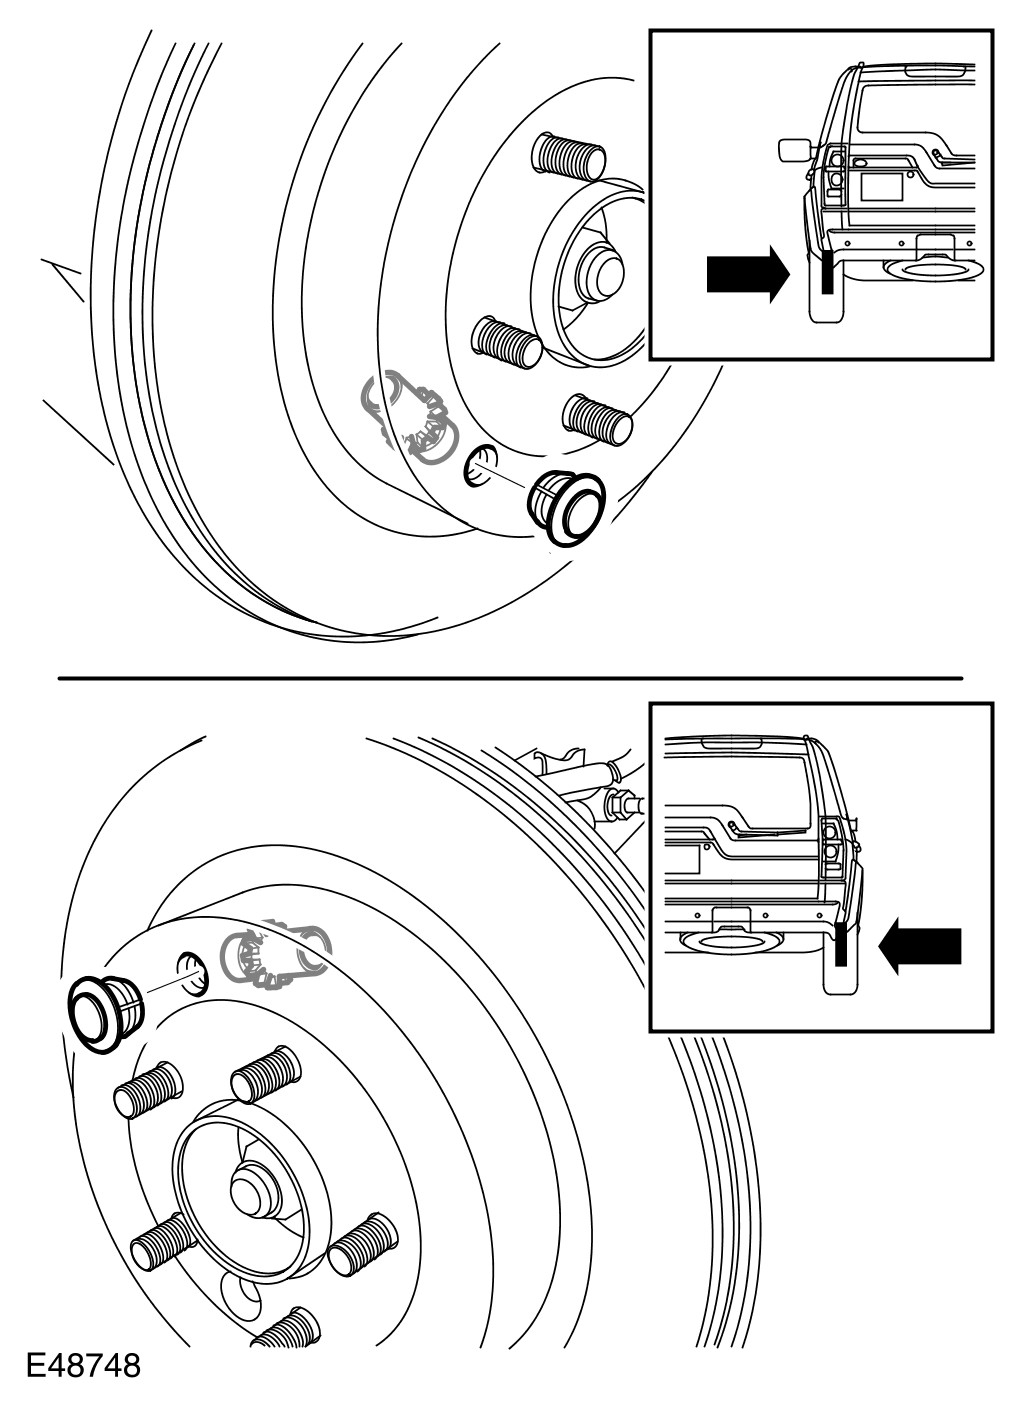
6 Release the parking brake shoe adjustment.
- Remove the plug from the access hole in the brake disc.
- Using a suitable tool, rotate the brake shoe adjuster to release the adjustment.
- Install the access plug.
pic 4
7 Remove the brake disc.
- Remove the Torx screw.
Installation
1 Make sure the brake disc and hub mating surfaces are clean.
2 Install the brake disc.
- Tighten the Torx screw to 35 Nm (26 lb.ft).
3 Install the brake caliper anchor plate. For additional information, refer to Brake Caliper Anchor Plate See: Brake Caliper > Removal and Replacement > Rear Brake Caliper Anchor Plate
4 Adjust the parking brake. For additional information, refer to Parking Brake Shoe and Lining Adjustment See: Parking Brake Shoe > Adjustments > Parking Brake Shoe And Lining Adjustment
5 Install fuse number 8 into the BJB.
6 Install the wheel and tire.
- Tighten the wheel nuts to 140 Nm (103 lb.ft).
_____________________________________
I hope this helps. Let me know if you have other questions.
Take care and God Bless,
Joe
Images (Click to make bigger)
SPONSORED LINKS
Wednesday, February 24th, 2021 AT 6:39 PM