Engine mount replacement

Tiny
SILVERSEL
  • MEMBER
  • 2006 CHRYSLER PACIFICA
  • 6 CYL
  • FWD
  • AUTOMATIC
  • 61,000 MILES
Do you have to disconnect the transaxles on a 2006 Chrysler Pacifica to change the forward motor mount? I cannot find a repair manual anywhere.
Thursday, December 23rd, 2010 AT 11:02 PM

10 Replies

Tiny
FIXITMR
  • MECHANIC
  • 9,990 POSTS
NO as far a s I can see? Here's advice from a guy who did them all!

You will need two jacks, a set of jack stands, and a stubby 12 point offset 21mm wrench (I had to cut my regular offset in half to make it small enough). You will also need a few regular shop tools and alot of patience. My local dealer wanted $800 for this repair on my 2006 pacifica 3.5 liter so I tried it first. My neighbor and I finished in about 3 hours. First chock the rear wheels and jack the front end of the car. Place a jack stand under the frame next to the front door (do not place it on the black subframe craddle). Jack the other side the same way. You should see the front & rear mounts at the center of the suspension cradle/subframe. Using you 21mm wrench, remove the rear top nut. This nut is not visible but should easily by removed from the rearward side. Next remove the bottom nut(19mm). Next comes the top front nut (patience and prayer) this was the only difficult part of the repair. Using a flashlight, you will see a small square window on the front mount bracket(left side looking forward). Using your 12 point offset stubby wrench, remove the top nut through this window. Remove the bottom nut. Now place your tallest jack under the black transmission support plate at the center of the engine assembly. Place your other jack under the center of the rearward beam of the suspension craddle. The second jack will be roughly between the two large rear suspension cradle bolts. Raise the engine jack 1 to 2 inches. Remove the first rear craddle bolt all the way and run it back in about 2 threads. Do the same to the other three suspension subframe craddle bolts (out and back in about 2 threads). You are ready, gently lower the craddle jack and remove fist the rear and then the front mounts. If needed GENTLY raise the engine or lower one full side(left or right) of the craddle for more gap. Install your new mounts, be mindfull that the mounts have a small dowel on th top that coincides with a hole in the mount brackets. While holding the front mount upward( to make sure the dowel is engaged) tighten both front suspension cradle bolts. Hold the rear mount up and tighten the rear bolts. Remove the two jacks. Install and tighten the front mount top nut (Patience & Prayer). Bottom nut next and the the rear mount the same. Take your pacifica off of the jack stands and enjoy your $800.00 savings.
Was this
answer
helpful?
Yes
No
+4
Friday, December 24th, 2010 AT 3:30 AM
Tiny
FIXITMR
  • MECHANIC
  • 9,990 POSTS
Another guy says put car on jack stands, loosen/lower front of engine cradle and remove/change mount. Now that sounds simple?
Was this
answer
helpful?
Yes
No
+1
Friday, December 24th, 2010 AT 3:46 AM
Tiny
KHLOW2008
  • MECHANIC
  • 41,815 POSTS
The job is a 1.6 hour job and manual does not specify removal of the transaxles.

LEFT MOUNT
REMOVAL
1. Disconnect the negative battery cable.

2. Remove engine cover.

3. Remove radiator cooling fan assembly.

4. Raise and support the vehicle.

5. Remove both of the engine mount to cradle nuts. See Fig. 144.

6. Lower the vehicle.

7. Connect the engine support fixture and support engine weight.

8. Remove the engine mount bolts and remove mount. See Fig. 144.

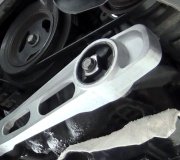
Fig. 144: Left Engine Mount

1 - BOLT
2 - BRACKET
3 - ENGINE MOUNT
4 - LEFT EXHAUST MANIFOLD

INSTALLATION

1. Install engine mount to bracket. Tighten nut to 101 N.M (75 lbs. Ft.). See Fig. 144.

2. Install left mount to the engine block. Tighten bolts to 54 N.M ( 40 lbs. Ft.). See Fig. 144.

3. Lower vehicle.

4. Remove the engine support fixture.

5. Raise and support the vehicle.

6. Install both of the engine mount to cradle nut. Tighten nut to 101 N.M (75 lbs. Ft.).

7. Lower vehicle.

8. Install radiator fan assembly.

9. Install the engine cover.

10. Connect the negative battery cable.
Was this
answer
helpful?
Yes
No
+1
Saturday, December 25th, 2010 AT 10:42 AM
Tiny
GRBULLETS
  • MEMBER
  • 5 POSTS
Yeah, if it were only that easy. If I got it right, you're loosening up the front sub frame and dropping it a bit? Unless I'm mistaken, if you don't bolt it back up exactly in the same position that it was in, you're front wheel alignment may have been affected? I had to replace my front mount 3 times (in 2 months. Went to a solid mount instead of the hydraulic ones that kept popping off at the top). I put the car on ramps and used a jack to lift the engine. I removed the front and rear mount to cradle nut's, and removed the bolts from the side mount (front of engine by the air cleaner). I did it once without moving the starter, and twice I did move the starter to jockey the mount and mount bracket out. I cut off about 1/2" of the bad mount stud too after removing the nut to make it easier to get out. Remove the 3 bracket bolts. Then place a floor jack under the engine and jack the engine up 4 or 5 inches. (If you can drop the sub frame without messing up the wheel alignment, this may be a good idea at this point. At you can remove the top nut that holds the mount to the bracket. Now you can remove the bracket and mount seperately. To install, put the bracket in place but no bolts yet. Hold it out of the way and then put the mount up into place. Start the mount to bracket nut and finger tighten. You can jockey the whole assy so that you can get a socket on the nut and with a long extension from above(engine compartment), tighten the nut to 75 ft/lbs.(It helps to have a helper to do this part. Have them hold the bracket/mount in place while you tighten the nut from above). Then jockey into place and replace bracket bolts. Lower engine and button up the rest of the nuts. Getting at the bracket bolts is not so easy. Having an offset 15mm ratcheting wrench will help, and a wobble adapter for sockets will help too. Any way you do it, replacing the front mount is a real itch! Anyone who say's they did it in an hour and a half is talking out of their butt crack. The Chrysler servive manual say's to remove the front fascia, and the radiator fan's. I think you'll have to move the exhaust manifold shield(maybe the manifold too) and the starter to get at the mount this way. I think Gumby would have a hard time trying to get at the mount from the front of the vehicle. You'd better be pretty flexible to go this route. The other way you just lay on your back and swear a lot while your arm's get tired.
Was this
answer
helpful?
Yes
No
+2
Thursday, June 21st, 2012 AT 2:15 PM
Tiny
GRBULLETS
  • MEMBER
  • 5 POSTS
One more question. Can you really loosen up a nut (that you can't see and can hardly get at)at 75 ft./Lbs with a stubby wrench? Bionic hand or whats the deal?
Was this
answer
helpful?
Yes
No
Thursday, June 21st, 2012 AT 2:36 PM
Tiny
RIVERMIKERAT
  • MECHANIC
  • 6,110 POSTS
Yes, grbullets, it CAN be done, but you'll need to use leverage. Put a boxed-end wrench around the end of the stubby ratchet and pull/push from the other side. That should help you break the 75 ft/lbs loose.
Was this
answer
helpful?
Yes
No
Sunday, July 29th, 2012 AT 6:02 PM
Tiny
GRBULLETS
  • MEMBER
  • 5 POSTS
There is not enough room in there to get a box end wrench on a stubby ratchet with the mount bracket mounted to the engine. Even if you did manage to get one on, there is no room there to turn the wrench either way. The easiest way to tighten or remove the mount to bracket nut is to do it before you put the bracket in place to bolt up. The mount/bracket assy can be jockeyed around in place once the bracket to engine bolts are removed and the engine is jacked up. You can then get a wrench on the mount to bracket nut to remove or tighten without too much difficulty.
Was this
answer
helpful?
Yes
No
Monday, July 30th, 2012 AT 10:28 PM
Tiny
RIVERMIKERAT
  • MECHANIC
  • 6,110 POSTS
Ahhh, Ok. Not even with a universal swivel and extension?

At least it sounds like you got it handled successfully and with ingenuity. Congrats.
Was this
answer
helpful?
Yes
No
Tuesday, July 31st, 2012 AT 12:35 AM
Tiny
GRBULLETS
  • MEMBER
  • 5 POSTS
Really, I've done this 3X and tried everything imagineable. If you've never actually done it, it's hard to imagine how little room there is in this area. You would be lucky to just get a stubby wrench on the 21mm nut. You really can't even use a ratchet and socket on it because there isn't enough room above the nut to get a socket and a ratchet on it. Even if there was, you would have to do it through a 2.5" square hole in the mounting bracket that is the only access to the nut with the bracket bolted to the motor. This is the 3.5L engine that I'm talking about. The 3.8L may be different, I've not done one them, but the 06 repair manual doesn't say anything about it being any different.
Was this
answer
helpful?
Yes
No
Tuesday, July 31st, 2012 AT 6:08 AM
Tiny
RIVERMIKERAT
  • MECHANIC
  • 6,110 POSTS
Huh. It definitely sounds like a universal swivel (or 2) and about 8 -10 inches worth of extension would make the job much easier. But, not being able to see it, I can't tell exactly.
Was this
answer
helpful?
Yes
No
Tuesday, July 31st, 2012 AT 3:58 PM

Please login or register to post a reply.

Sponsored links