Welcome back:
If you have the E brake on all the time, there most likely isn't much left to the brake shoes. Since the brake pedal is going to the floor, first check the brake fluid level. If it isn't low, suspect a bad master cylinder. If it is very low or empty, it could still be the master cylinder, but also check for evidence of brake fluid leaking from the back of one of the wheels or anywhere under the vehicle. You will find the master cylinder and fluid reservoir under the hood mounted on the firewall, driver's side.
It's not my business, but I have to be honest with you. I'm concerned you are driving it this way. I would never let anyone in my family drive a car under those conditions, and now you are (indirectly) part of this family. Please remove the rear wheels and inspect the brakes to see what has happened. Also, check the fluid in the MC to make sure it isn't empty. I have a feeling the e brake is allowing the master cylinder to do less work and that is why it is helping. However, and I don't want to scare you, but if the parking brake is still working, then the brakes are getting extremely hot because it is always on. Under extreme conditions it could even cause a fire. I really don't want you to get hurt. And as Ken had mentioned earlier, the brakes need replaced at this point.
Now that you mentioned the brake pedal is going to the floor, take a look through these links:
https://www.2carpros.com/articles/brake-pedal-goes-to-the-floor
https://www.2carpros.com/articles/how-to-replace-a-brake-master-cylinder
Here is a link that explains how to replace rear brake shoes:
https://www.2carpros.com/articles/how-to-replace-rear-brake-shoes-and-drums
Please understand that the two things I mentioned may not be the problem at all. You could have a leak in the system, a bad wheel cylinder, a rusted steel brake line, rubber line or a bad caliper. That is why I recommended that you check for leaks.
________________________________
I am going to provide the directions specific to your vehicle for both mater cylinder replacement and rear brake shoes. All attached pics correlate with the directions.
1999 Toyota Truck 4 Runner 2WD L4-2.7L (3RZ-FE)
Procedures
Vehicle Brakes and Traction Control Drum Brake System Service and Repair Procedures
PROCEDURES
REMOVAL
pic 1
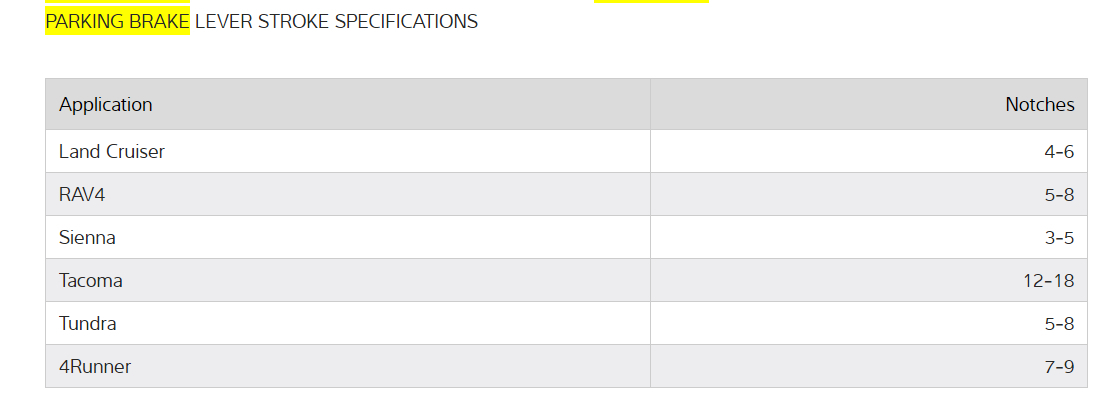
1. INSPECT SHOE LINING THICKNESS
Remove the inspection hole plug, and check the shoe lining thickness through the hole. If less than the minimum, replace the shoes.
Minimum thickness: 1.0 mm (0.039 inch)
2. REMOVE REAR WHEEL
pic 2
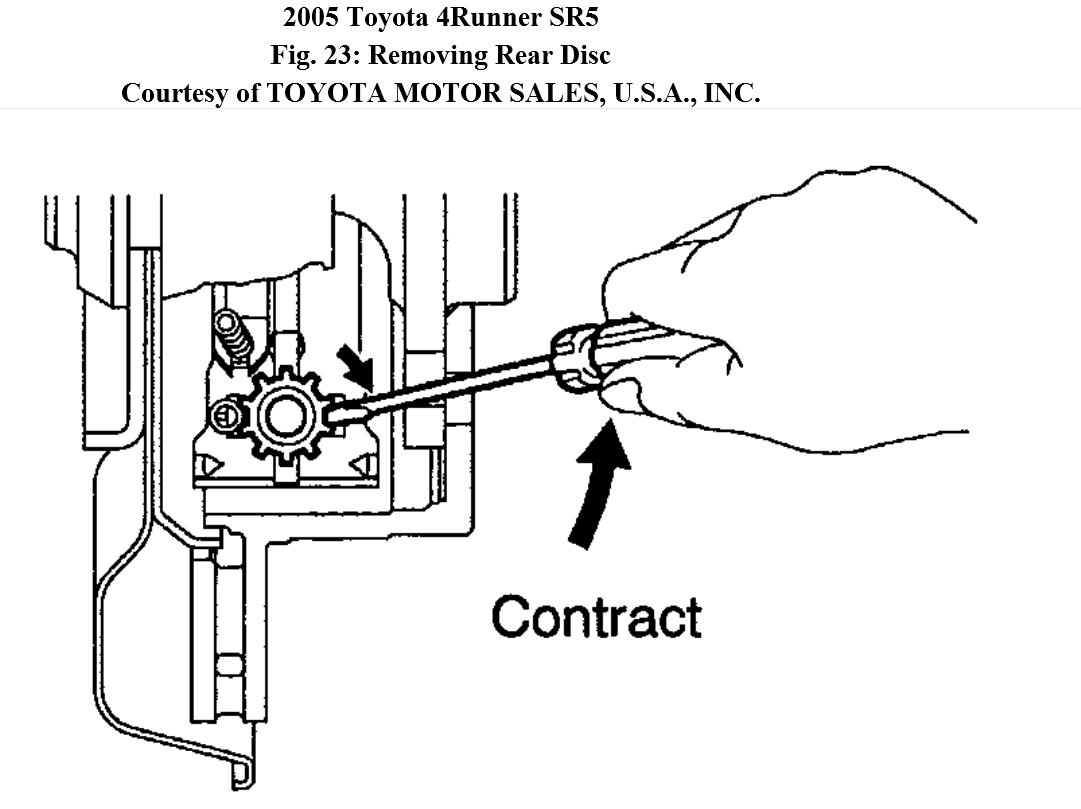
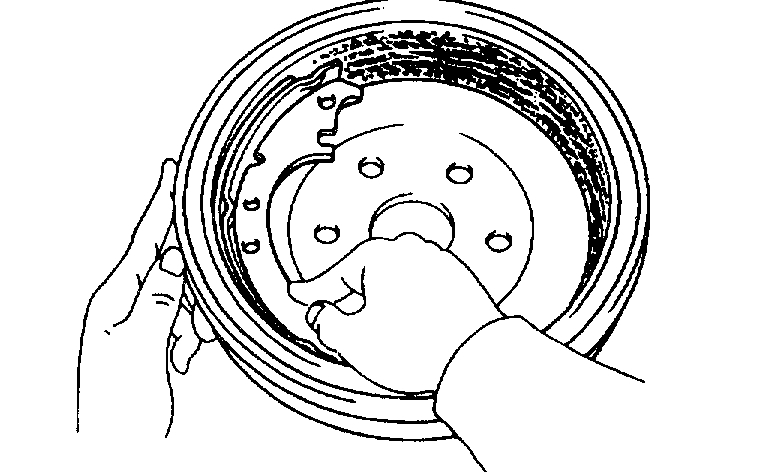
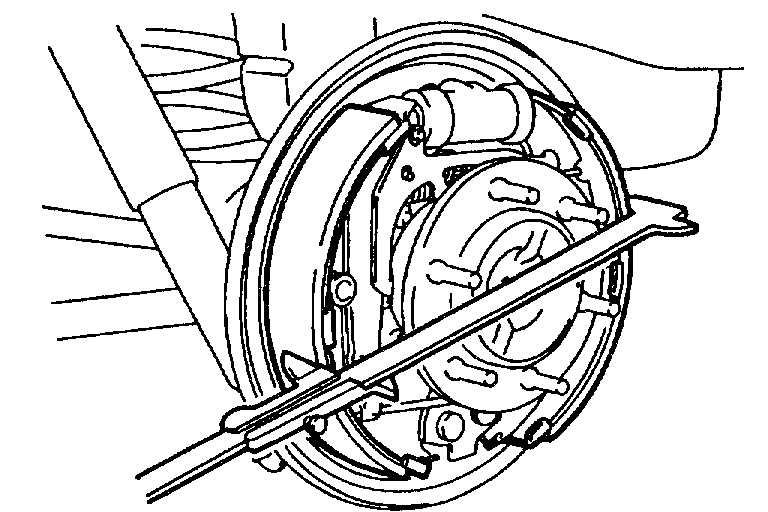
3. REMOVE BRAKE DRUM
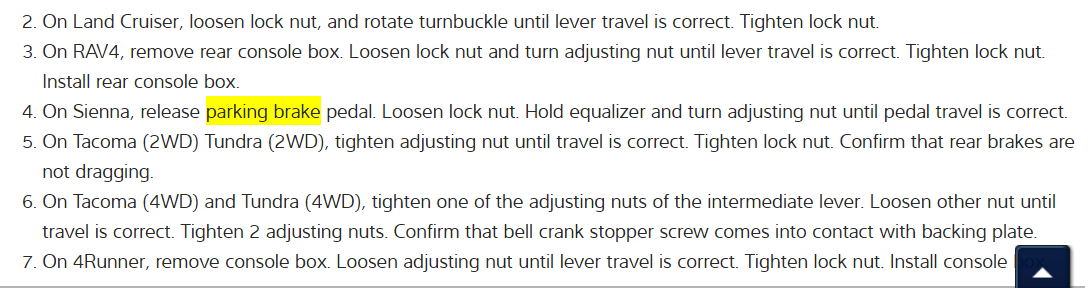
HINT: If the brake drum cannot be removed easily, do the following steps:
a. Remove the adjusting hole plug in the backing plate.
b. Insert a screwdriver through the hole in the backing plate, and hold the automatic adjusting lever away from the adjusting bolt.
c. Using another screwdriver, reduce the brake shoe adjustment by turning the adjusting bolt.
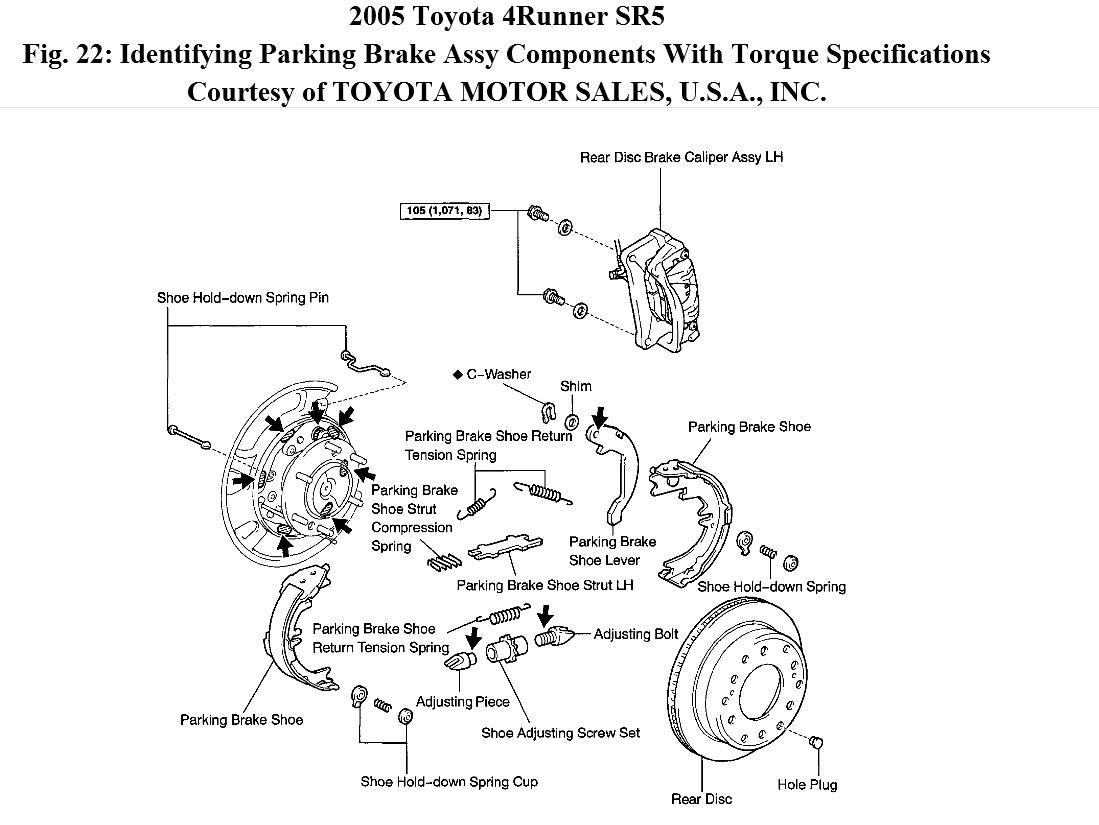
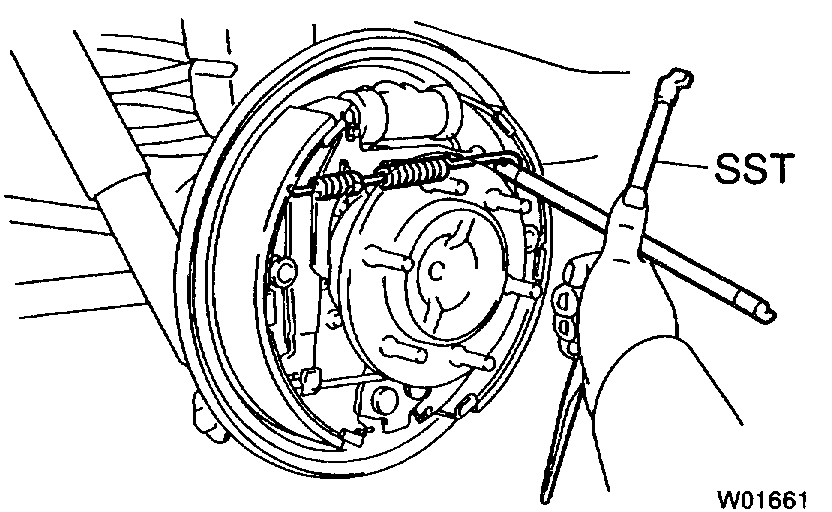
4. REMOVE REAR SHOE
pic 3
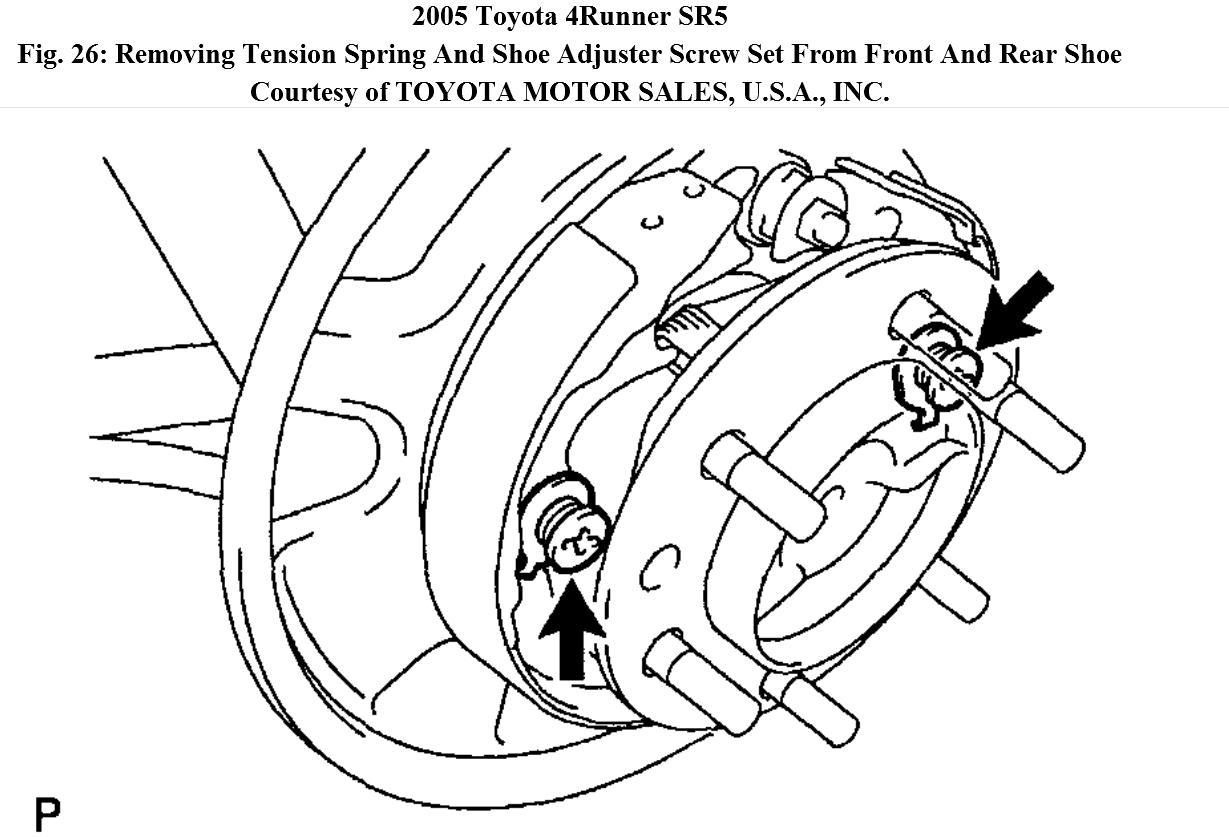
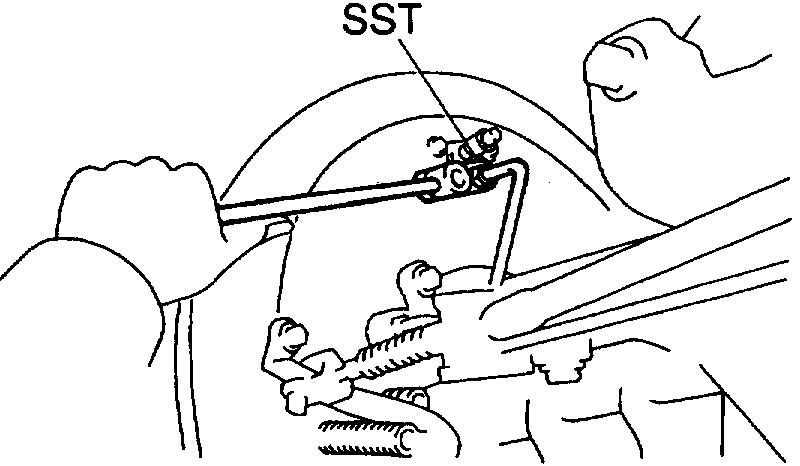
a. Using Special Service Tools (SST), disconnect the return spring.
SST 09703-30010
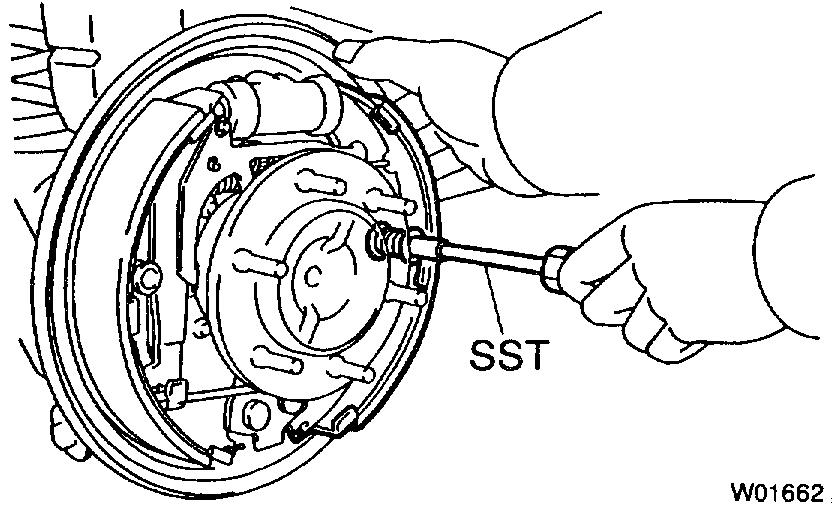
pic 4
b. Using SST, remove the shoe hold-down spring, cups and pin.
SST 09718-00010
c. Disconnect the anchor spring from the rear shoe and remove the rear shoe.
d. Remove the anchor spring from the front shoe.
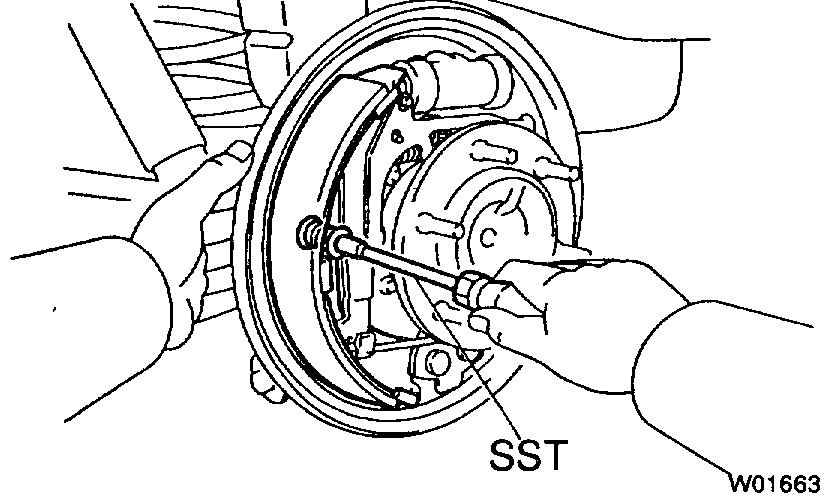
pic 5
5. REMOVE FRONT SHOE
a. Using SST, remove the shoe hold-down spring, cups and pin.
SST 09718-00010
b. Remove the return spring from the front shoe.
c. Remove the front shoe with adjuster.
d. Disconnect the parking brake cable from the front shoe.
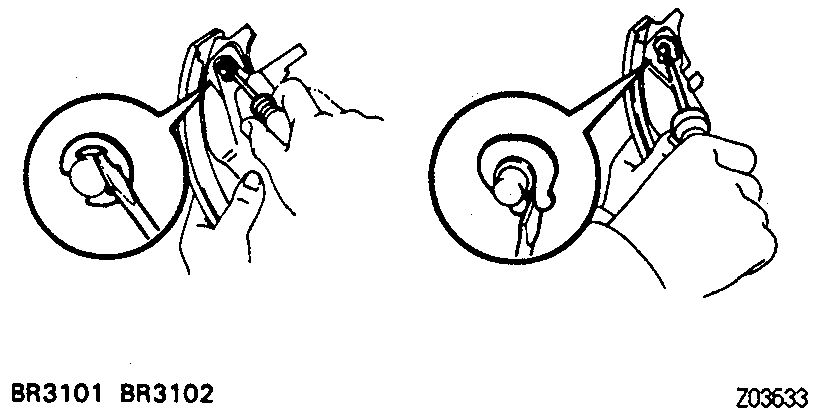
Remove E-Ring And C-Washer
pic 6
6. REMOVE ADJUSTER FROM FRONT SHOE
a. Remove the adjusting lever spring.
b. Remove the adjuster.
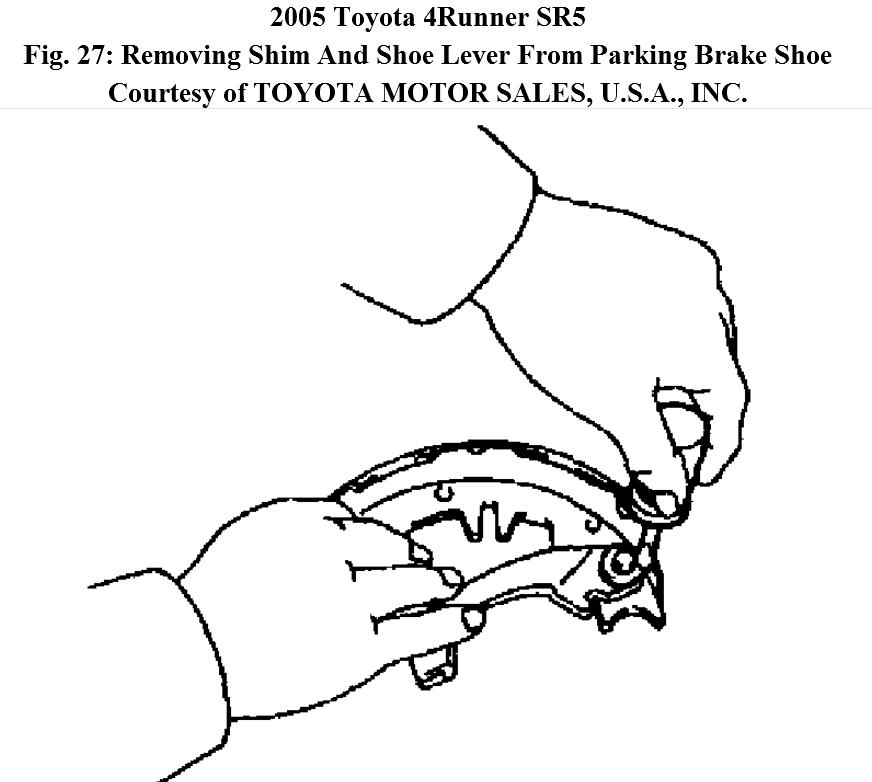
7. REMOVE AUTOMATIC ADJUSTING LEVER AND PARKING BRAKE LEVER
a. Remove the E-ring.
b. Remove the automatic adjusting lever.
c. Remove the C-washer.
d. Remove the parking brake lever.
8. REMOVE AND DISASSEMBLE PARKING BRAKE BELLCRANK
pic 7
a. Remove the clip and disconnect the parking brake cable.
b. Remove the tension spring.
c. Remove the 2 bolts and bellcrank.
Torque: 13 Nm (130 kgf-cm, 9 ft. lbs.)
d. Remove the bellcrank boot from the bellcrank bracket.
pic 8
e. Remove the C-washer and pin.
f. Remove the parking brake bellcrank from the bellcrank bracket.
pic 9
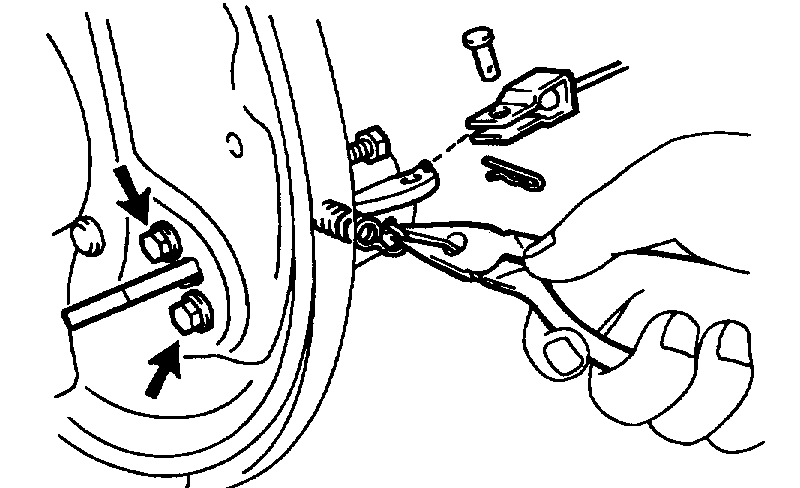
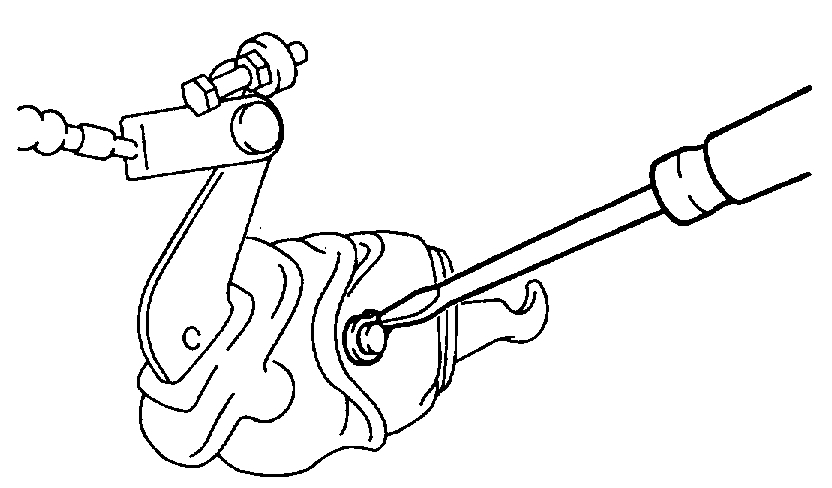
9. REMOVE WHEEL CYLINDER
a. Using SST, disconnect the brake line. Use a container to catch the brake fluid.
Torque: 15 Nm (155 kgf-cm, 11 ft. lbs.)
SST 09023-00100
b. Remove the 2 bolts and the wheel cylinder.
Torque: 10 Nm (100 kgf-cm, 7 ft. lbs.)
10. DISASSEMBLE WHEEL CYLINDER
Remove the these parts from the wheel cylinder.
1. 2 boots
2. 2 pistons
3. 2 piston cups
4. Spring
INSPECTION
1. INSPECT DISASSEMBLED PARTS
Inspect the disassembled parts for wear, rust or damage.
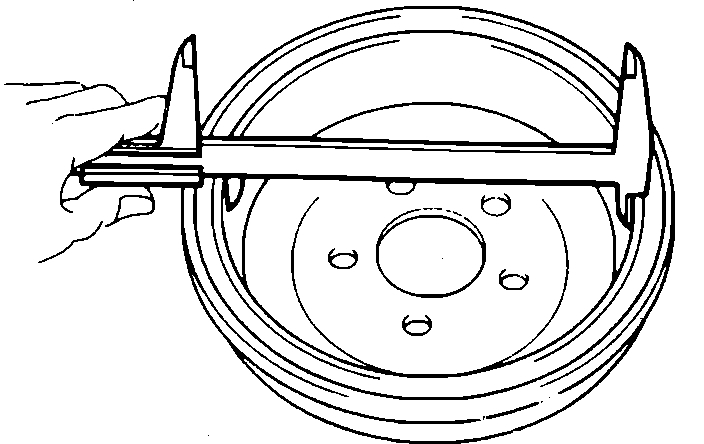
Fig. 3 Measuring Brake Drum Inside Diameter
pic 10
2. MEASURE BRAKE DRUM INSIDE DIAMETER
Using vernier calipers, measure the inside diameter of the drum.
Standard inside diameter: 295.0 mm (11.614 inch)
Maximum inside diameter: 297.0 mm (11.693 inch)
If the drum is scored or worn, the brake drum may be lathed to the maximum inside diameter.
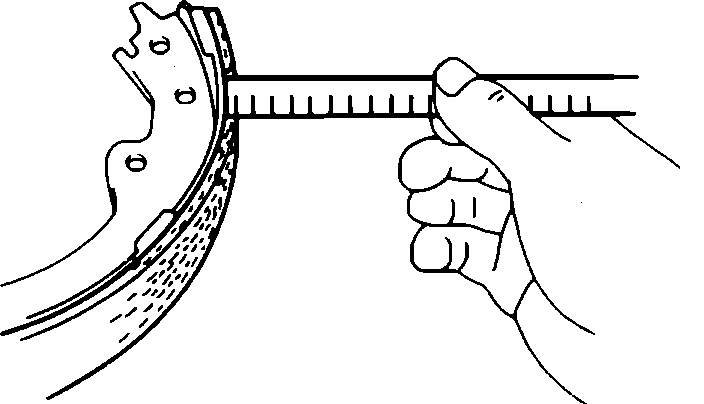
Fig. 4 Measuring Brake Shoe Lining Thickness
pic 11
3. MEASURE BRAKE SHOE LINING THICKNESS
Using a ruler, measure the shoe lining thickness.
Standard thickness: 6.0 mm (0.236 inch)
Minimum thickness: 1.0 mm (0.039 inch)
If the shoe lining is less than the minimum, or shows signs of uneven wear, replace the brake shoes.
HINT: If any of the brake shoes have to be replaced, replace all of the rear brake shoes in order to maintain even braking.
pic 12
4. INSPECT BRAKE LINING AND DRUM FOR PROPER CONTACT
If the contact between the brake lining and drum is improper, repair the lining with a brake shoe grinder, or replace the brake shoe assembly.
INSTALLATION
Installation is in the reverse order of removal.
NOTICE: Apply lithium soap base glycol grease and high temperature grease to the parts indicated by the arrows.
pic 13
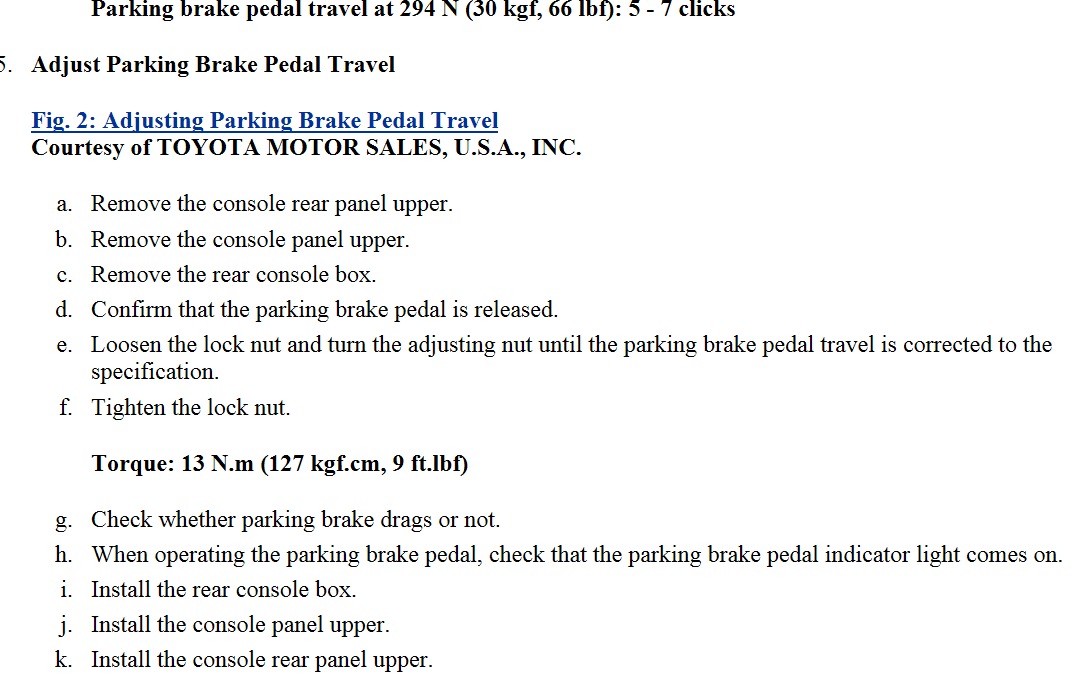
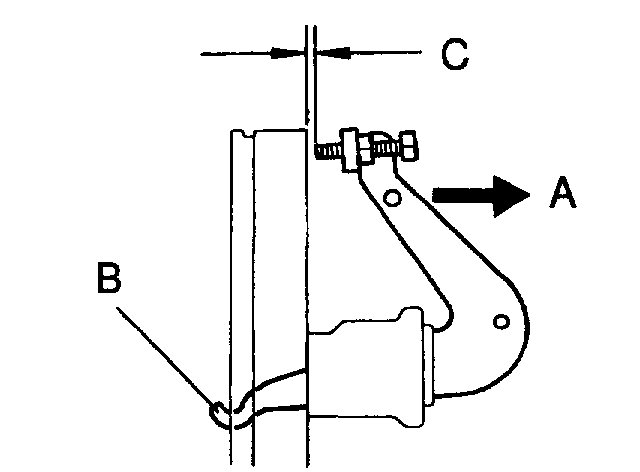
1. ADJUST BELLCRANK
a. Lightly pull the bellcrank in direction A until there is no slack at part B.
b. In this condition, turn the adjusting bolt so that dimension C will be 0.4 - 0.8 mm (0.016 - 0.031 inch).
c. Lock the adjusting bolt with the lock nut.
d. Connect the parking brake cable to the parking brake bellcrank and install the clip.
e. Install the tension spring.
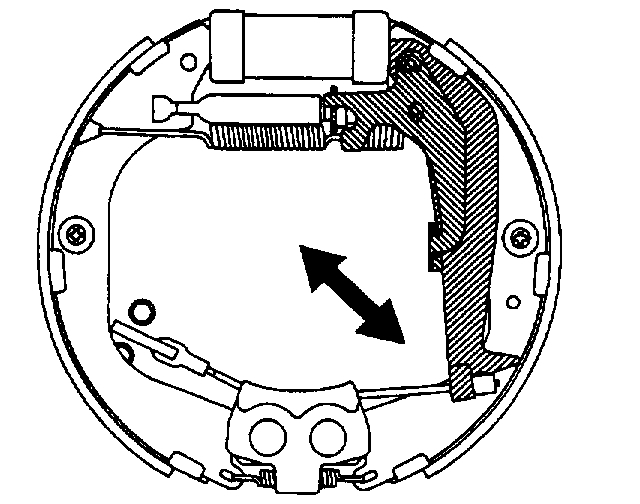
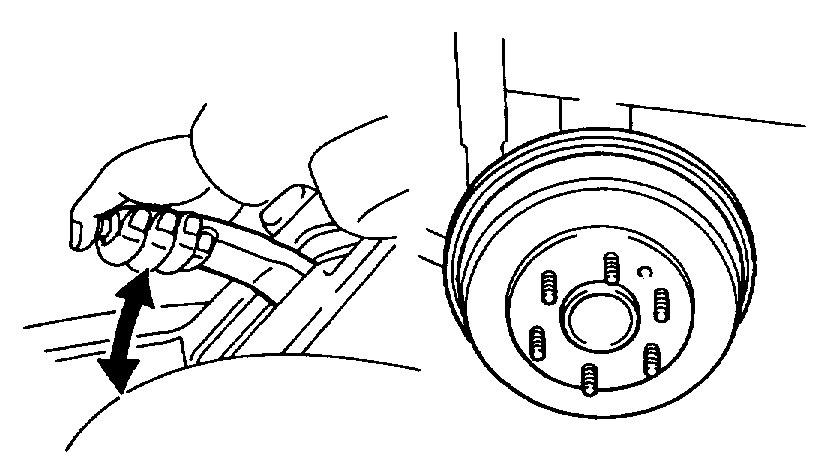
2. CHECK OPERATION OF AUTOMATIC ADJUSTING MECHANISM
pic 14
a. Move the parking brake lever of the rear shoe back and forth, as shown. Check that the adjusting bolt turns. If it does not turn, check for incorrect installation of the rear brakes.
pic 15
b. Adjust the adjuster length to the shortest possible amount.
c. Install the drum.
d. Pull the parking brake lever all the way up until a clicking sound can no longer be heard.
3. CHECK CLEARANCE BETWEEN BRAKE SHOES AND DRUM
pic 16
a. Remove the drum.
Fig. 3 Measuring Brake Drum Inside Diameter
pic 17
b. Measure the brake drum inside diameter and diameter of the brake shoes. Check that the difference between the diameters is the correct shoe clearance.
Shoe clearance: 0.5 mm (0.020 inch)
If it is incorrect, check the parking brake system.
4. FILL BRAKE RESERVOIR WITH BRAKE FLUID
5. BLEED BRAKE SYSTEM.
6. Check for leaks
________________________________________________________
Here are the directions for replacing the master cylinder.
1999 Toyota Truck 4 Runner 2WD L4-2.7L (3RZ-FE)
Removal and Installation
Vehicle Brakes and Traction Control Hydraulic System Brake Master Cylinder Service and Repair Procedures Removal and Installation
REMOVAL AND INSTALLATION
REMOVAL
1. DISCONNECT LEVEL WARNING SWITCH CONNECTOR
2. TAKE OUT FLUID WITH SYRINGE
NOTICE: Do not let brake fluid remain on a painted surface. Wash it off immediately.
pic 18
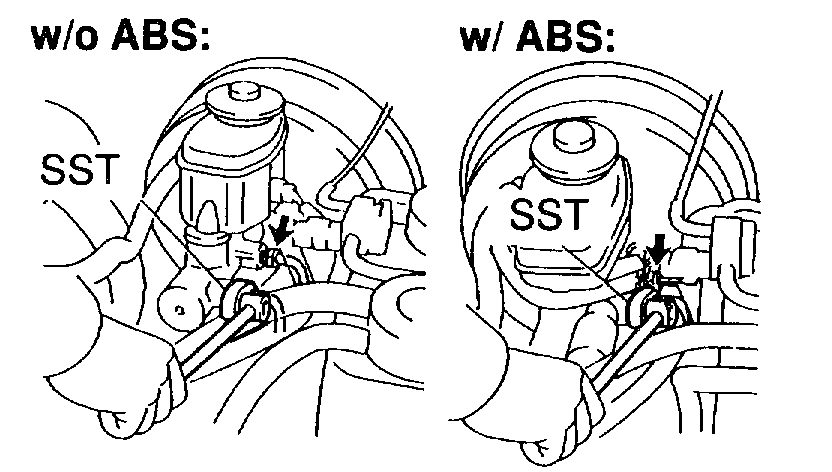
3. DISCONNECT BRAKE LINES
Using Special Service Tools (SST), disconnect the 6 (w/o ABS) or 2 (w/ABS) brake lines.
SST 09023-00100
Torque: 15 Nm (155 kgf-cm, 11 ft. lbs.)
pic 19
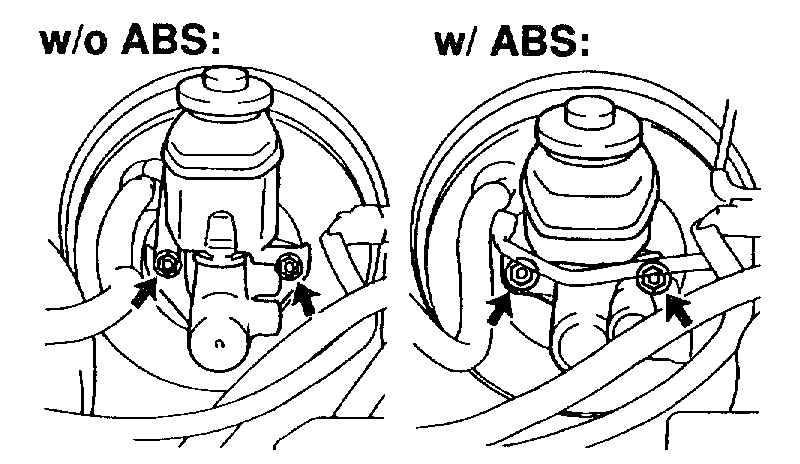
4. REMOVE MASTER CYLINDER
Remove the 2 nuts, 4-way (w/o ABS), check valve bracket, bracket and pull out the master cylinder and gasket.
Torque: 13 Nm (130 kgf-cm, 9 ft. lbs.)
INSTALLATION
Installation is in the reverse order of removal.
1. BEFORE INSTALLATION, ADJUST LENGTH OF BRAKE BOOSTER PUSH ROD.
2. AFTER INSTALLATION, FILL BRAKE RESERVOIR WITH BRAKE FLUID, BLEED BRAKE SYSTEM, CHECK FOR LEAKS, CHECK AND ADJUST BRAKE PEDAL.
Next is bleeding the brakes. You can follow the link above related to MC replacement.
Let me know if you have questions or need help.
Take care,
Joe
Images (Click to enlarge)
Apr 12, 2021 at 10:02 AM
(Merged)