How do I replace the radiator

Tiny
ANONYMOUS
  • MEMBER
  • 2003 JEEP GRAND CHEROKEE LAREDO
  • 122,000 MILES
How do I replace the radiator
Monday, January 21st, 2013 AT 11:07 PM

11 Replies

Tiny
ASEMASTER6371
  • MECHANIC
  • 52,797 POSTS
Here is a guide to help you step by step with instructions in the diagrams below to show you how on your car.

https://www.2carpros.com/articles/how-to-replace-a-car-radiator

RADIATOR. 4.0L

REMOVAL

WARNING: DO NOT REMOVE THE CYLINDER BLOCK DRAIN PLUGS OR LOOSEN THE RADIATOR DRAINCOCK WITH THE SYSTEM HOT AND UNDER PRESSURE. SERIOUS BURNS FROM COOLANT CAN OCCUR. REFER TO COOLING SYSTEM DRAINING.

Do not waste reusable coolant. If the solution is clean, drain the coolant into a clean container for reuse.

WARNING: CONSTANT TENSION HOSE CLAMPS ARE USED ON MOST COOLING SYSTEM HOSES. WHEN REMOVING OR INSTALLING, USE ONLY TOOLS DESIGNED FOR SERVICING THIS TYPE OF CLAMP, SUCH AS SPECIAL CLAMP TOOL (NUMBER 6094). SNAP-ON CLAMP TOOL (NUMBER HPC-20) MAY BE USED FOR LARGER CLAMPS. ALWAYS WEAR SAFETY GLASSES WHEN SERVICING CONSTANT TENSION CLAMPS.

CAUTION: A number or letter is stamped into the tongue of constant tension clamps. If replacement is necessary, use only an original equipment clamp with matching number or letter.

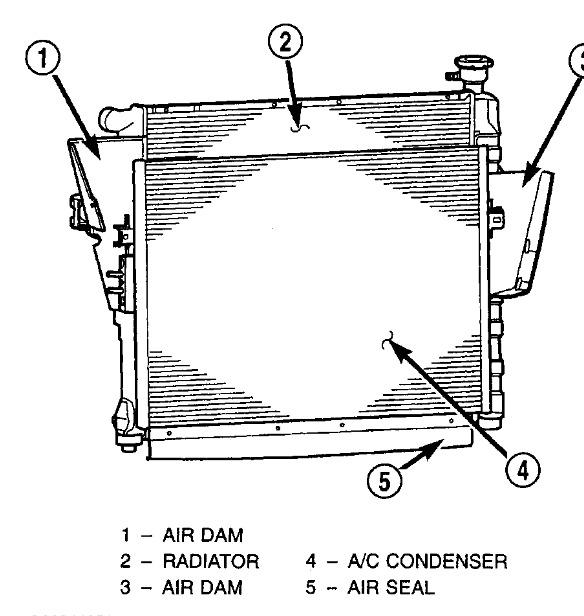
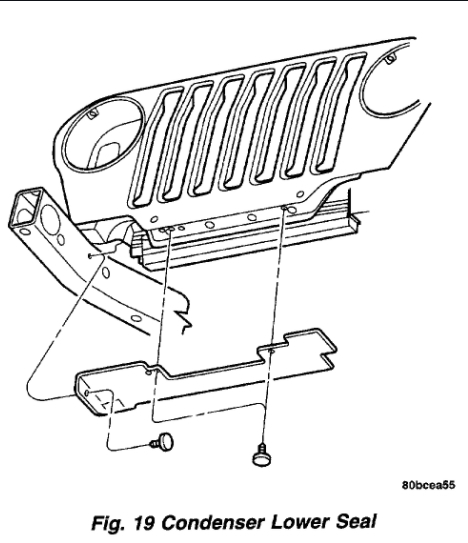
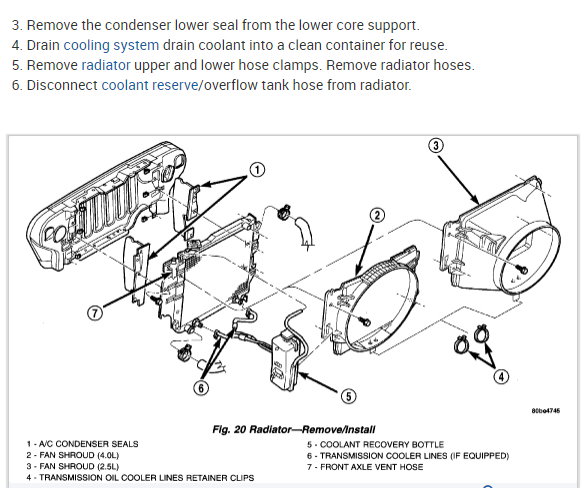
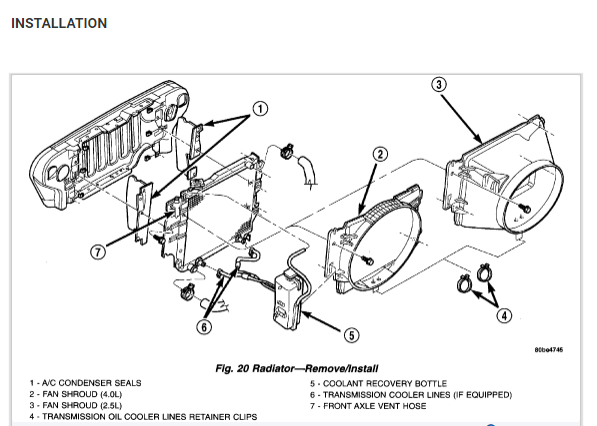
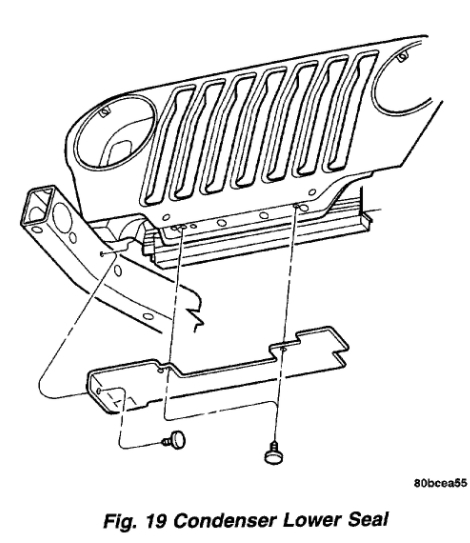
CAUTION: When removing the radiator or A/C condenser for any reason, note the location of all radiator-to-body and radiator-to-A/C condenser rubber air seals. These are used at the top, bottom and sides of the radiator and A/C condenser. To prevent overheating, these seals must be installed to their original positions.

Disconnect the negative battery cable at battery.
Drain coolant from radiator. Refer to Cooling System, Service and Repair See: Service and Repair
Do not attempt to remove fan/viscous fan drive assembly from vehicle at this time.
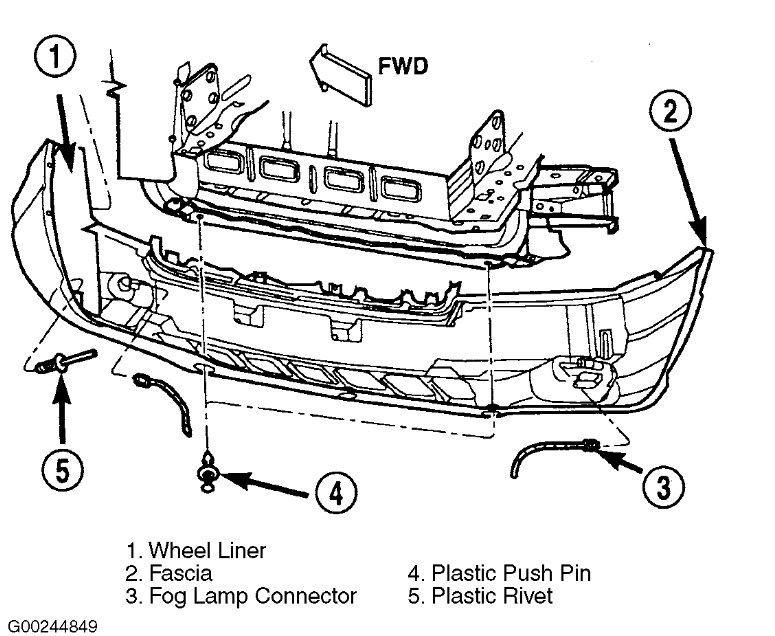
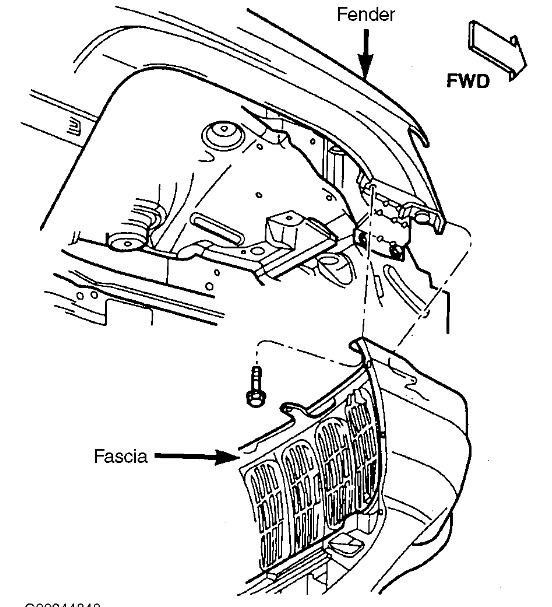
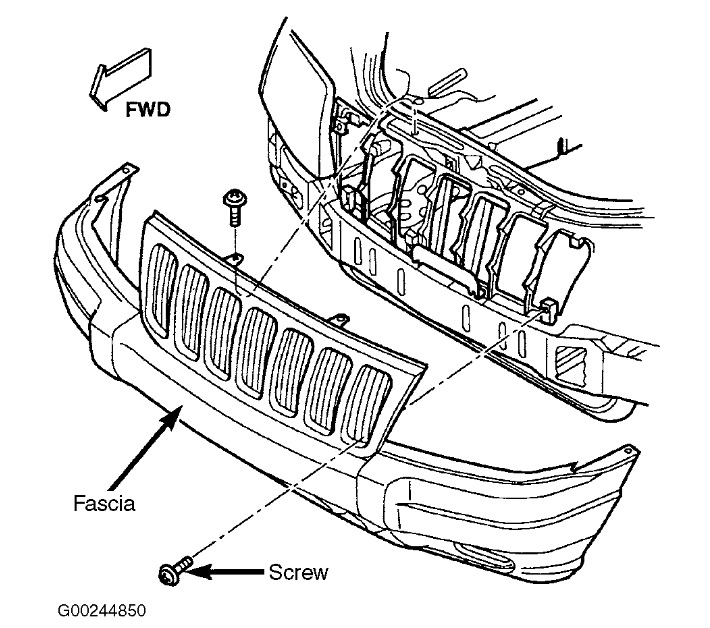
Remove the front grill. Body and Frame, Grille, Service and Repair See: Body and FrameGrilleService and Repair

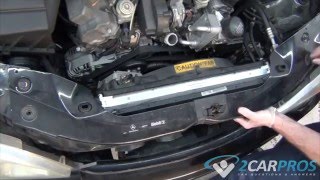
Remove two radiator mounting bolts.
Disconnect both transmission cooler lines from radiator.
Disconnect electric fan connector, then disconnect connector harness from shroud.
Disconnect the radiator upper and lower hoses.
Disconnect the overflow hose from radiator.
Remove the air inlet duct at the grill.

The lower part of radiator is equipped with two alignment dowel pins. They are located on the bottom of radiator tank and fit into rubber grommets. These rubber grommets are pressed into the radiator lower crossmember.

WARNING: THE AIR CONDITIONING SYSTEM (IF EQUIPPED) IS UNDER A CONSTANT PRESSURE EVEN WITH THE ENGINE OFF. REFER TO REFRIGERANT WARNINGS BEFORE HANDLING ANY AIR CONDITIONING COMPONENT.

If equipped with an auxiliary automatic transmission oil cooler, use caution when removing radiator. The oil cooler lines are routed through a rubber air seal on the right side of radiator. Do not cut or tear this seal.
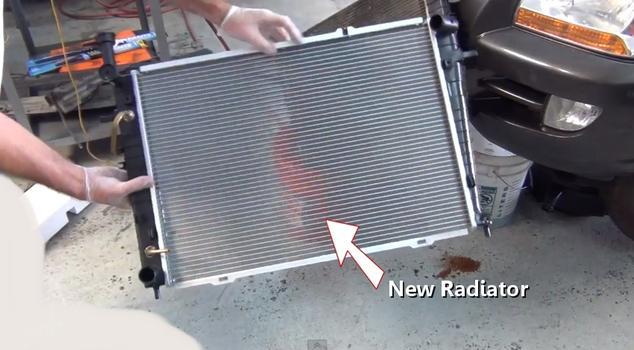
Gently lift up and remove radiator from vehicle. Be careful not to scrape the radiator fins against any other component. Also be careful not to disturb the air conditioning condenser (if equipped).

CLEANING
Clean radiator fins with the engine cold, apply cold water and compressed air to the back (engine side) of the radiator to flush the radiator and/or A/C condenser of debris.

INSPECTION
The radiator cooling fins should be checked for damage or deterioration. Inspect cooling fins to make sure they are not bent or crushed, these areas result in reduced heat exchange causing the cooling system to operate at higher temperatures. Inspect the plastic end tanks for cracks, damage or leaks.
Inspect the radiator neck for damage or distortion.

INSTALLATION

CAUTION: Before installing the radiator or A/C condenser, be sure the radiator-to-body and radiator-to A/C condenser rubber air seals are properly fastened to their original positions. These are used at the top, bottom and sides of the radiator and A/C condenser. To prevent overheating, these seals must be installed to their original positions.

Equipped with air conditioning: Gently lower the radiator into the vehicle. Guide the two radiator alignment dowels through the holes in the rubber air seals first and then through the A/C support brackets. Continue to guide the alignment dowels into the rubber grommets located in lower radiator crossmember. The holes in the L-shaped brackets (located on bottom of A/C condenser) must be positioned between bottom of rubber air seals and top of rubber grommets.

Connect the radiator upper and lower hoses and hose clamps to radiator.

CAUTION: The tangs on the hose clamps must be positioned straight down.

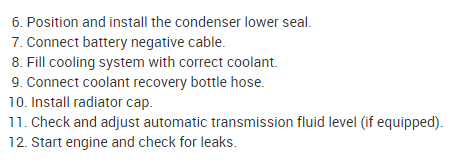
Install coolant reserve/overflow tank hose at radiator.
Connect both transmission cooler lines at the radiator.
Install both radiator mounting bolts.
Install air inlet duct at grill.
Attach electric fan harness to shroud, then connect harness to connector.
Install the grill. Body and Frame, Grille, Service and Repair See: Body and FrameGrilleService and Repair
Install the fan/viscous fan drive assembly to the water pump.
Rotate the fan blades (by hand) and check for interference at fan shroud.
Be sure of at least 25 mm (1.0 in.) between tips of fan blades and fan shroud.
Fill cooling system. Refer to Cooling System, Service and Repair See: Service and Repair
Connect battery cable at battery.
Start and warm engine. Check for leaks.

Was this
answer
helpful?
Yes
No
Monday, January 21st, 2013 AT 11:32 PM
Tiny
MULTARI68
  • MEMBER
  • 1 POST
  • 2001 JEEP GRAND CHEROKEE LAREDO
  • 4.7L
  • V8
  • 4WD
  • AUTOMATIC
  • 158,000 MILES
Help changing radiatorinstructions on how to change a radiator in 2001 jeep grand cherokee laredo 4.7L
Was this
answer
helpful?
Yes
No
Tuesday, December 29th, 2020 AT 1:27 PM (Merged)
Tiny
HMAC300
  • MECHANIC
  • 48,601 POSTS
Here is a guide to help you step by step with instructions in the diagrams below to show you how on your car.

https://www.2carpros.com/articles/how-to-replace-a-car-radiator

CAUTION: When removing radiator or A/C condenser for any reason, note location of all radiator-to-body and radiator-to-A/C condenser rubber air seals. See Fig. 23. These are used at top, bottom and sides of radiator and A/C condenser. To prevent overheating, these seals must be installed to their original positions.

Disconnect negative battery cable. Drain cooling system. Raise and support vehicle. Turn front wheels to access rivets, and remove plastic rivets attaching front fascia to wheel liner. See Fig. 24.
Remove bolts attaching fascia to fender. See Fig. 25. Remove plastic push pins attaching fascia to lower radiator crossmember splash shield. Disconnect fog lamp connectors, if equipped.
Remove screws attaching fascia to upper radiator crossmember. See Fig. 26. Slide fascia forward and remove from vehicle.
Remove 2 radiator mounting bolts. Disconnect both transmission cooler lines from radiator. Disconnect electrical connector for fan control solenoid. Disconnect power steering cooler line from cooler and filter.
Disconnect radiator hoses from radiator. Disconnect power steering cooler line from cooler and filter. Disconnect overflow hose from radiator. Remove air inlet duct at grill.
NOTE: Radiator and cooling fan can be removed as an assembly. It is not necessary to remove cooling fan before removing or installing radiator.

Disconnect 2 high pressure fluid lines at hydraulic fan drive. Disconnect low pressure return at hydraulic fan drive. Gently lift up and remove radiator from vehicle. Do not scrape radiator fins against any other component.Also, do not disturb A/C condenser
AUTION: Before installing radiator or A/C condenser, ensure radiator-to-body and radiator-to-A/C condenser rubber air seals are properly fastened to their original positions. See Fig. 23. These are used at top, bottom and sides of radiator and A/C condenser. To prevent overheating, these seals must be installed to their original positions.

Gently lower radiator into vehicle. Guide to radiator alignment dowels through holes in rubber air seals first and then through A/C support brackets.
Continue to guide alignment dowels into rubber grommets located in lower radiator crossmember. Holes in L-shaped brackets (located on bottom of A/C condenser) must be positioned between bottom of rubber air seals and top of rubber grommets.
Connect radiator hoses to radiator with tinga on hose clamps positioned straight down. To complete installation, reverse removal procedure. Fill cooling system. Connect negative battery cable. Start and warm engine. Check for leaks
Was this
answer
helpful?
Yes
No
+1
Tuesday, December 29th, 2020 AT 1:27 PM (Merged)
Tiny
YUNGSPOIL
  • MEMBER
  • 1 POST
  • 2002 JEEP GRAND CHEROKEE LAREDO
  • 4.0L
  • 6 CYL
What tools do I need
Was this
answer
helpful?
Yes
No
+1
Tuesday, December 29th, 2020 AT 1:27 PM (Merged)
Tiny
JACOBANDNICKOLAS
  • MECHANIC
  • 108,139 POSTS
You will need a general Metric socket set / ratchet. Also, you will need to have what are called line wrenches. They are needed to remove the transmission cooling lines which you will most likely need to reinstall in the new radiator. Screwdrivers will be needed to remove the radiator hose clamps. Other than that, you just need a large pan to capture the coolant that will be drained from the system.

One last thought, on some of these vehicles, there is a coolant temp sensor mounted in the driver's side tank of the rad. If yours is like that, you will need either a large adjustable wrench or if I recall, a 1 1/4" open end or box end wrench.

We always recommend eye protection. And make sure the engine is cold before starting this process.
Was this
answer
helpful?
Yes
No
+2
Tuesday, December 29th, 2020 AT 1:27 PM (Merged)
Tiny
PRODMONSTER
  • MEMBER
  • 1 POST
  • 1999 JEEP GRAND CHEROKEE LAREDO
  • 6 CYL
  • 4WD
  • AUTOMATIC
  • 94,000 MILES
How long should it take to change a radiator in my 99 g. Cherokee laredo?
Was this
answer
helpful?
Yes
No
Tuesday, December 29th, 2020 AT 1:27 PM (Merged)
Tiny
RUSTYKRIDER
  • MEMBER
  • 2 POSTS
I have changed the one in my 2000 twice. Shouldn't have went to the junkyard on the first one. It took me about 3 hours. There are alot of little things that need to be taken off to get it out right. Just take your time and don't force it. It will come out okay.
Was this
answer
helpful?
Yes
No
Tuesday, December 29th, 2020 AT 1:27 PM (Merged)
Tiny
HORNEDANGEL
  • MEMBER
  • 2 POSTS
  • 1995 JEEP GRAND CHEROKEE LAREDO
1995 Jeep Laredo 6 cyl Four Wheel Drive Automatic

is there a special tool to remove the raidiator plug to flush it out
Was this
answer
helpful?
Yes
No
Tuesday, December 29th, 2020 AT 1:27 PM (Merged)
Tiny
BLUELIGHTNIN6
  • MECHANIC
  • 16,542 POSTS
No special tools required. Front grill must be removed to access radiator draincock. Can also just remove drain plug from side of block to empty system. The radiator draincock will not come completely out, it will just loosen up.
Was this
answer
helpful?
Yes
No
Tuesday, December 29th, 2020 AT 1:27 PM (Merged)
Tiny
RILEYFULMER
  • MEMBER
  • 1 POST
  • 2001 JEEP GRAND CHEROKEE LAREDO
  • 4 CYL
  • 4WD
  • AUTOMATIC
  • 14,500 MILES
My radiator was leaking, I ordered a new one and went to install it. Can not get the old one out. The manual says just lift the radiator and cooling fan assembly out but it hits the steering gearbox. Any ideas? This is the most involved radiator R&R I hav ever done.
Thanks,
Riley
Was this
answer
helpful?
Yes
No
Monday, February 1st, 2021 AT 9:57 AM (Merged)
Tiny
DANNY L
  • MECHANIC
  • 5,648 POSTS
Hello, I'm Danny.

Here is a tutorial for you to view on radiator replacement:

https://www.2carpros.com/articles/how-to-replace-a-car-radiator

I've attached picture steps below for radiator replacement on your vehicle. Hope this helps and thanks for using 2CarPros.
Was this
answer
helpful?
Yes
No
Monday, February 1st, 2021 AT 9:57 AM (Merged)

Please login or register to post a reply.

Sponsored links