9-5 SAAB

Tiny
CHUCKOBAR
  • MEMBER
  • 2002 SAAB 9-5
  • 4 CYL
  • FWD
  • AUTOMATIC
  • 133,000 MILES
Heater motor runs intermitently. I have heat but the fan seems to run when it wants to. Is this a sign the motor is going out? Or could this be an electrical issue?
Sunday, March 6th, 2011 AT 2:10 PM

11 Replies

Tiny
KHLOW2008
  • MECHANIC
  • 41,815 POSTS
Symptoms indicates the blower fan motor is failing. When blower stops working, give its housing some banging and if it restarts, it means the blower is due for replacment.
Was this
answer
helpful?
Yes
No
+2
Sunday, March 6th, 2011 AT 2:27 PM
Tiny
MNTHNY4
  • MECHANIC
  • 612 POSTS
Just some more help here, you may need to replace fan speed control unit [resistor ] firstly before changing fan motor, note most of the time the control resistor fails or goes faulty before fan motor, good luck.
Was this
answer
helpful?
Yes
No
+3
Sunday, March 6th, 2011 AT 5:08 PM
Tiny
CHUCKOBAR
  • MEMBER
  • 9 POSTS
Could you give me more information on the cotrol resistor. Where is it located and is it fairly easy to replace?
Was this
answer
helpful?
Yes
No
+3
Monday, March 7th, 2011 AT 2:15 PM
Tiny
KHLOW2008
  • MECHANIC
  • 41,815 POSTS
Saab calls it Ventilating Fan Control Unit (resistor unit), located on driver's side of heating and ventilating unit, near firewall. It is a solid state type and would normally allow the highest speed to run when other speed control modes are bad. Testing the blower fan motor when it fails is the best way of going about.

Except for the descriptin of the component location, I could not find any other information as to the testing and removal installation of the fan control unit. The diagram shows a component that looks like the resistor underneathe the fan motor and if that is the correct location, seems the fan motor has to be removed to gain access.

I would check with other experts to see if they have better information on the subject as I am using and Alldata might be more informative on this.
Was this
answer
helpful?
Yes
No
Monday, March 7th, 2011 AT 6:34 PM
Tiny
KHLOW2008
  • MECHANIC
  • 41,815 POSTS
I managed to get the removal procedure for the resistor and here they are.
 Â
Blower Motor Resistor
Removal and Replacement

1. Put the air recirculation flap in position OFF with ignition in LOCK position.
2. Remove the 3 screws at lower panel from the driver's side.
3. Remove the 3 data link connector screws and detach the leads to the floor lighting.
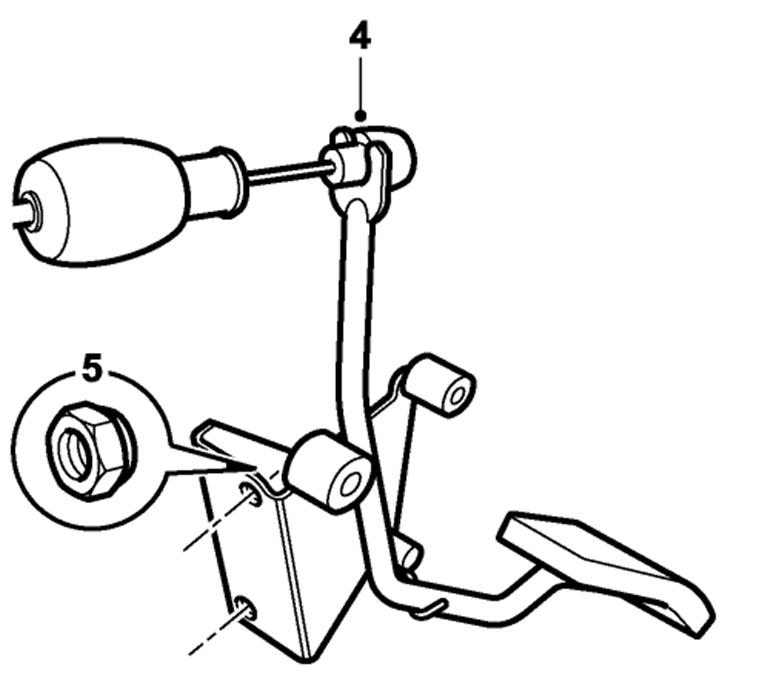
4. LHD: Detach the accelerator cable from the accelerator pedal.
5. LHD: Remove the 2 nuts holding accelerator pedal.
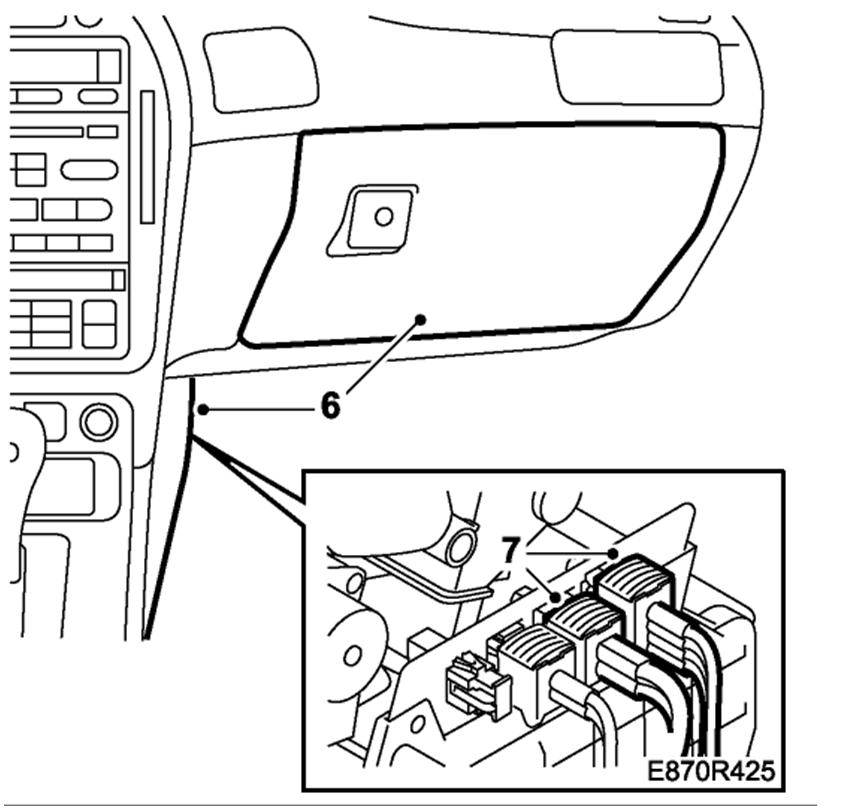
6. Remove the glove box. Remove the trim from the side of the centre console.
7. Loosen the two front connectors above the filter cartridge. Unplug the contacts from the plate and cut the cable tie.
8. Remove the wiper arms with special tool 85 80 144 Puller, windscreen
wiper arm.
9. Remove the rubber seals from the wiper spindles.
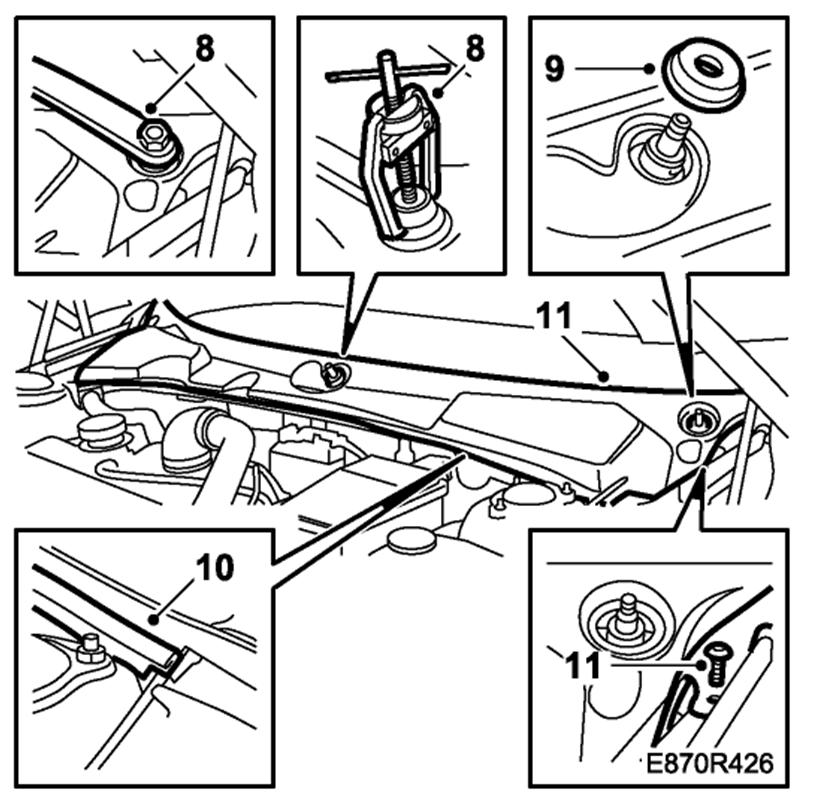
10. Remove the rubber moulding along the edge of the bulkhead and loosen the clips on one side. Place the rubber moulding on one side.
11. Loosen the cover over the bulkhead partition space (fastened with clips) by lifting it carefully forwards so that it is released from the windscreen. Hold the wire to the bonnet release to one side and lift the cover backwards towards the windscreen.

NOTE: Take care when remove the clips.

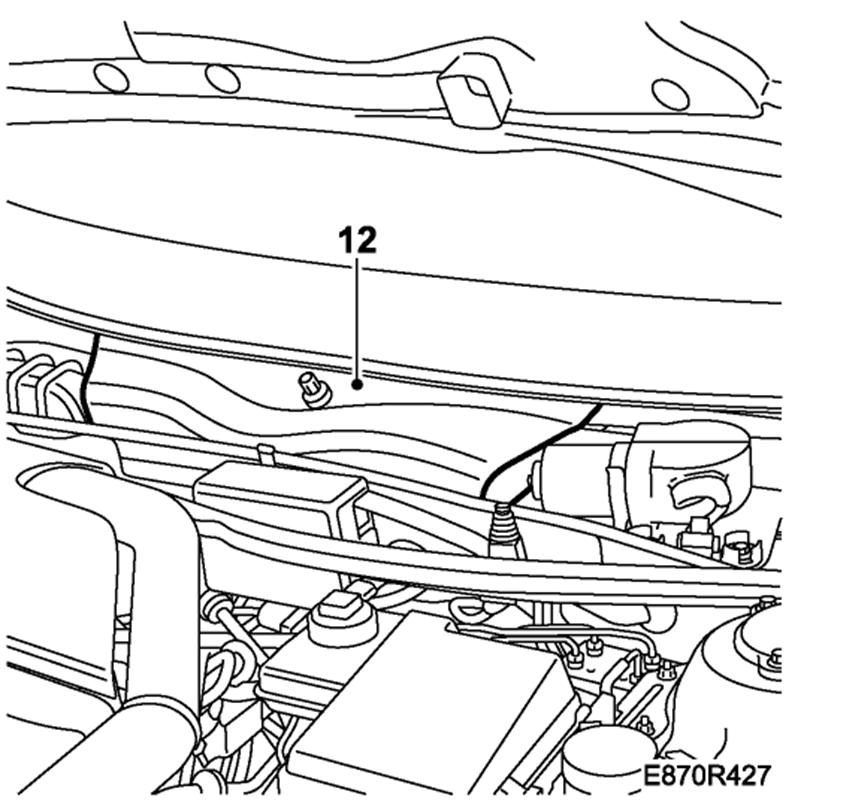
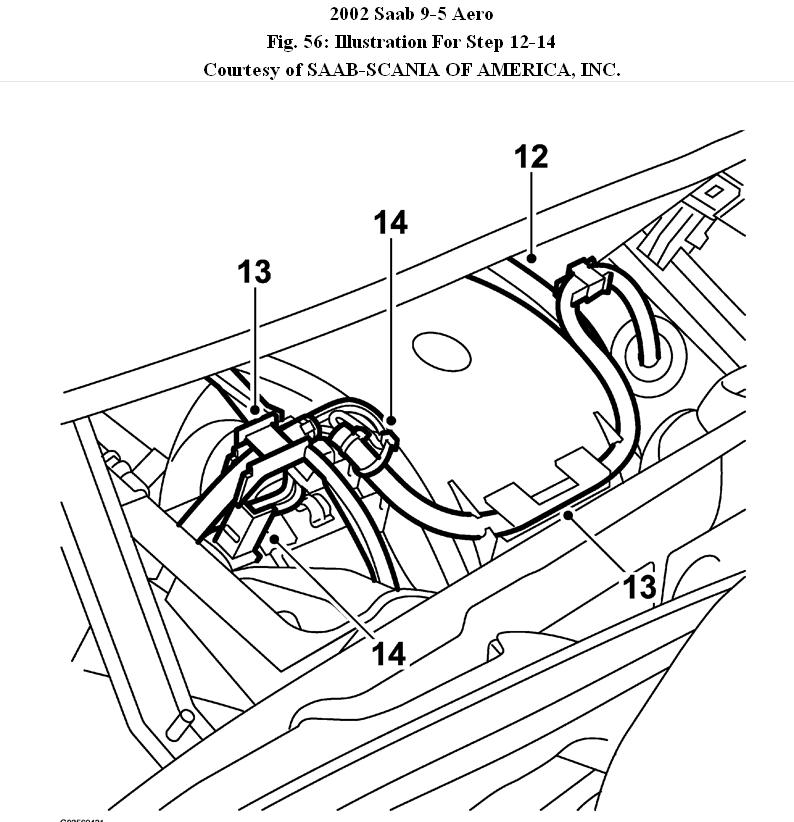
12. Loosen the clips holding the front edge of the water shield with a
screwdriver. Lift off the water shield.
13. RHD: Remove the wiper assembly and unplug the connector.
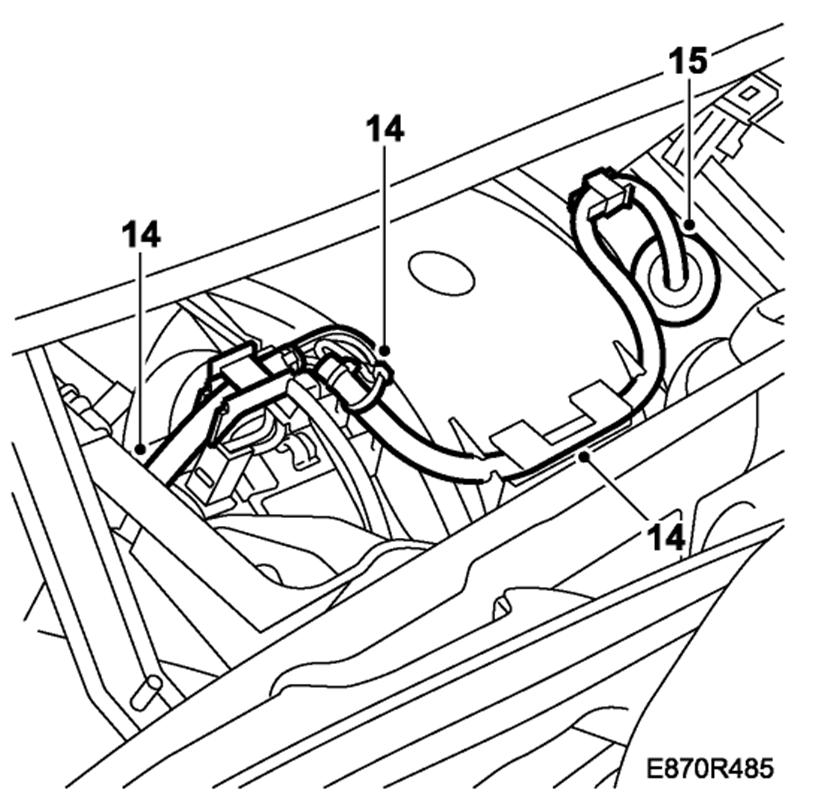
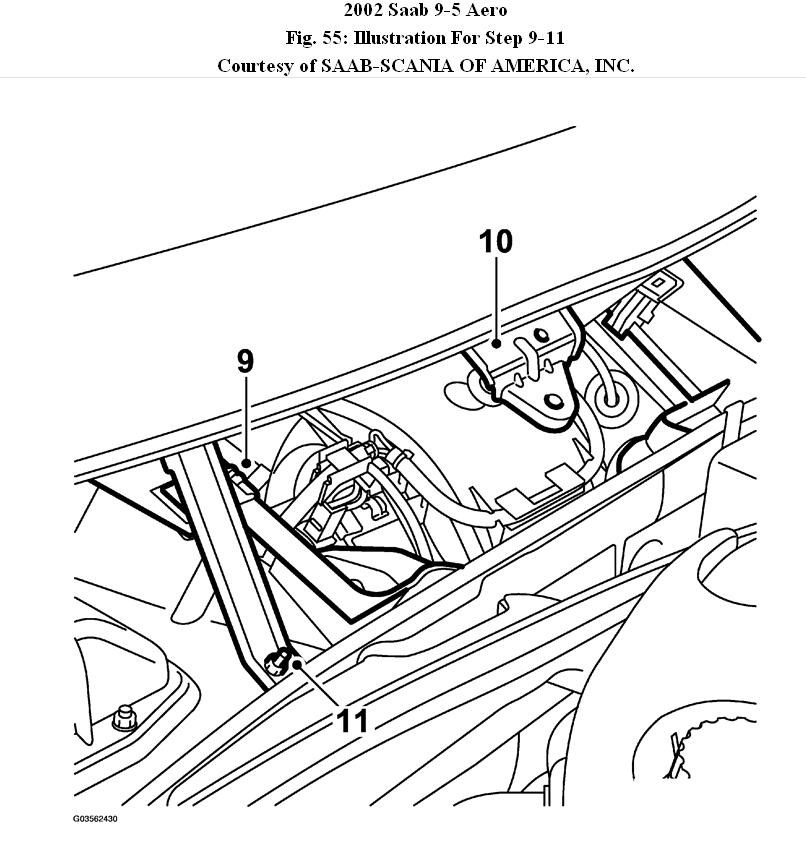
14. Pull up the wiring harness including rubber seal and cut the cable tie.
NOTE: Make a note of the position of the wiring harness.
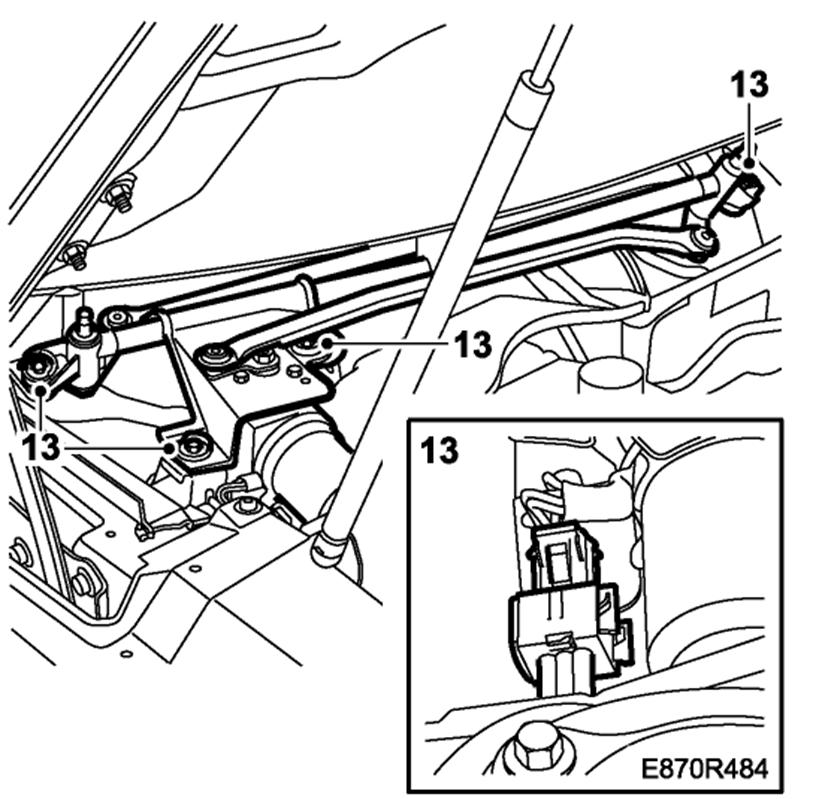
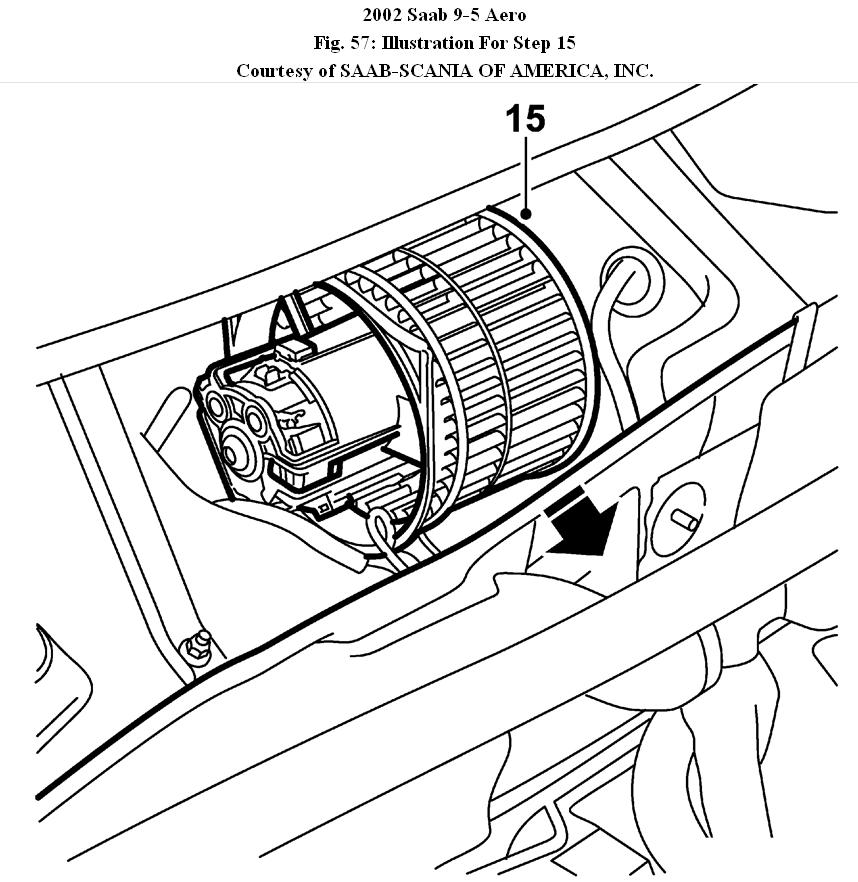
15. Press down the wiring harness on the other side, including the rubber seal to the control unit.
16. Remove the 2 bolts holding fan control unit with water protector.
Was this
answer
helpful?
Yes
No
+4
Monday, March 7th, 2011 AT 7:47 PM
Tiny
MNTHNY4
  • MECHANIC
  • 612 POSTS
From a level 1-10 ten been the hardest, I would rate this job a 8-1/2 u do not need to remove fan motor but u will need to remove gas pedal, to remove screws that hold a section of the resistor on the d/s, so recommend taking to a saab tech for repairs.
Was this
answer
helpful?
Yes
No
+3
Monday, March 7th, 2011 AT 8:16 PM
Tiny
CHUCKOBAR
  • MEMBER
  • 9 POSTS
In your reply you said, It is a solid state type and would normally allow the highest speed to run when other speed control modes are bad. But that is not the case here. It won't work at all, and then it will just kick in and work fine. And then the next time I use the car it won't work at all again. Confused.
Was this
answer
helpful?
Yes
No
+2
Tuesday, March 8th, 2011 AT 12:24 AM
Tiny
KHLOW2008
  • MECHANIC
  • 41,815 POSTS
That would indicate a likely failing blower motor. As I mentioned, when it fails to work, give the blower housing some thumping and if it starts up, the motor is failing.
Was this
answer
helpful?
Yes
No
+1
Tuesday, March 8th, 2011 AT 7:57 PM
Tiny
MNTHNY4
  • MECHANIC
  • 612 POSTS
Ok my final reply to u sir, your problem is, note I said is your fan speed control unit [resister] not your fan motor, u can put the fan motor in first if u have money to waste but make sure to ask if it is returnable if u dont have money to waste, good luck.
Was this
answer
helpful?
Yes
No
+1
Wednesday, March 9th, 2011 AT 3:35 AM
Tiny
CHUCKOBAR
  • MEMBER
  • 9 POSTS
I tried what you said about giving the housing a thumping and the motor started right up, like instatnly. Tried again the very next time and it started right up again. I'm assuming this is a failing motor? If so how hard is it ot replace. I am fairly mechanicaly able, just terrible at diagnostics. Thanks for all your help. Both of you.
Was this
answer
helpful?
Yes
No
+2
Wednesday, March 9th, 2011 AT 2:25 PM
Tiny
KHLOW2008
  • MECHANIC
  • 41,815 POSTS
You're welome.

Symptoms indicates the fan motor is failing and replacement is due.

Part of the rmoval procedures are as per previoud post regarding the removal of the wiper assy.

9. Remove the frame around the ventilator fan, 2 clips and 2 nuts on front edge.
Fig. 55: Illustration For Step 9-11

10. Remove the wiper arm bracket over the ventilation fan, 3 bolts.
11. Remove the bolted stay.
12. Remove the cover over the ventilation fan, 2 bolts on front edge and 2 bolts on rear edge.
Fig. 56: Illustration For Step 12-14
13. Free the cable harness from the cover over the ventilation fan (fastened with clips).
14. Cut the cable tie and detach the connector to the ventilation fan. Detach and extract the connector from the cover.

IMPORTANT:
Be careful that the pollen filter is not damaged during removal.

15. Bend forward the bulkhead panel slightly to make it easier to remove the fan from the bulkhead partition space. At the same time, lift the fan and angle it towards the dismantled stay in order to remove it from the bulkhead partition space.
Fig. 57: Illustration For Step 15

For installation, reverse removal procedures.
Was this
answer
helpful?
Yes
No
+4
Wednesday, March 9th, 2011 AT 5:03 PM

Please login or register to post a reply.

Sponsored links