Serpentine belt

Tiny
BBROWN385
  • MEMBER
  • 2002 HYUNDAI SANTA FE
  • 2.7L
  • 4WD
  • AUTOMATIC
I need a picture of how the belt should be placed back on the car?
Wednesday, May 28th, 2014 AT 2:59 AM

21 Replies

Tiny
HMAC300
  • MECHANIC
  • 48,601 POSTS
Hello,

Here is a guide that will walk you through the replacement and a diagrams below to show you how to install the belt on your car.

https://www.2carpros.com/articles/replace-serpentine-belt

Please let us know if you need anything else to get the problem fixed.

Was this
answer
helpful?
Yes
No
Wednesday, May 28th, 2014 AT 6:51 AM
Tiny
LAWRENCE2010
  • MEMBER
  • 3 POSTS
  • 2002 HYUNDAI SANTA FE
Engine Mechanical problem 6 cyl Two Wheel Drive Automatic 120000 miles

Hello!
How is the spring loaded belt tensioner moved so that the belt can be removed? Neither the Chilton's manual or the instructions on Hyundai's site describe this enough or accurately. Hyundai's site indicates to use a 16mm spaner (sic). The Chilton book says to use a long ratchet or breaker bar. There appear to be only 2 bolts holding the tensoner assembly to the engine, but it seems like I may have only to push the pulley downward to loosen the tension. I can't see how to do this without leveraging against another pulley and/or the belt itself, risking damage. This is a 2.7L V6. Any help would be truly appreciated!
Thank You - Lawrence
Was this
answer
helpful?
Yes
No
+2
Tuesday, February 19th, 2019 AT 8:13 PM (Merged)
Tiny
KHLOW2008
  • MECHANIC
  • 41,815 POSTS
Hi Lawrence,

Thank you for the donation.

The tensioner lever is turned clockwise to release the tension to remove the belting.

At the 3 o'clock position of the tensioner is a square block jutting out. Use the 16 mm open end spanner to lock onto it as a leverage point.


https://www.2carpros.com/forum/automotive_pictures/192750_DriveBelt02SantaFe27LV6Fig03_1.jpg

Was this
answer
helpful?
Yes
No
+3
Tuesday, February 19th, 2019 AT 8:13 PM (Merged)
Tiny
LAWRENCE2010
  • MEMBER
  • 3 POSTS


https://www.2carpros.com/forum/automotive_pictures/467674_Tension_Arm_1.jpg


Thank you for the quick response. The block at 3 o'clock is not nearly as square as that in the diagram. In the uploaded photo, you can see how it doesn't even look designed to take a spanner - the upper side is curved. It's also about 14 1/2 mm wide. I must be missing something basic here: is the entire arm and pulley supposed to be rotated clockwise to reduce the tension enough to remove the belt? I'm assuming that 'tensioner lever' is the entire arm with the pulley at the end.
Thanks Again - Lawrence
Was this
answer
helpful?
Yes
No
Tuesday, February 19th, 2019 AT 8:13 PM (Merged)
Tiny
KHLOW2008
  • MECHANIC
  • 41,815 POSTS
The arm with the pulley should be turned clockwise. Our database does not have any other diagrams for the tensioner and personally those that I have dealt with either have a bolt at the pully side or an indent for holding a box handle to use as leverage point.

At the bottom end where pulley bearing is attached I see a small indent in your picture. Is it suqare or round? If it is square or hexagonal, then that would be the best point to attach a wrench to turn the arm.

Alternatively, are the 4 indents at center of arm able to provide any grip for some tools?
Was this
answer
helpful?
Yes
No
Tuesday, February 19th, 2019 AT 8:13 PM (Merged)
Tiny
LAWRENCE2010
  • MEMBER
  • 3 POSTS
A poster in alt. Autos. Hyundai cleared things up. There's a square at the end of the tensioner arm right in front of the pulley made for a 3/8" ratchet. After placing the square of the ratchet there I needed only to apply my body weight to easily remove the belt. The Hyundai site and the Chilton's manual are both incorrect, and don't even depict the ratchet hole. Thank you for all your help - I had never worked with a tensioner arm before and am a little embarrassed that I didn't understand what I needed to do. Thanks Again.
Was this
answer
helpful?
Yes
No
+3
Tuesday, February 19th, 2019 AT 8:13 PM (Merged)
Tiny
KHLOW2008
  • MECHANIC
  • 41,815 POSTS
Glad that you have resolved the problem.

There is nothing to be embarassed about as for all things there are always a first time.

Have a nice day.
Was this
answer
helpful?
Yes
No
Tuesday, February 19th, 2019 AT 8:13 PM (Merged)
Tiny
KALLOSUE
  • MEMBER
  • 1 POST
Would either of you happen to know how to remove the bolts to be able to replace the serpentine belt tensioner?
Was this
answer
helpful?
Yes
No
Tuesday, February 19th, 2019 AT 8:13 PM (Merged)
Tiny
KHLOW2008
  • MECHANIC
  • 41,815 POSTS
The diagram shows the tensioner holding bolts, one on either of the tensioner. After removing the belt, you can proceed to remove the tensioner.
Was this
answer
helpful?
Yes
No
-1
Tuesday, February 19th, 2019 AT 8:13 PM (Merged)
Tiny
OLD-N-GREY
  • MEMBER
  • 3 POSTS
The illustration posted earlier is no help in identifying how to release the tension. The wrench is applied to the bottom of the tension arm, NOT to that little tab at the top of the arm assembly.


https://www.2carpros.com/forum/automotive_pictures/556092_DriveBeltSantaFe27LV6_2.jpg

Was this
answer
helpful?
Yes
No
+7
Tuesday, February 19th, 2019 AT 8:13 PM (Merged)
Tiny
KHLOW2008
  • MECHANIC
  • 41,815 POSTS
Hi Old-n-Grey,

Sorry you got it wrong.

Along the post we mentioned a 3/8" ratchet holding point. The red shaded area is where the socket or ratchet handle can fit to turn the tensioner arm.


https://www.2carpros.com/forum/automotive_pictures/192750_DriveBelt02SantaFe27LV6Fig03_2.jpg

Was this
answer
helpful?
Yes
No
Tuesday, February 19th, 2019 AT 8:13 PM (Merged)
Tiny
OLD-N-GREY
  • MEMBER
  • 3 POSTS
I regret bothering to sign up just to set this issue straight. But I was NOT wrong.

The later information about a 3/8" ratchet hole only applies to later models of the tensioner.

Anyone relying upon your "red shaded area" will be lost if they have the early version and attempt to use either the first descriptions posted above or your reference.
Was this
answer
helpful?
Yes
No
+5
Tuesday, February 19th, 2019 AT 8:13 PM (Merged)
Tiny
KHLOW2008
  • MECHANIC
  • 41,815 POSTS
The person asking the question verified that there is a point for the ratchet on his vehicle, that is the main thing, problem was resolved.

If people follow your suggestion, I wonder if there is any space for the wrench to be moved.

Nobody is correct all the time and sometimes information are incomplete. At times different countries have different specifications. Under such circumstances, the person handling the job should be on the lookout for any differences and act accordingly.

If you are here to prove you are better than others, you have made your point.
Was this
answer
helpful?
Yes
No
Tuesday, February 19th, 2019 AT 8:13 PM (Merged)
Tiny
OLD-N-GREY
  • MEMBER
  • 3 POSTS
I added that information and the crude illustration that I created simply because I had searched for the answer of "How to" do this through Google and discovered your website. I was replacing an AC compressor on one of these cars for someone and then had to finally discover how to do it. The HARD way. And "yes" there is room for the wrench (17mm or a large Crecent Wrench) to release the tention of the belt. I did it just as I illustrated, to take the belt off and to put it back on.

I have plenty to do in my life without stopping to help others. But it's in my nature to do so. And I am not the one in this discussion with the bad attitude or has an issue with self esteem. Apparently it's very important to you to be right (even when you're wrong.)

I simply thought I'd take the time to help the next guy who comes along since, the person originally asking the question is not the only one receiving the answer in these days of Google. I'm an old man who has worked on cars since my first Model A HotRod with an Oldsmobile engine, Lincoln rearend, hydraulic brakes, etc. Probably decades before you were born.
Was this
answer
helpful?
Yes
No
+6
Tuesday, February 19th, 2019 AT 8:13 PM (Merged)
Tiny
SMITH.P.SEAN
  • MEMBER
  • 1 POST
Old-n-Grey is 100% correct in identifying the newer tensioner and its use of a 3/8 socket wrench and the older tensioner which has no such point for the socket wrench to attach. He was also correct in stating that the first 2 pictures did absolutely nothing to help one understand how the tensioner pulley should be slackened.

Also, Old-n-Grey was not at all confrontational and was not at all in the wrong. You were KHLow2008 by stating, "Hi Old-n-Grey, Sorry you got it wrong." When in fact he had a better understanding of the part and its revisions then you do.
Was this
answer
helpful?
Yes
No
+1
Tuesday, February 19th, 2019 AT 8:13 PM (Merged)
Tiny
KHLOW2008
  • MECHANIC
  • 41,815 POSTS
Smith.P. Sean,

Pleas read this post and let me understand myself better.

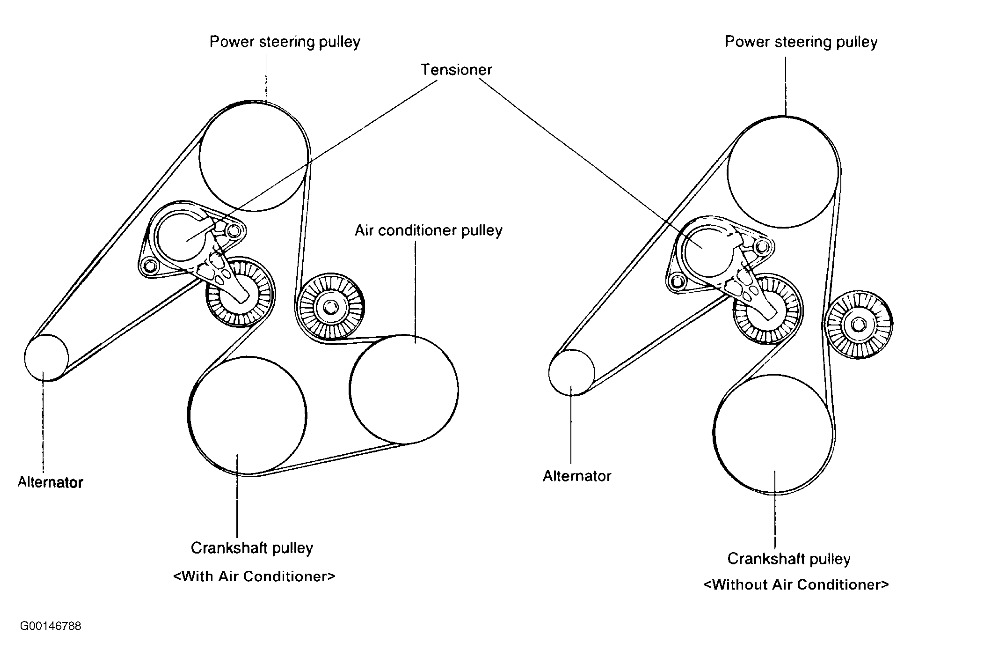
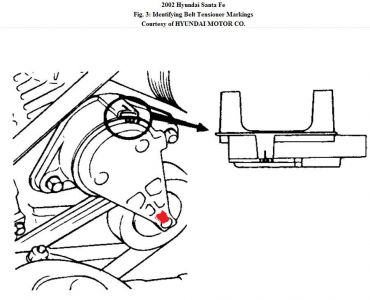
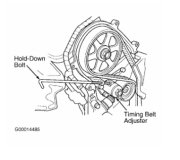
" The illustration posted earlier is no help in identifying how to release the tension "

To me this is confrontaional.

He should have been more tactful.

He should have said that there are two different designs and the diagram did not show the way it is done.

From diagrams we some times do not get the picture corretly so we need to provide extra explanation which is in the post as listed above.

During the course of the post I had already provided additional infornmation.

We work at our spare time to help others and deserve more respect than that. We are not correct all the time and are open to suggestions but the work load at times shortens the fuse.
Was this
answer
helpful?
Yes
No
Tuesday, February 19th, 2019 AT 8:13 PM (Merged)
Tiny
MERLIN2021
  • MECHANIC
  • 17,250 POSTS
The arm with the pulley should be turned clockwise. Our database does not have any other diagrams for the tensioner and personally those that I have dealt with either have a bolt at the pully side or an indent for holding a box handle to use as leverage point.
This kinda says it all, for either design, you only need to read it?
Was this
answer
helpful?
Yes
No
-2
Tuesday, February 19th, 2019 AT 8:13 PM (Merged)
Tiny
NWEAVER1982
  • MEMBER
  • 3 POSTS
Hey guys, have a follow up on this issue. I had been using a 3/8 ratchet and top half of my jack as a breaker, rotating clockwise as specified. Belt off, part changed, belt on, all good. I had to take the belt off again today as I believe the compressor bearings are shot, but when I attempted to loosen the belt the same way, the idler pulley assembly (is that right?) Actually cracked, leaving me with 2 of the 4 sides of the ratchet hole (above red shaded area). Obviously, I cannot use a ratchet or breaker bar any longer, but the belt is still on and tight. I assume I will need to replace the assembly so I can get belt back on later, but does anyone have some advice for taking the belt off now? I read that cutting it is really bad, and I cannot get any type of grip or leverage to move the pulley to loosen the belt. Help!
Was this
answer
helpful?
Yes
No
Tuesday, February 19th, 2019 AT 8:13 PM (Merged)
Tiny
CJ MEDEVAC
  • MECHANIC
  • 11,004 POSTS
Sometimes it's trial and error! Even crafting a special tool sometimes works depending on your resources.

The 1st things I might try (if there is room) would be a Monkey wrench or a pipe wrench attacking the arm at a perpendicular position.

Maybe even a 'crows foot"with a long ratchet extension grabbing the arm in the same manner (lacking better words, from the side of the arm).

I'm not opposed to hacking a belt off if it were older and worn!

I might put in more effort with the tensioner if the belt were expensive and maybe a too long of a wait to obtain a new one!

The Medic
Was this
answer
helpful?
Yes
No
Tuesday, February 19th, 2019 AT 8:13 PM (Merged)
Tiny
HAMDYATTALAH
  • MEMBER
  • 1 POST
Size and number for the belt
hyundai santafe 2003 2.7 L
Was this
answer
helpful?
Yes
No
Tuesday, February 19th, 2019 AT 8:13 PM (Merged)

Please login or register to post a reply.

Sponsored links