Where is the flywheel cover located?

Tiny
APAC408
  • MEMBER
  • 2001 FORD ESCAPE
  • 150,000 MILES
I am trying to take the crankshaft pulley off to do a head gasket change but I can't seem to find the flywheel cover. I picture would be helpful or any reference of nearby parts.
Saturday, September 1st, 2012 AT 5:07 PM

18 Replies

Tiny
KHLOW2008
  • MECHANIC
  • 41,815 POSTS
The cover between the oil pan and transmission.
Was this
answer
helpful?
Yes
No
Saturday, September 1st, 2012 AT 5:35 PM
Tiny
APAC408
  • MEMBER
  • 118 POSTS
Okay question I got every bolt off of the timing cover do I need to unbolt the alternator mounting bracket as well to remove the timing cover
Was this
answer
helpful?
Yes
No
Tuesday, September 4th, 2012 AT 1:57 AM
Tiny
APAC408
  • MEMBER
  • 118 POSTS
Another thing do I have to drop the oil pan also to remove it or can I get by without having to do that
Was this
answer
helpful?
Yes
No
Tuesday, September 4th, 2012 AT 1:58 AM
Tiny
KHLOW2008
  • MECHANIC
  • 41,815 POSTS
With the questions you are asking, I believe you do not have sufficient information nor the experience to do it and if I were you, I would not be doing this job.

Anyway these are the procedures from our database. Hope they are helpful.

REMOVAL & INSTALLATION

TIMING BELT

CAUTION:
This application is an interference engine. Do not rotate camshaft or crankshaft when timing belt is removed, or engine damage may occur.

Removal

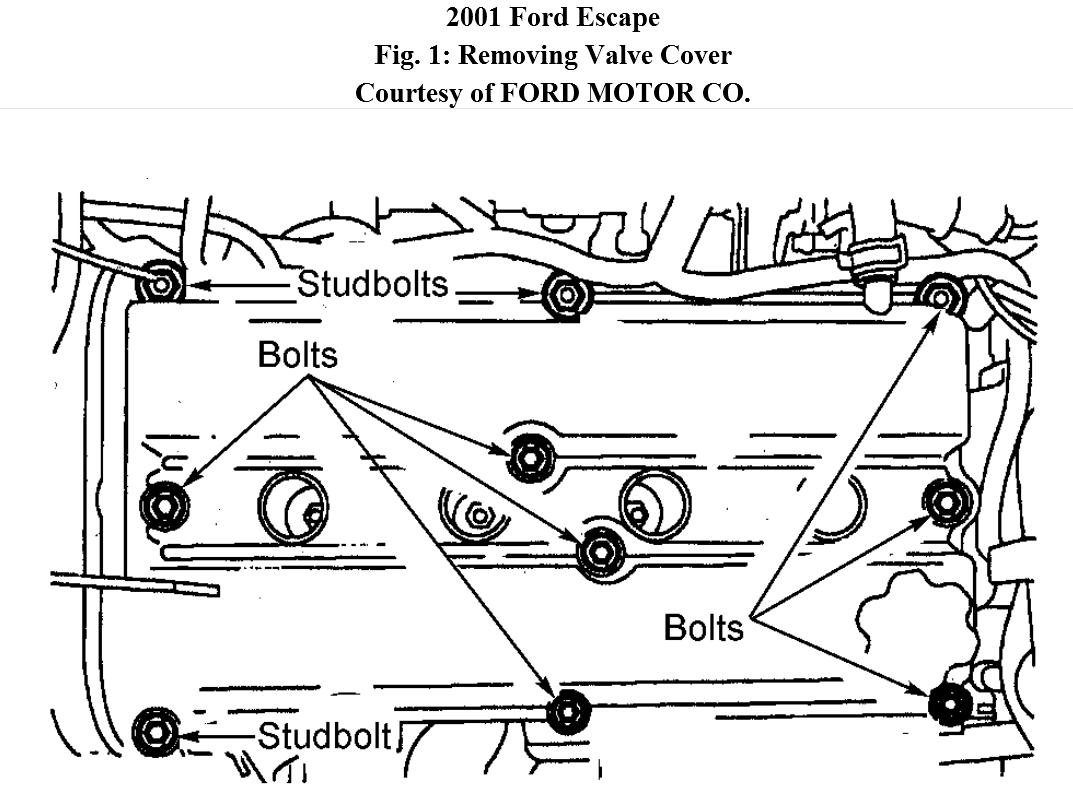
1. Disconnect negative battery cable. Remove accessory drive belt. Remove air cleaner outlet pipe. Disconnect ignition wires from spark plugs. Remove spark plugs. Disconnect throttle cable and cruise control actuator cable. On 2002-04 models, disconnect the catalyst monitor and heated oxygen sensor connectors, and detach the connectors from the bracket. Remove wiring harness anchors from valve cover studs, and position the wiring harness aside. On all models, remove valve cover. See Fig. 1.

2. Remove catalytic converter. Remove coolant tube bolt and nut. Position coolant tube to side. Remove right front wheel and tire assembly. Remove right lower splash shield.

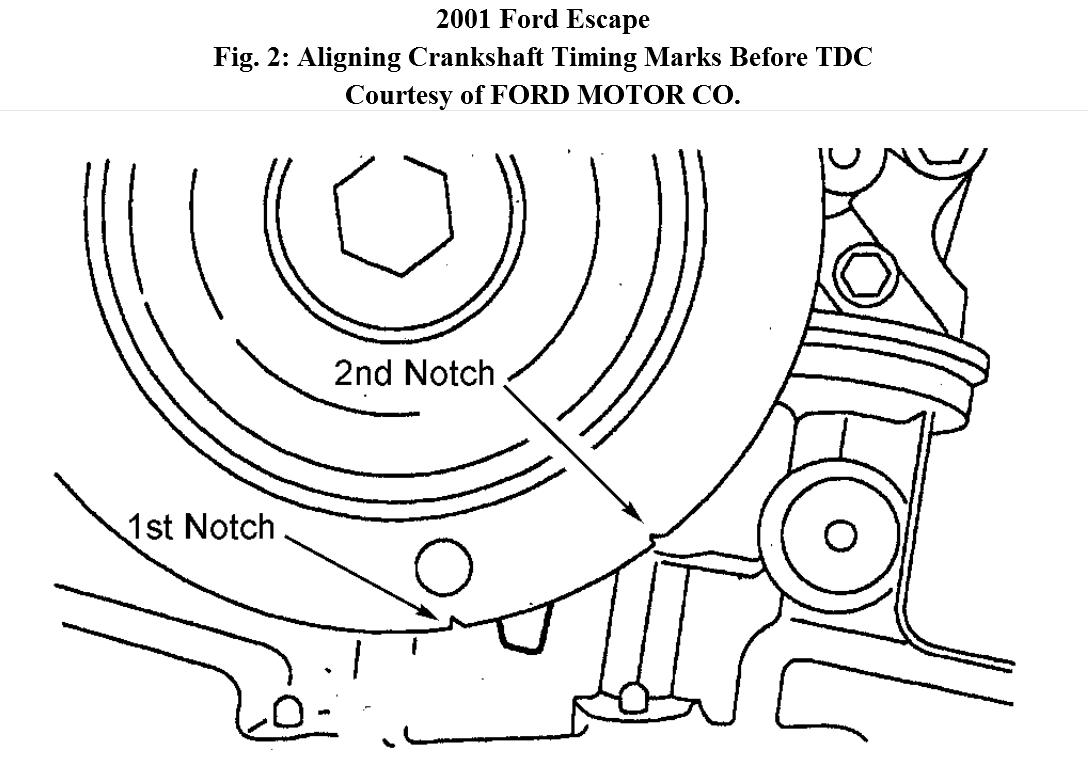
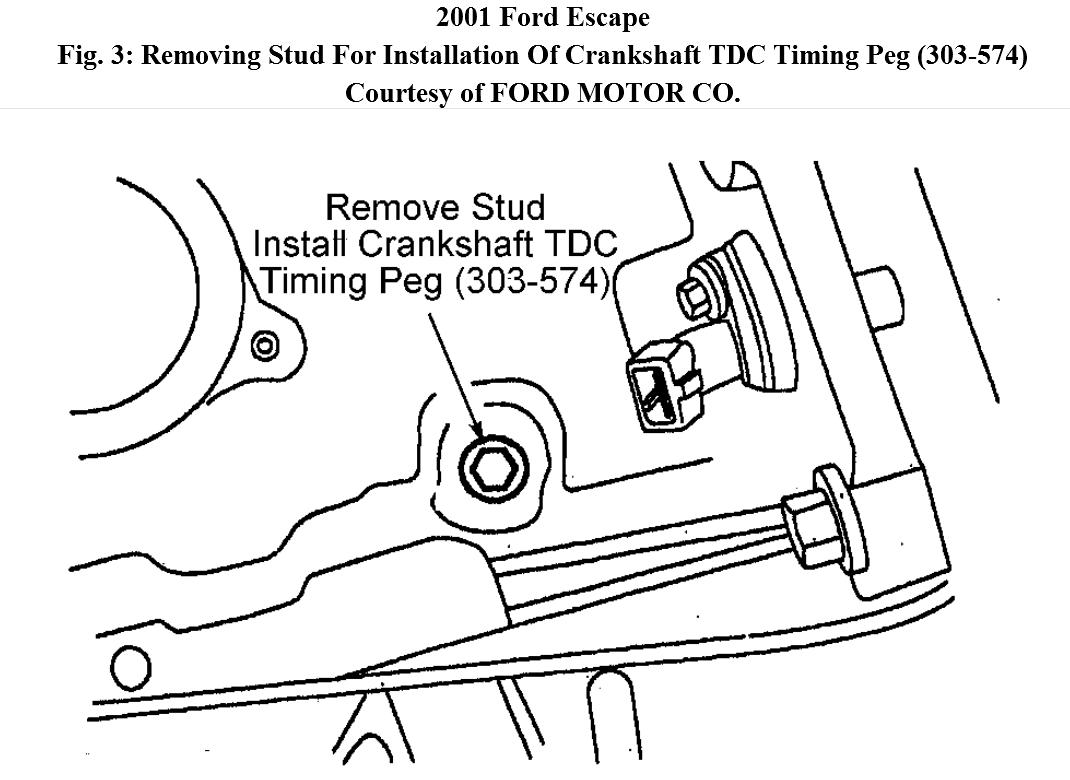
3. Rotate crankshaft to just before No. 1 cylinder TDC. See Fig. 2. Remove stud and install Crankshaft TDC Timing Peg (303-574). See Fig. 3.

NOTE:
Make sure second notch in pulley is indexed to lower cylinder block. See Fig. 2.

4. Rotate crankshaft clockwise against peg to bring it to TDC. Loosen water pump pulley bolts.

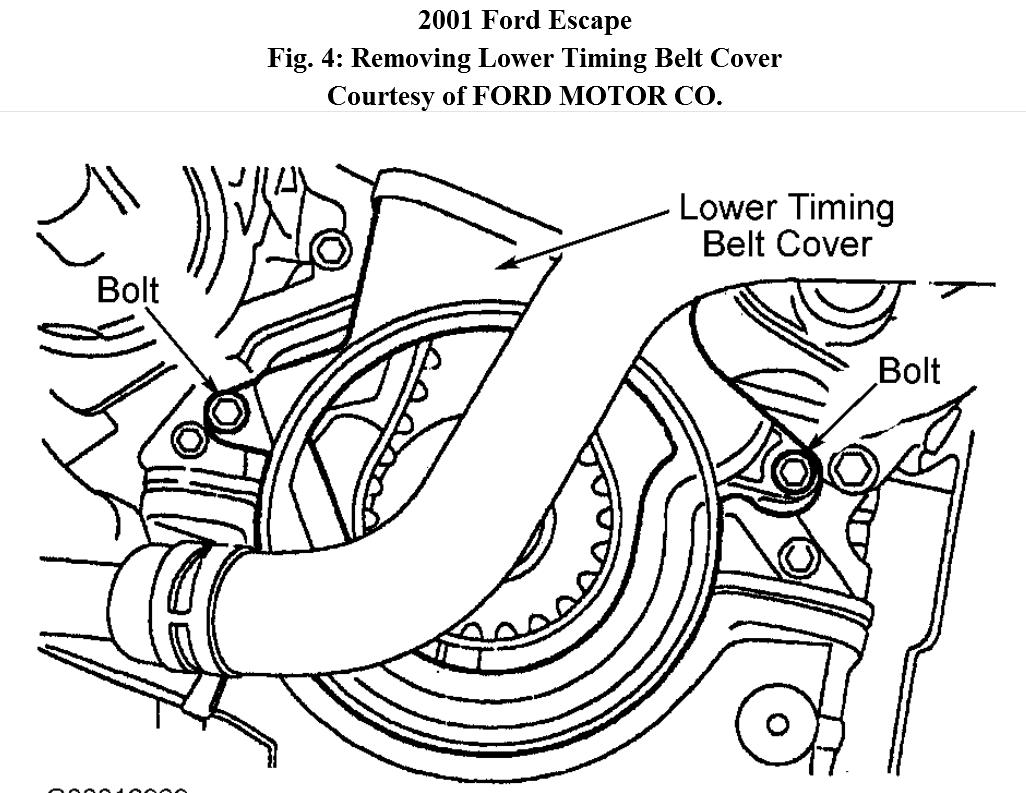
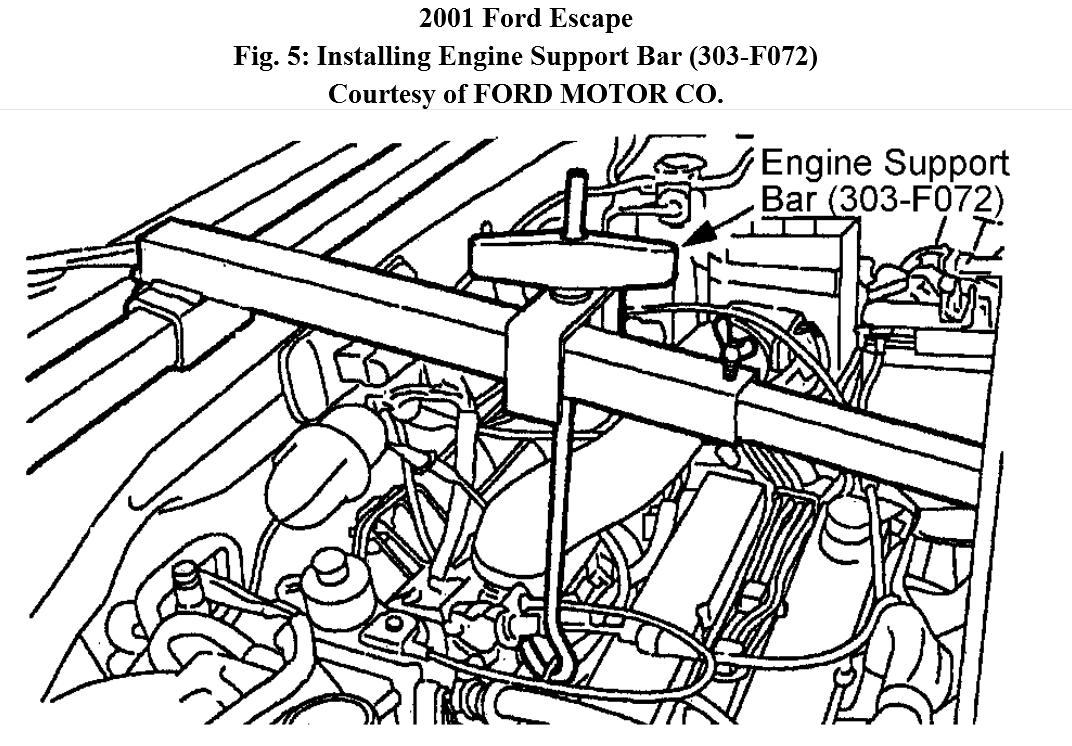
5. Loosen crankshaft pulley bolt. Rotate tensioner and remove accessory drive belt. Remove crankshaft pulley. Remove bolts and lower timing belt cover. See Fig. 4. Install Engine Support Bar (303-F072). See Fig. 5.

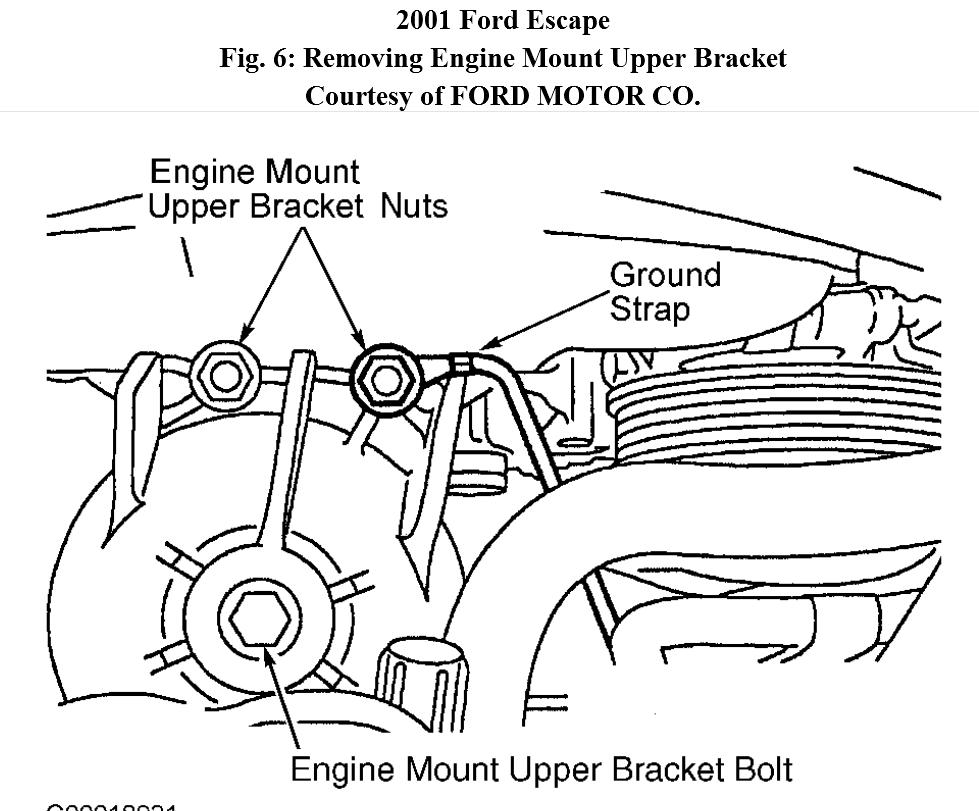
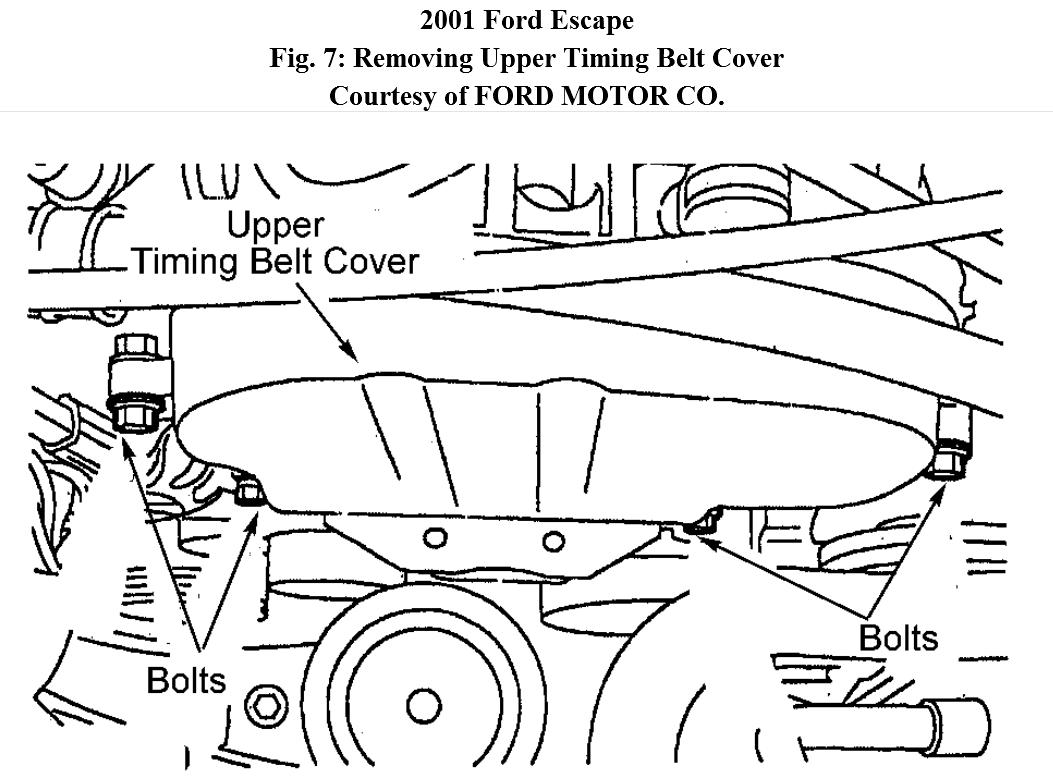
6. Remove ground strap and engine mount upper bracket. See Fig. 6. Remove upper timing belt cover studs. Disconnect the knock sensor connector from upper timing cover, if necessary. Remove upper timing belt cover bolts and cover. See Fig. 7.

NOTE:
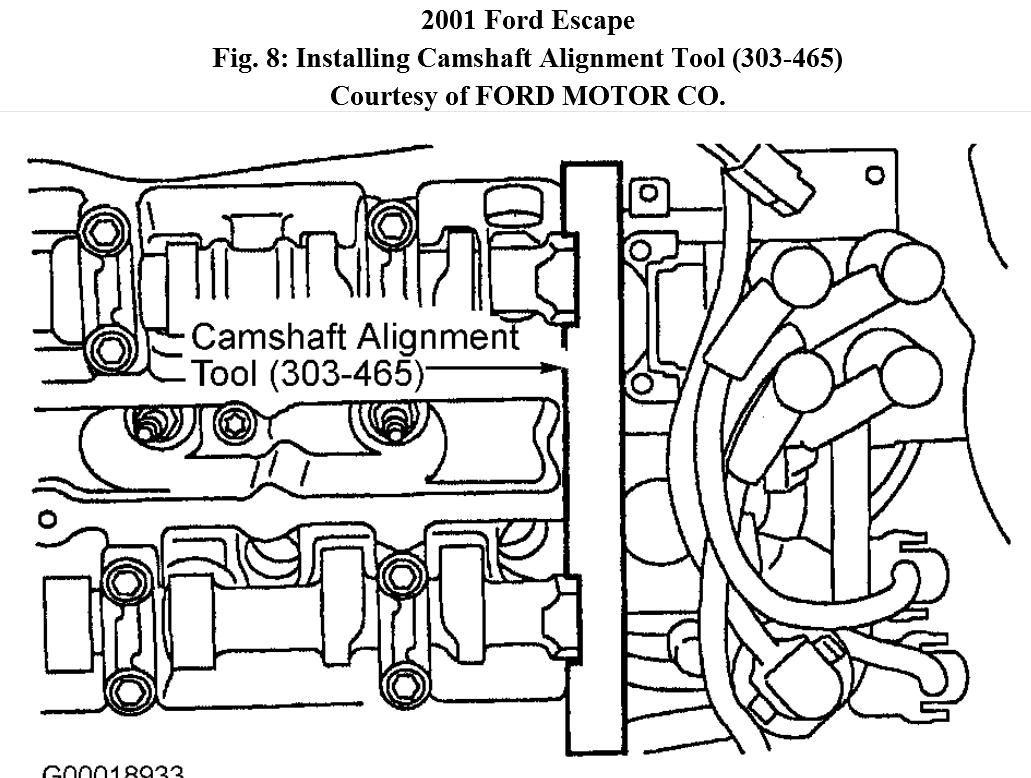
Installation of Camshaft Alignment Tool (303-465) into exhaust camshaft may require camshafts to be rotated slightly clockwise.

7. Remove water pump pulley and accessory drive belt idler pulley. Install Camshaft Alignment Tool (303-465) and align camshafts. See
Fig. 8.

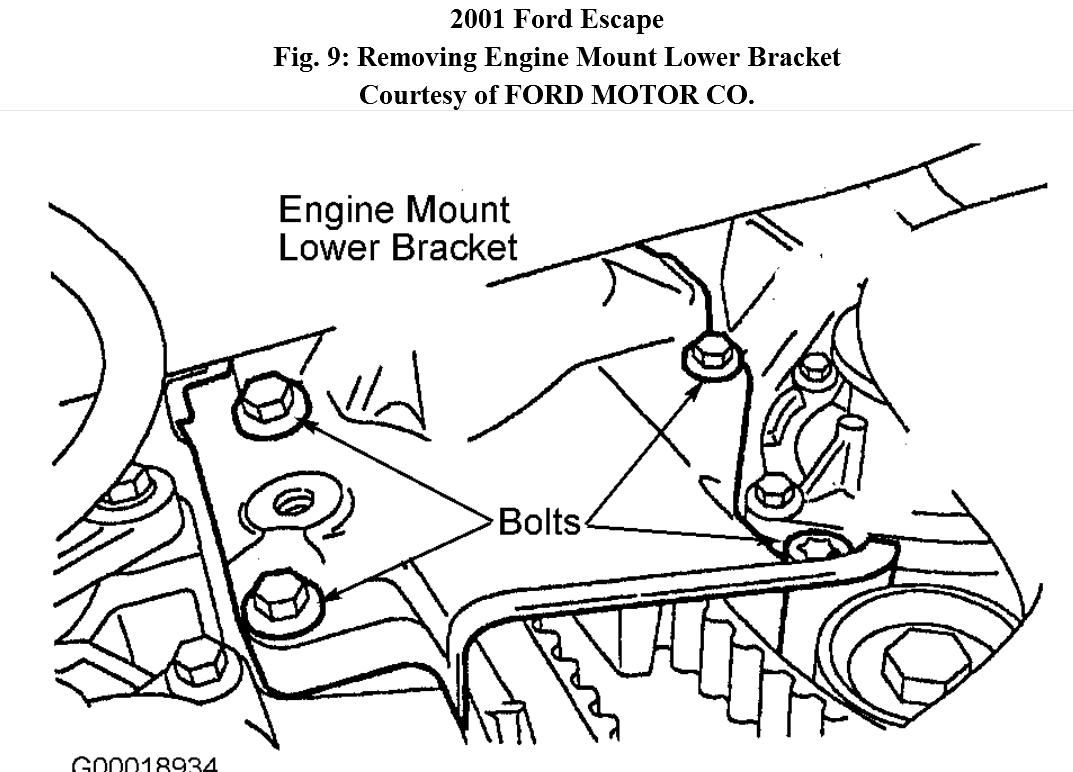
8. Raise and support vehicle. Remove engine mount lower bracket. See
Fig. 9.

9. Loosen timing belt tensioner pulley, and allow it to slide down to bottom of its travel. If timing belt is going to be reused, mark direction of rotation for installation reference. Slide timing belt off of camshaft and crankshaft sprockets.

Installation

1. Slide crankshaft pulley onto crankshaft. Ensure crankshaft position is at No. 1 TDC by rotating it clockwise against Crankshaft TDC Timing Peg (303-574). Ensure second notch in pulley is indexed to lower cylinder block. See Fig. 2. Remove crankshaft pulley.

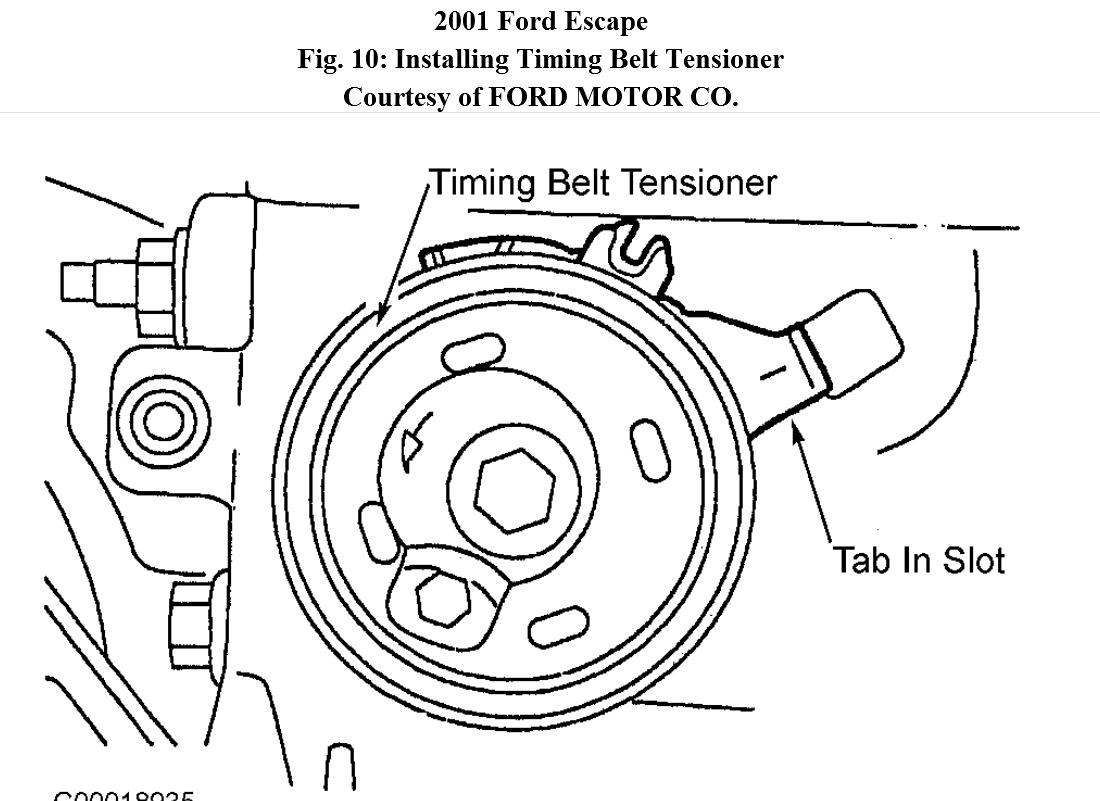
2. Ensure timing belt tensioner is installed correctly with tab positioned in slot in inner timing cover. See Fig. 10.

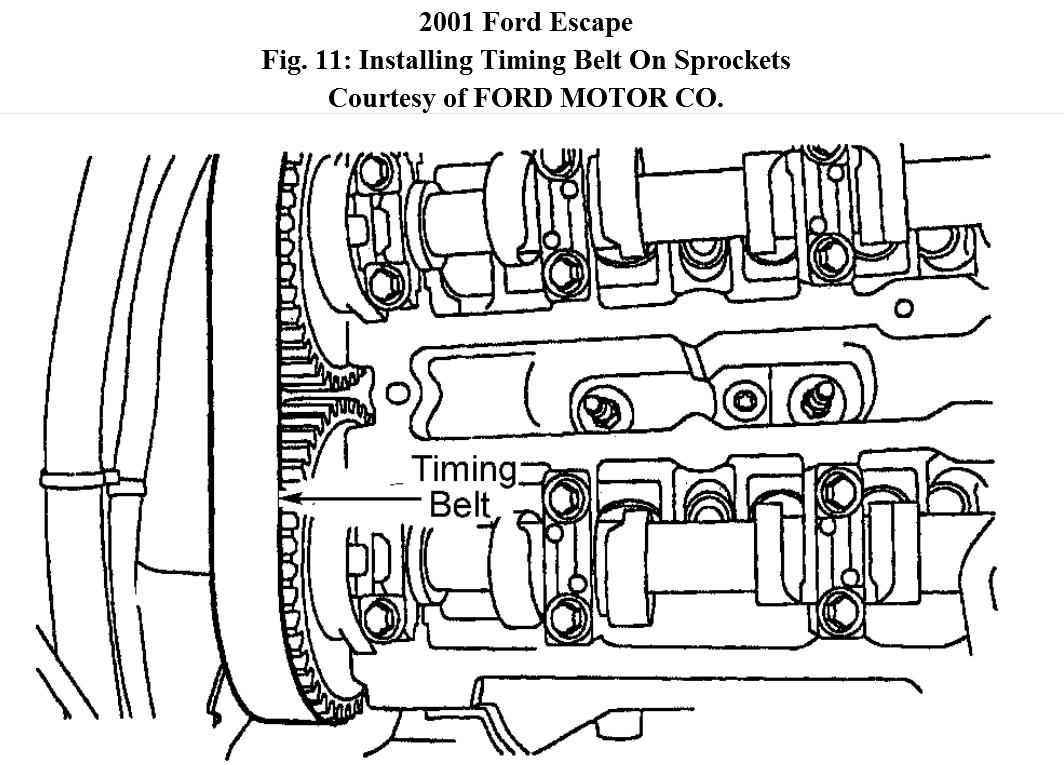
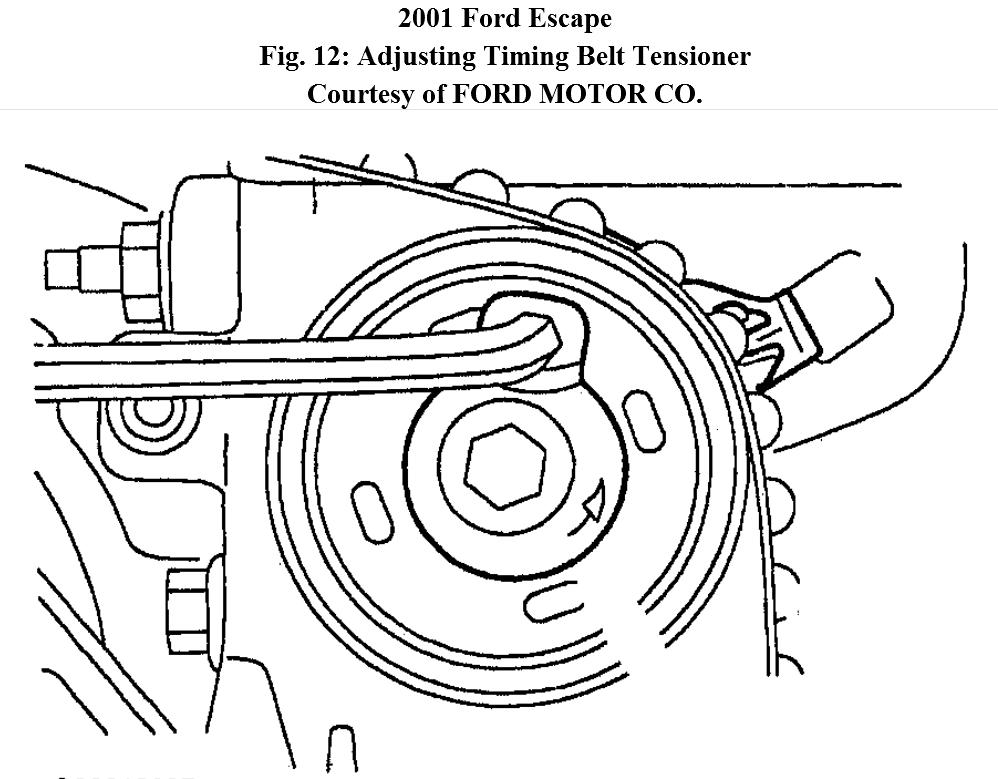
3. Starting from the crankshaft timing belt pulley and working counterclockwise, position the timing belt in place while keeping it under tension. Adjust timing belt tensioner by using a 6-mm Allen wrench to rotate adjuster counterclockwise and align marks. See
Fig. 11 and Fig. 12. Tighten tensioner pulley bolt to
specification.

4. Install front engine mount lower bracket. Install accessory drive belt idler pulley. Install water pump pulley, and hand tighten bolts. Install timing belt covers. Install crankshaft pulley. Tighten water pump pulley bolts to specification.

5. Install splash shield, then wheel and tire assembly. Remove Crankshaft TDC Timing Peg (303-574). Install stud. Install engine mount upper bracket and ground strap. Remove Engine Support Bar (303-F072). Install coolant tube and catalytic converter. Remove Camshaft Alignment Tool (303-465).

6. Install valve cover and spark plugs. On 2002-04 models, connect wiring harness anchors to valve cover studs. Install and reconnect the catalyst monitor and heated oxygen sensor connectors. On all models, reconnect accelerator cable and cruise control actuator cable. Install ignition wires, air cleaner outlet pipe and
accessory drive belt. Reconnect negative battery cable.
Was this
answer
helpful?
Yes
No
Tuesday, September 4th, 2012 AT 12:55 PM
Tiny
APAC408
  • MEMBER
  • 118 POSTS
I do have the information but with the pictures you gave and the removal procedure it is totally different than the one I am looking at
Was this
answer
helpful?
Yes
No
Tuesday, September 4th, 2012 AT 2:46 PM
Tiny
APAC408
  • MEMBER
  • 118 POSTS
I think the one you are referring to is the 4 cylinder the one I am working on is a v6
Was this
answer
helpful?
Yes
No
Tuesday, September 4th, 2012 AT 2:55 PM
Tiny
KHLOW2008
  • MECHANIC
  • 41,815 POSTS
V6 is timing chainand for this, you need to remove the power steering pump and oil pan.

Work is done with engine on the floor.
Was this
answer
helpful?
Yes
No
Tuesday, September 4th, 2012 AT 4:41 PM
Tiny
APAC408
  • MEMBER
  • 118 POSTS
Success and no I didn't have to remove the oil pan to do the work but it was a pain in the ass to do it
Was this
answer
helpful?
Yes
No
Wednesday, September 5th, 2012 AT 1:15 AM
Tiny
KHLOW2008
  • MECHANIC
  • 41,815 POSTS
Sometimes you can skip procedure from the manual but extra care has to be taken and it always makes it more difficult.

Cheers.
Was this
answer
helpful?
Yes
No
Wednesday, September 5th, 2012 AT 12:06 PM
Tiny
APAC408
  • MEMBER
  • 118 POSTS
Question I took the head off thinking I needed a head gasket and what I found was one of my exhaust valves is cracked what would have caused this I would like to say about a 1/4 inch is missing at the bottom, I don't see any metal shavings either
Was this
answer
helpful?
Yes
No
Wednesday, September 5th, 2012 AT 7:38 PM
Tiny
KHLOW2008
  • MECHANIC
  • 41,815 POSTS
Exhaust valves would burn off when there is a leak due to not being seated correctly. Tight valve clearances is another possibility.
Was this
answer
helpful?
Yes
No
Wednesday, September 5th, 2012 AT 7:50 PM
Tiny
APAC408
  • MEMBER
  • 118 POSTS
As far as getting the valves would this tool work from autozone http://www.autozone.com/autozone/accessories/OEM-Valve-spring-compressor-with-knob/_/N-25j4?itemIdentifier=231210_0_0_
Was this
answer
helpful?
Yes
No
Thursday, September 6th, 2012 AT 1:07 AM
Tiny
KHLOW2008
  • MECHANIC
  • 41,815 POSTS
It can work but you need to be sure of the size. Valve springs might not have too much clearances around it to fit the compressor for some engines.

With cylinder head, this is the prefered design.

http://www.autozone.com/autozone/accessories/Proform-Heavy-duty-valve-spring-compressor/_/N-25j4?itemIdentifier=525537&_requestid=2517497
Was this
answer
helpful?
Yes
No
Thursday, September 6th, 2012 AT 11:31 AM
Tiny
APAC408
  • MEMBER
  • 118 POSTS
Okay so I changed the valve and put new headgasket, timing cover gasket, crankshaft seal, camshaft seal, new headbolts, pretty much everthing is all put back together when I go to start it though all the needles stay at the lowest point on the dash and after a few cranks they go all the way up to highest point and than drop back down engine wont turn over any clue
Was this
answer
helpful?
Yes
No
Sunday, September 9th, 2012 AT 1:57 AM
Tiny
KHLOW2008
  • MECHANIC
  • 41,815 POSTS
Seems you have a ground circuit connection fault somewhere.

You need to find out what is missing causing the non starting.

https://www.2carpros.com/articles/car-cranks-but-wont-start

Was this
answer
helpful?
Yes
No
Sunday, September 9th, 2012 AT 10:15 AM
Tiny
APAC408
  • MEMBER
  • 118 POSTS
That is what I was thinking as far as the ground connection I removed one but forgot where it went I figured it went on top of one of the motor mount screws
Was this
answer
helpful?
Yes
No
Monday, September 10th, 2012 AT 1:58 AM
Tiny
APAC408
  • MEMBER
  • 118 POSTS
As far as oil in the throttle body what does that mean
Was this
answer
helpful?
Yes
No
Monday, September 10th, 2012 AT 2:02 AM
Tiny
KHLOW2008
  • MECHANIC
  • 41,815 POSTS
How much oil is found in the throttle body?

The main ground cable has to be secured to something that is solid with the transmission.
Was this
answer
helpful?
Yes
No
Monday, September 10th, 2012 AT 5:30 PM

Please login or register to post a reply.

Sponsored links