2001 Dodge Neon Control Arm bolts Removal

Tiny
GRAEME
  • MEMBER
  • 2001 DODGE NEON
Suspension problem
2001 Dodge Neon 4 cyl Two Wheel Drive Manual

I have a 2001 dodge Neon and am trying to remove the control arms from the passenger/ driver side. I removed the vertical bolts with little difficulty but am unable to completley remove the horizontal bolts. The bolts came down a bit requiring a great deal of torque bit stopped causing a loud cracking sound when attempting to remove them?
Sunday, February 8th, 2009 AT 7:58 PM

7 Replies

Tiny
BLUELIGHTNIN6
  • MECHANIC
  • 16,542 POSTS
Upper or lower control arms? Let me know and I will post the proper replacement procedure.

Thanks for using 2CarPros. Com!
Was this
answer
helpful?
Yes
No
-1
Sunday, February 8th, 2009 AT 8:11 PM
Tiny
GRAEME
  • MEMBER
  • 3 POSTS
Its the upper control arms any help would be greatly appreciated
Was this
answer
helpful?
Yes
No
Sunday, February 8th, 2009 AT 9:53 PM
Tiny
BLUELIGHTNIN6
  • MECHANIC
  • 16,542 POSTS
Your vehicle doesn't have upper control arms. You sure you are working on upper control arms? Picture of your front end suspension is below..


https://www.2carpros.com/forum/automotive_pictures/261618_0900c152802230ed_1.jpg


Thanks for using 2CarPros.com!
Was this
answer
helpful?
Yes
No
+3
Monday, February 9th, 2009 AT 12:34 AM
Tiny
GRAEME
  • MEMBER
  • 3 POSTS
Sorry, its the lower control Arms that i'm trying to remove. Thanks for postring the diagram. The problem i'm having is that i'm unable to remove the bolts going through section six of the lower control arm?
Was this
answer
helpful?
Yes
No
+1
Monday, February 9th, 2009 AT 10:48 AM
Tiny
BLUELIGHTNIN6
  • MECHANIC
  • 16,542 POSTS
Okay, no problem. I will post the replacement procedures for your lower control arms. If you still need further assistance after reviewing the procedures just let me know..
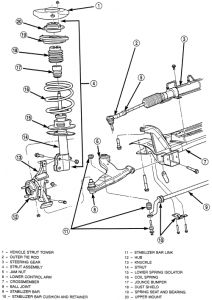
REMOVAL:
Raise and safely support the vehicle.
Remove the wheel and tire assembly from the side of the vehicle requiring control arm replacement.
Remove the steering knuckle-to-ball joint ball stud, clamping nut and bolt.
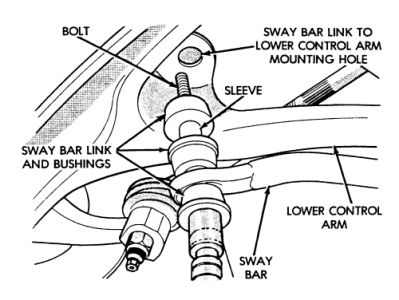
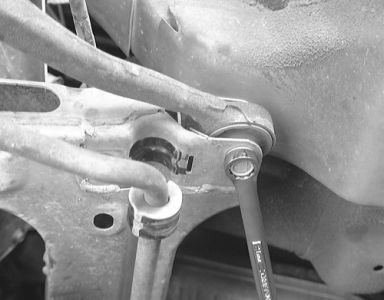
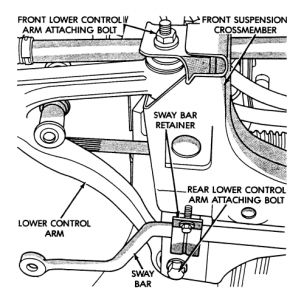
Remove the 2 attaching links connecting the stabilizer bar to the lower control arms.
Loosen, but do not remove the bolts holding the stabilizer bar retainers to the crossmember. Then, rotate the stabilizer bar and attaching links away from the lower control arms.

(((Removing the knuckle-to-ball joint clamping nut and bolt)))


https://www.2carpros.com/forum/automotive_pictures/261618_0900c152802230bc_1.jpg


(((Unfastening the front lower control arm bushing-to-crossmember attaching nut and bolt)))


https://www.2carpros.com/forum/automotive_pictures/261618_1_4.jpg


(((Removing the rear lower control arm-to-crossmember and frame rail attaching bolt)))


https://www.2carpros.com/forum/automotive_pictures/261618_2_7.jpg


(((Unfasten the lower control arm retainers, then remove the control arm from the vehicle)))


https://www.2carpros.com/forum/automotive_pictures/261618_5_2.jpg


WARNING: Pulling the steering knuckle out from the vehicle after releasing the ball joint can separate the inner CV-joint.

Use a pry bar to separate the steering knuckle from the ball joint stud. Be careful when separating the ball joint stud from the knuckle, so the seal does not become damaged.
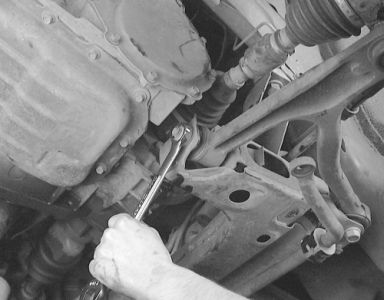
Remove the front lower control arm bushing-to-crossmember attaching nut and bolt. Remove the rear lower control arm-to-crossmember and frame rail attaching bolt. Then, remove the lower control arm from the crossmember.

INSTALLATION:
Position the lower control arm into the front crossmember. Install the rear lower control arm-to-crossmember and frame rail attaching bolt. Do NOT tighten the rear bolt at this time. Then, install the front lower control arm-to-crossmember nut and bolt.
Tighten the front lower, then the rear control arm nut and bolt to 120 ft. lbs. (163 Nm).
Place the ball joint stud into the steering knuckle. Install the steering knuckle-to-ball joint stud clamping bolt and nut. Tighten the bolt to 70 ft. lbs. (95 Nm).
Assemble the stabilizer bar-to-lower control arm link assemblies and bushings.
Rotate the stabilizer bar into position, installing the stabilizer bar links into the lower control arms. Install the top stabilizer bar link bushings and nuts. Do NOT tighten the link yet.
Install the wheel and tire assembly.
Carefully lower the vehicle so the suspension is supporting the total weight of the vehicle.
Tighten the stabilizer bar-to-lower control arm links to 21 ft. lbs. (28 Nm).
Tighten the stabilizer bar bushing retainer-to-crossmember attaching bolts to 21 ft. lbs. (28 Nm).

(((Position the lower control arm into the front crossmember)))


https://www.2carpros.com/forum/automotive_pictures/261618_1_5.jpg


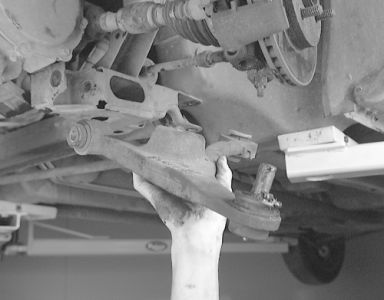
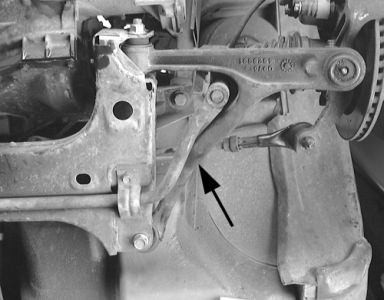
(((Installed position of the lower control arm assembly (see arrow) )))


https://www.2carpros.com/forum/automotive_pictures/261618_1_6.jpg


Thanks for using 2CarPros.com!
Was this
answer
helpful?
Yes
No
+1
Monday, February 9th, 2009 AT 12:18 PM
Tiny
BENNYLEO
  • MEMBER
  • 1 POST
I was wondering one the control arm has been replaced do I need to have the front aligned
Was this
answer
helpful?
Yes
No
Sunday, May 8th, 2011 AT 3:06 AM
Tiny
BRYLO
  • MEMBER
  • 1 POST
Hello. Seems that all I can find treats the 2001 the same as 2003 as far as control arm replacement goes. Only cosmetic changes I guess. However, these pics do not represent my 2003 Neon. I wonder if they are from a 1995-99 generation? In any event that "loud cracking noise" in my case was severe rust. That and the "nut" is buried inside the sub-frame rail. Mine started to turn (I guess breaking it's factory spot weld?) And I had to cut a small hole in frame to get access. (Somebody had already done that to the other side and I think they put a weld tack on it to stop it from turning.) Anyway. The nut is actually round! I heated the nut and gave it a shot with a chisel. That freed it enough to let me at least tighten it back up. I plan to put some muriactic acid on it to clean the rest of the rust off. Hopefully that will completely free it up so it won't spin inside rail. Their design is fine for the assembly line. Insane if you need to work on it in the salt belt 8 years later.
Was this
answer
helpful?
Yes
No
+2
Thursday, October 20th, 2011 AT 5:09 AM

Please login or register to post a reply.

Sponsored links