SPECIAL TOOLS REQUIRED (or equivalents)
^ J-41427, Universal lift bracket.
NOTE: This procedure must be performed on a side lift hoist. The engine and mounting frame will be removed out of the bottom of the vehicle, therefor, a single or twin post hoist can not be used to perform this procedure.
CAUTION: If the engine is damaged Internally and a new engine assembly is Installed in the vehicle, make sure all foreign material is completely flushed out of the cooling system. The oil cooler system should also be flushed out (if equipped). Failure to rid the oil or cooler system of debris can result in engine damage to the replacement engine.
REMOVE OR DISCONNECT
1. Battery and engine cover.
2. Air filter assembly.
3. Throttle cable from throttle body bracket.
4. Cruise control cable from throttle body bracket (if equipped).
5. Cruise control stepper motor electrical connection (if equipped).
6. Recover A/C system, then disconnect lines at the accumulator and condenser (if equipped).
7. Distributor cap and spark plug wires.
8. Drain cooling system and remove radiator.
9. Power steering reservoir and drain fluid.
10. Lines from the hydro boost unit.
11. Master cylinder from hydro boost unit and tie to oil fill tube.
12. Steering shaft from steering gear.
13. Heater hoses from engine.
14. Vacuum line at vacuum tank.
15. Fuse box and wiring harness from bulkhead connector and all related electrical connectors. Lay harness on engine.
16. Raise vehicle and drain crankcase.
17. Rear propeller shaft.
18. Starter and starter opening shield.
19. Torque converter bolts through starter opening.
20. Shift linkage from transmission.
21. Exhaust system at the main flange behind the catalytic converter.
22. Park brake bracket from the frame and the rear brake line from the BMPV.
23. Front bumper.
24. Power steering cooler from the front air deflector.
25. SIR sensor connector.
26. Wheel housing splash shields from chassis to frame.
27. Rear A/C lines at the rear crossmember (if equipped) and leave lines attached to the powertrain assembly.
28. Fuel lines at fuel filter. Pull the fuel lines through the crossmember (forward) and lay on the transmission.
29. Fuel tank electrical connector.
30. Transfer case vent hose (All wheel drive only).
31. Make sure all the connections are disconnected between the chassis and frame.
WARNING: To help avoid personal injury when a vehicle is on a hoist, provide additional support for the opposite end from which components are being removed. The additional support will reduce the possibility of the vehicle falling off the hoist. When removing major components of the vehicle while the vehicle is on a hoist, the vehicle frame should be chained to the hoist pads at the same end as the removed components to prevent tip-off. Failure to follow these precautionary measures could result in vehicle damage, serious personal injury or death.
Side Lift Hoist
a. Install J-41602 to pinch weld area on both sides of the vehicle.
b. Lower the vehicle.
c. Position the front hoist arms under the body protection hoist adapter set. Make sure the rear of vehicle is higher than the front.
d. Support the rear crossmember with suitable stands.
e. Remove frame bolts.
f. Raise the hoist to separate the body from the frame assembly.
g. Install support stands under the rear axle.
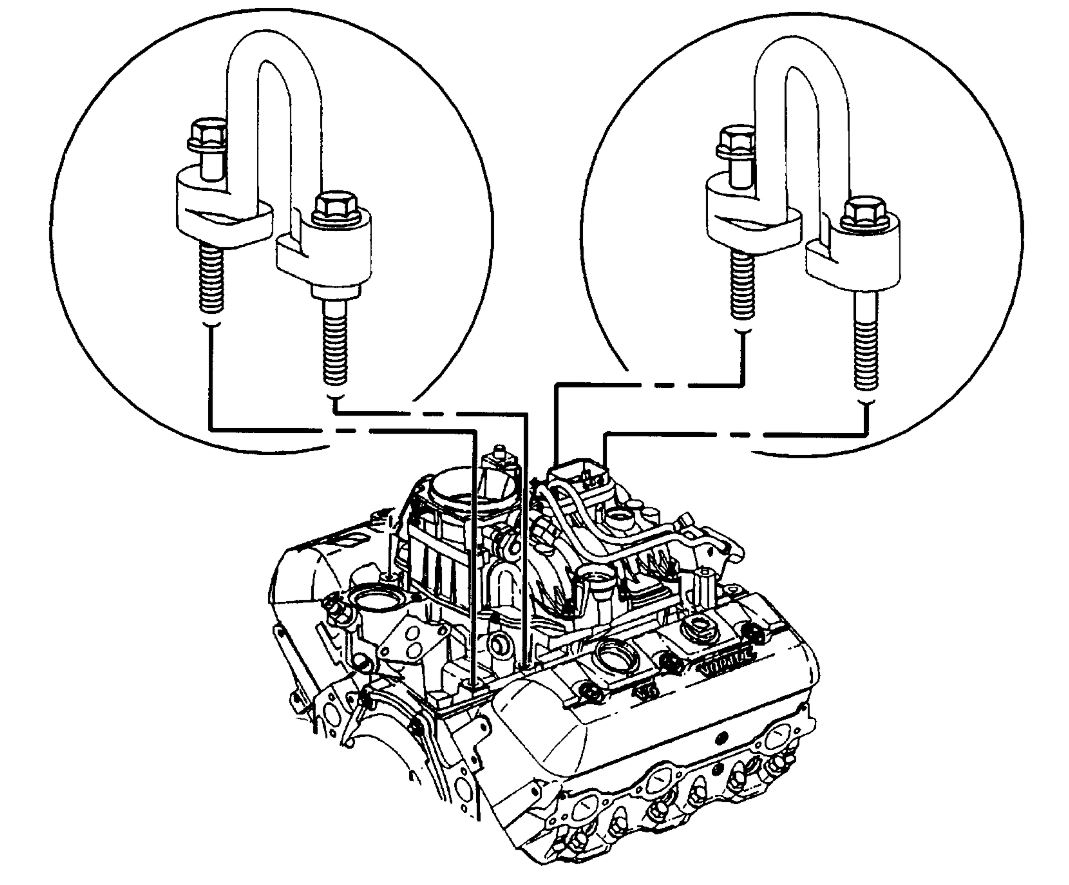
32. Install the engine lift brackets J-41427.
a. Remove the two right rear lower intake manifold bolts.
b. Install J-41427 engine lift bracket marked right rear.
c. Tighten the retaining bolts to 15 Nm (11 lbs ft).
d. Remove A/C compressor and accessory drive bracket.
e. Disconnect the EGR tube from the intake manifold.
f. Remove the two left front lower intake manifold bolts.
g. Install J-41427 engine lift bracket marked left front with the arrow pointing to the front of the engine.
h. Tighten the retaining bolts to 15 Nm (11 lbs ft).
33. Engine mount through bolts.
34. Fuel line bracket from rear of the left cylinder head and fuel lines from the fuel rail.
35. Electrical harness at the transmission connections and at all emission sensors.
36. Transfer case to the engine block support brace (All wheel drive only). Slightly raise the engine and support the transmission with suitable floor stands and a block of wood. Do not support transmission under the oil pan.
37. Remove the exhaust "Y" pipe from exhaust manifolds.
38. Engine from transmission and the frame.
INSTALL OR CONNECT
1. If a new engine is to be installed, make sure any remaining components, brackets, or accessories are transferred to the new engine.
2. Engine into frame and connect to transmission. Remove the transmission jack. Lower engine and transmission onto engine mountings.
3. Engine mount through bolts.
4. Exhaust "Y" pipe to the exhaust manifolds.
5. Fuel line bracket to the rear of the left cylinder head and connect the fuel lines to the fuel rail.
6. Electrical harness at the transmission connections and all emissions sensors.
7. Transfer case to engine block support brace and remove engine lift hooks J-41427 from engine.
8. Intake manifold bolts where the lift hooks where.
9. A/C compressor, bracket, and accessory drive bracket (if equipped).
10. EGR pipe to the intake manifold.
11. Lower the vehicle onto the frame W(side post hoist) or raise engine/frame assembly up into vehicle W(twin post hoist).
12. Align frame. There are two alignment holes in the frame and body. Use a pry bar or dowel pin to align the holes as the vehicle is being lowered/raised in to the frame.
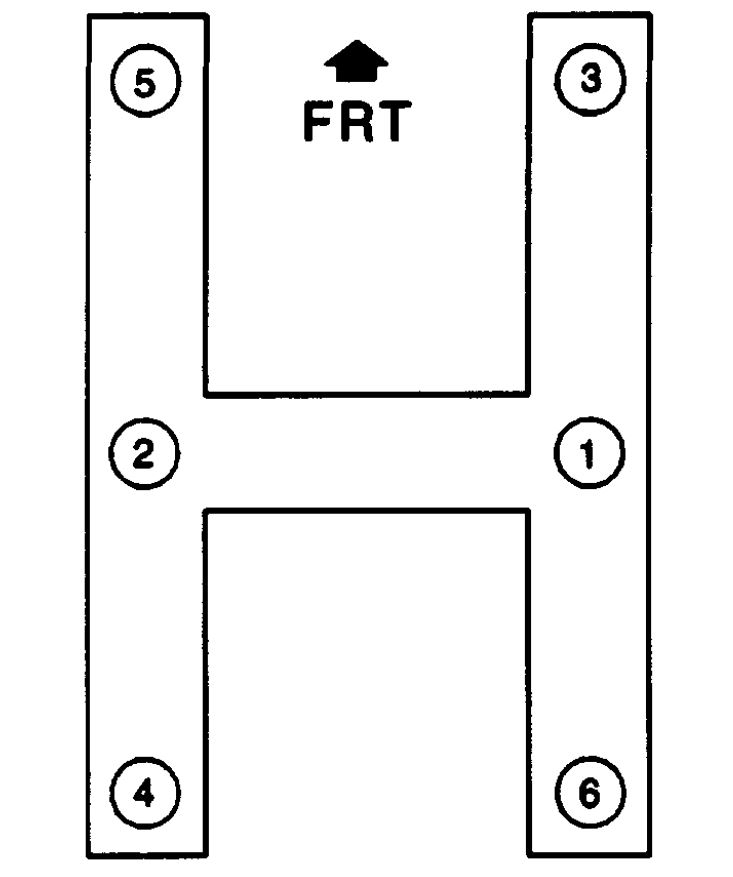
13. Frame mounting bolts. To ensure proper alignment of the frame to the chassis, the frame mounting bolts must be tightened in sequence to:
a. Center bolts to 155 Nm (114 lbs ft).
b. Remaining bolts to 90 Nm (66 lbs ft).
14. Recheck torque.
15. Engine wire harness connectors.
16. Wheel housing splash shields to frame.
17. Steering shaft to steering gear.
18. Cooler line to steering pump and to steering gear.
19. Lines to hydro boost unit and hose to power steering reservoir.
20. Heater hoses to engine.
21. SIR sensor connector.
22. Cruise control stepper motor connector.
23. Throttle cable.
24. A/C lines at the accumulator and condenser (if equipped).
25. Distributor cap and spark plug wires.
26. Radiator and air filter assembly.
27. Transmission and engine oil cooler lines to radiator. Replace the retaining clips.
28. Master cylinder, then raise the vehicle.
29. Rear brake line to BMPV and park brake bracket to the frame.
30. Fuel lines at the fuel filter.
31. Rear A/C lines (if equipped) at the rear crossmember.
32. Transfer case vent tube (All wheel drive only).
33. Power steering cooler.
34. Front bumper.
35. Shift linkage to transmission.
36. Torque converter bolts and tighten to specifications.
37. Starter shield and starter.
38. Rear propeller shaft.
39. Exhaust system at the center flange behind the catalytic converter.
40. Lower the vehicle.
41. Evacuate and recharge the A/C system (if equipped).
42. Fill and bleed the brake system.
43. Replenish all fluid levels with proper grade fluids:
^ Engine crankcase.
^ Transmission.
^ Power steering system.
^ Cooling system.
44. Engine cover.
45. Battery.
46. Perform a tech 1 function test.
See diagrams below as well
Images (Click to enlarge)
Mar 10, 2017 at 7:41 PM