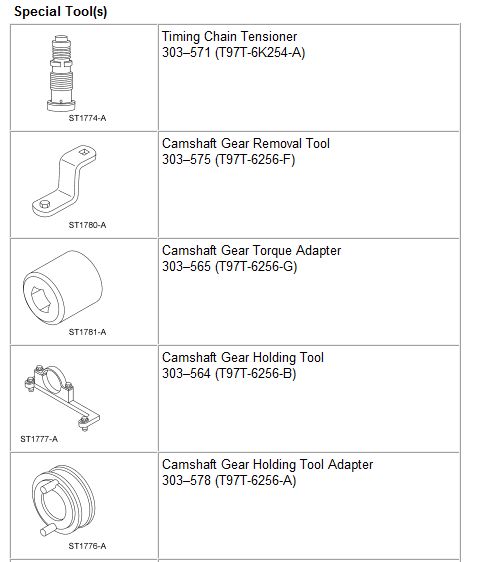
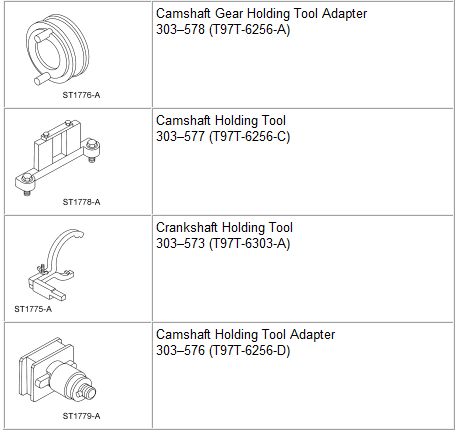
ITS NOT A JOB TO BE DONE AT HOME SPECIAL TOOLS IS NEEDED
Remove the valve covers.
Remove the lower intake manifold.
Remove the fuel supply manifold.
Remove the accessory drive belt.
Remove the thermostat housing.
Remove the roller followers.
Remove the nut and position the A/C manifold and tube assembly bracket aside.
NOTE: You must re-time the LH and RH camshafts when either camshaft is disturbed.
Turn the crankshaft one revolution clockwise.
NOTE: The special tool must be installed on the damper and should contact the engine block, this positions the engine at top dead center (TDC).
Install the special tool
CAUTION: The right-hand camshaft sprocket bolt is a left-hand threaded bolt.
Using the special tool, loosen the RH camshaft sprocket bolt.
NOTE: The camshaft timing slots are off-center.
Position the camshaft timing slots below the centerline of the camshaft to correctly fit the special tools and install the special tools on the front of the RH cylinder head.
NOTE: Leave the top two special tool clamp bolts loose.
Install the special tools on the rear of the RH cylinder head.
Raise and support the vehicle.
Remove the RH wheel and tire.
Remove the RH lower splash splash.
Remove the RH camshaft tensioner and install the special tool.
Lower the vehicle.
CAUTION: The right-hand camshaft sprocket bolt is a left-hand threaded bolt.
Tighten the bolts.
Tighten the special tool top two clamp bolts to 10 Nm (89 lb-in).
Tighten the camshaft bolt.
Remove the special tool.
NOTE: When using a new washer the camshaft tensioner must be torqued to 44 Nm (32 lb-ft).
Install the RH camshaft tensioner.
Raise the vehicle.
Install the RH lower splash shield.
Install the RH wheel and tire.
Lower the vehicle.
Remove the special tools from the RH cylinder head.
Install the special tools on the front of the LH cylinder head and tighten the top two clamp bolts to 10 Nm (89 lb-in).
Loosen the LH camshaft sprocket bolt.
Loosen the top two clamp bolts on the special tool to allow the camshaft sprocket to rotate freely.
NOTE: The camshaft timing slots are off-center.
Position the camshaft timing slots below the centerline of the camshaft to correctly fit the special tools, and install the special tools on the rear of the LH cylinder head.
Remove the LH camshaft tensioner and install the special tool.
Tighten the bolts.
Tighten the special tool top two clamp bolts to 10 Nm (89 lb-in).
Tighten the camshaft bolt.
Remove the special tool.
NOTE: When using a new washer the camshaft tensioner must be torqued to 44 Nm (32 lb-ft).
Install the LH camshaft tensioner.
Remove all of the special tools.
Install the A/C manifold and tube assembly bracket.
Install the roller followers.
Install the thermostat housing.
Install the accessory drive belt.
Install the fuel supply manifold.
Install the lower intake manifold.
Install the valve covers.
Images (Click to make bigger)
Sunday, December 19th, 2010 AT 2:39 AM