YES ALL MUST COME OUT SOME CLAIMS IT CAN BE DONE WITH OUT THE REMOVAL OF THE PANEL, I AM NOT SURE HOW
OR IF IT IS POSSIBLE
Instrument Panel 1997 Town Car Workshop Manual
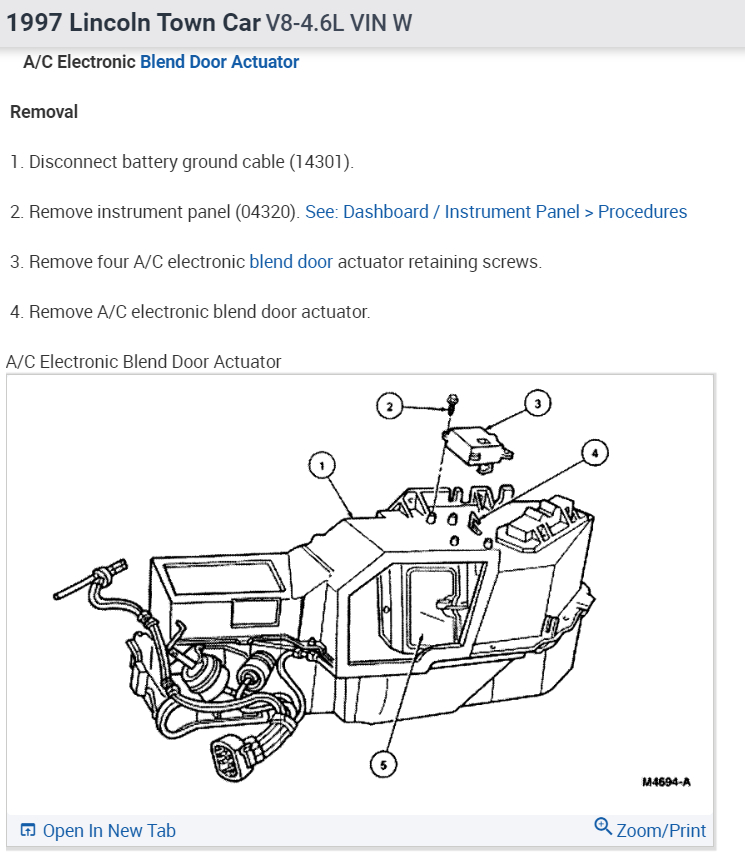
REMOVAL AND INSTALLATION Procedure
Instrument Panel
Removal and Installation
Disconnect battery ground cable (14301).
Raise vehicle on hoist.
Remove RF wheel and tire assembly.
Remove three nuts in radiator coolant recovery reservoir area.
Remove bolt retaining front fender apron (16054) to front fender (16005).
Position front fender splash shield out of the way.
Lower vehicle.
Tag and remove main harness connector from jumper harness (located in front of blower motor).
Remove LH instrument panel lower insulator (043A89) and RH instrument panel lower insulator (043A88).
Remove steering column.
Instrument Panel Lower Insulators
Item Part Number Description
1 04320 Instrument Panel
2 N804236-S Cap
3 388577-S Push Pin (6 Req'd)
4 043A88 Instrument Panel Lower Insulator, RH
5 043A89 Instrument Panel Lower Insulator, LH
6 � Bracket (Part of Module)
7 13466 Miniature Bulb
8 043A88 Instrument Panel Lower Insulator, RH
043A89 Instrument Panel Lower Insulator, LH
9 � Power Point
Remove RH cowl side trim panel (02344) and LH cowl side trim panel (02345).
Tag and disconnect wiring connectors in LH and RH cowls.
Remove ground wire located on LH cowl side.
Remove RH instrument panel upper moulding (04268) and LH instrument panel moulding (04389) from instrument panel (04320) by pulling away from instrument panel and snapping out of retainers. Disconnect wiring connectors as required.
Remove glove compartment (06010) as described.
Remove two screws from center instrument panel support bracket at left side of glove compartment opening.
Remove instrument panel upper finish panel (044A90) and disconnect the A/C sunload sensor (19E663)..
Instrument Panel Finish Panels
Item Part Number Description
1 044A90 Instrument Panel Upper Finish Panel
2 04320 Instrument Panel
3 06081 Glove Compartment Lock Set
4 061A40 Glove Compartment Door Cover
5 N807122-S411 Screw (2 Req'd)
6 04459 Instrument Panel Steering Column Cover
7 � Parking Brake Release Handle (Part of Parking Brake Assembly)
8 N800312-S36 Bolt (5 Req'd)
9 04502 Instrument Panel Steering Column Opening Cover Reinforcement
A � Tighten to 2-3 Nm (18-26 Lb-In)
B � Tighten to 3-5 Nm (27-44 Lb-In)
Remove five screws retaining instrument panel to cowl.
Instrument Panel
Item Part Number Description
1 01631 Vehicle Identification Plate
2 383554-S100 Rivet (2 Req'd)
3 N802539-S100 Nut (5 Req'd)
4 N800854-S2 Nut (2 Req'd)
5 N806030-S36 Stud
6 N606675-S36 Bolt (2 Req'd)
7 045D56 Instrument Panel Cowl Brace
8 N805632-S36 Bolt
9 � Steering Column Retaining Nut
10 3F659 Brake Pedal Support Steering Column Brace
11 � Brake Pedal Support (Part of Body)
12 N801366-S2 Stud
13 N807122-S411 Screw
14 N620480-S55 Nut
15 04320 Instrument Panel
16 N806115-S100 Bolt (3 Req'd)
17 04502 Instrument Panel Steering Column Opening Cover Reinforcement
18 N806067-S2 Bolt
19 N620482-S36 Nut
A � Tighten to 8-10 Nm (71-88 Lb-In)
B � Tighten to 2-3 Nm (18-26 Lb-In)
C � Tighten to 22-34 Nm (17-25 Lb-Ft)
D � Tighten to 47-63 Nm (35-46 Lb-Ft)
Disconnect automatic temperature control sensor hose and elbow (19D888) from evaporator housing.
Disconnect vacuum hose harness assembly.
On left side of engine compartment, disconnect all connectors and push harness through bulkhead.
NOTE: The following steps should be performed by two technicians.
Remove one nut and one bolt retaining left side of instrument panel to cowl panel.
Remove one nut retaining right side of instrument panel to cowl panel.
Remove instrument panel from vehicle.
To install, reverse Removal procedure.
Images (Click to make bigger)
Thursday, January 6th, 2011 AT 11:59 PM