This is not a simple job so you have to be careful. The procedures are for camshaft removal as well as the gasket neneath it has to be replaced.
INTAKE CAMSHAFT & HOUSING
Removal
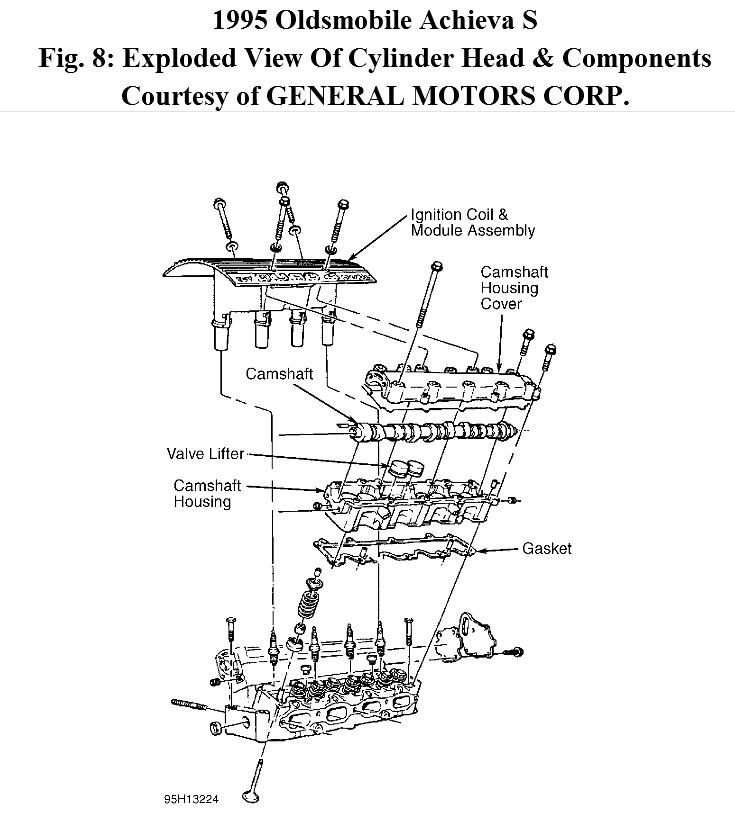
1. Disconnect negative battery cable. Disconnect electrical connector. Remove bolts, and remove ignition coil and module assembly by pulling it straight up. See Fig. 8. Remove power steering pump (leave hoses connected).
2. Remove oil/air separator with hoses attached at separator. Disconnect vacuum line from fuel pressure regulator. Disconnect fuel injector harness connector. Remove fuel line clamp from top of intake camshaft housing. Remove fuel rail bolts.
3. Remove fuel rail (leave fuel lines attached). Cover injector openings in cylinder head. Cover injector nozzles. Remove timing chain and camshaft sprockets. See TIMING CHAIN & SPROCKETS. Remove bolts securing timing chain housing to camshaft housing.
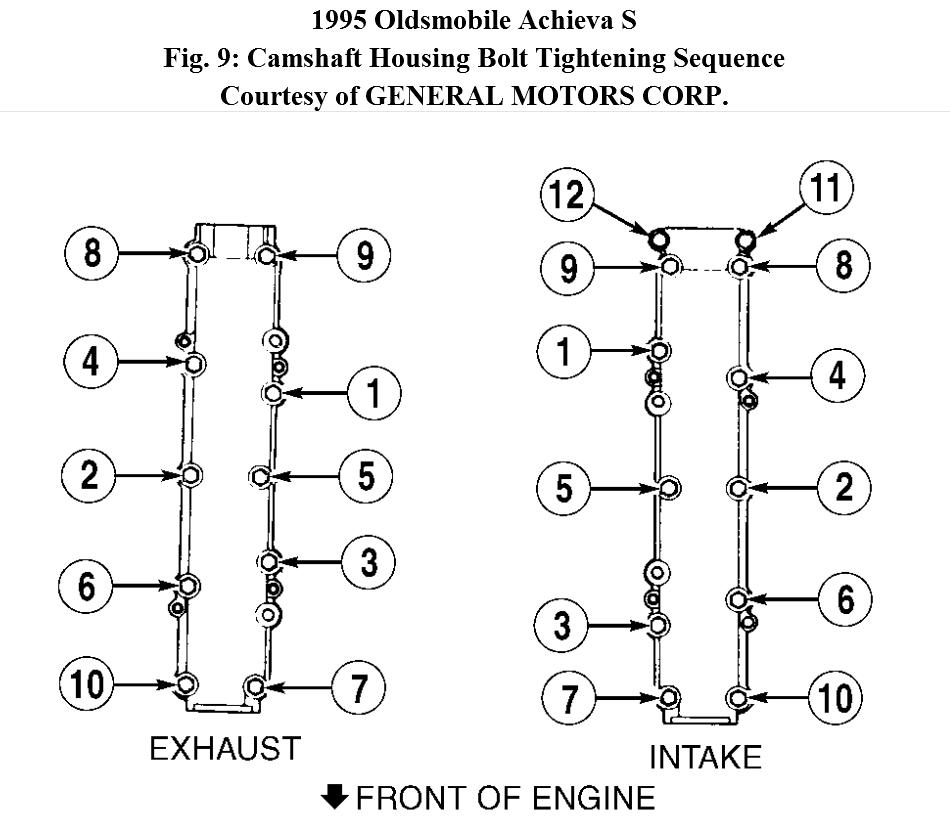
4. Remove bolts that secure camshaft housing cover to camshaft housing. Working in reverse order of tightening sequence, evenly loosen and remove bolts securing camshaft housing to cylinder head (leave 2 bolts loosely in place to keep camshaft housing in place while separating cover from housing). See Fig. 9.
5. Install 4 camshaft housing-to-cylinder head bolts into tapped holes in camshaft housing cover. Evenly tighten bolts to separate cover from housing. Remove 2 loosely installed camshaft housing bolts. Remove camshaft housing cover and seals.
6. Install and hand-tighten one camshaft housing bolt to keep camshaft housing in place while removing camshaft and lifters. For installation reference, note position of dowel pin (on timing chain sprocket) in relation to camshaft housing. Remove camshaft. Remove camshaft housing and lifters as an assembly. If necessary, remove lifters from camshaft housing.
CAUTION:
Any time camshaft housing bolts are loosened or removed, the gasket between the camshaft housing and cylinder head must be replaced.
NOTE:
If removing lifters, keep them in order; they must be installed in their original locations. To prevent bleed-down, store lifters upside down in clean engine oil.
Installation
1. Ensure dowel pins aligning camshaft housing with cylinder head are installed. Install camshaft housing with a NEW gasket (no sealant required). Loosely install one camshaft housing bolt to keep camshaft housing in place while installing lifters and camshaft.
2. Coat lifters and camshaft with Prelube (12345501). Install lifters in their original locations. Install camshaft, ensuring dowel pin on timing chain sprocket is in same position as when removed. Install NEW Green seals into cover (no sealant required).
3. Remove bolt installed to keep camshaft housing in place. Apply Pipe Sealant (1052080) to threads of bolts securing housing to cylinder head 6and cover to housing. Tighten camshaft housing bolts to specification in sequence. Refer to Fig. Fig. 9.
4. Install timing chain housing and timing chain in reverse order of removal. Lubricate NEW "O" ring seals with engine oil, and install them onto injectors. Install fuel rail. To install remaining components, reverse removal procedure.
5. If a spark plug boot connector remained on a spark plug when ignition coil and module assembly was removed, remove it from spark plug and install it onto ignition coil and module assembly. Set ignition coil and module assembly in place and press straight down to install assembly onto spark plugs.
6. Clean oil from threads of bolts securing assembly to camshaft housing. Apply thread sealant to bolt threads. To complete installation, reverse removal procedure.
Procedure is similar for both cams.
Images (Click to make bigger)
Wednesday, August 22nd, 2012 AT 9:29 PM