Hi Mike,
Hope the following are helpful.
REMOVAL & INSTALLATION
CAUTION:This application is an interference engine. Do not rotate camshaft or crankshaft when timing belt is removed, or engine damage may occur.
TIMING BELT
Removal (Mechanical Timing Belt Tensioner)
1. Raise and support vehicle. Remove right inner splash shield. Remove center bolt from crankshaft pulley. Use gear puller to remove crankshaft pulley.
2. Remove power steering pump (hoses attached) and mounting bracket from engine. Move out of way.
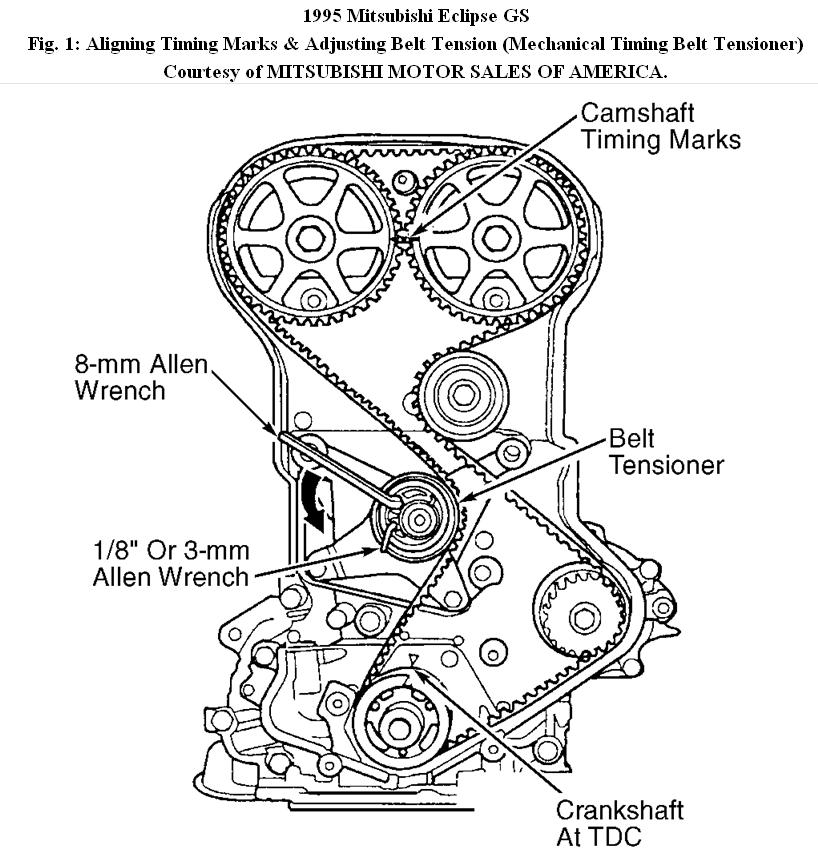
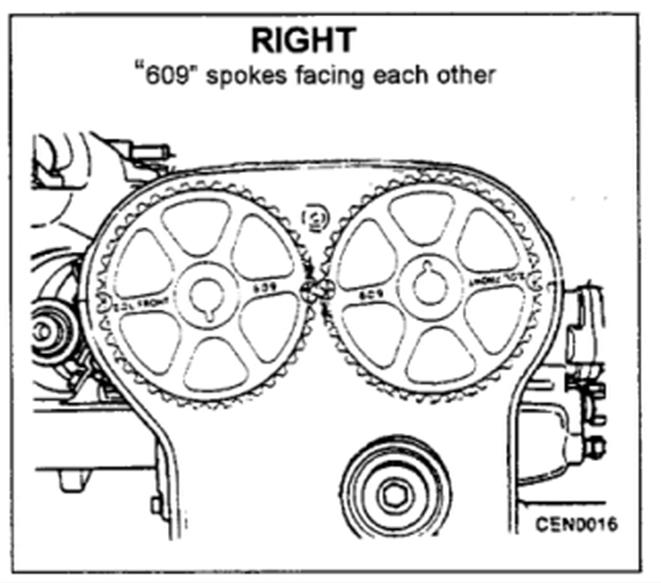
3. Lower vehicle. Place jack under engine for support. Remove right side engine mount. Remove engine mount bracket from front of engine. Remove timing belt cover. Rotate engine clockwise to align the camshaft and crankshaft timing marks. See Fig. 1 .
CAUTION:To prevent pistons from hitting valves, do not rotate camshaft
or crankshaft after removing the timing belt.
4. Install 8-mm Allen wrench into timing belt tensioner. See Fig. 1 . Insert long end of a 3-mm Allen wrench into pin hole in the front of tensioner. Slowly rotate tensioner counterclockwise with 8-mm Allen wrench while pushing lightly on the 3-mm Allen wrench, until it slides into the locking hole. If reusing old timing belt, mark belt with arrow to indicate direction of rotation. Remove timing belt.
CAUTION: Mechanical timing belt tensioner is serviced as an assembly. To prevent premature timing belt failure and engine damage, do not
separate tensioner pulley from tensioner bracket.
Fig. 1: Aligning Timing Marks & Adjusting Belt Tension (Mechanical Timing Belt Tensioner) (ENSURE THE MARKINGS "609" ARE FACING EACH OTHER WHEN INSTALLING.)
Inspection
Check belt teeth for damage or oil contamination. Inspect belt for glossy, hardened or non-elastic surface. Ensure the belt is not cracked, separated or showing canvas fiber. Inspect all sprockets for damage. Check tensioner pulley and idler pulley for signs of grease leakage or roughness in rotation. Replace components if damaged.
Installation (Mechanical Timing Belt Tensioner)
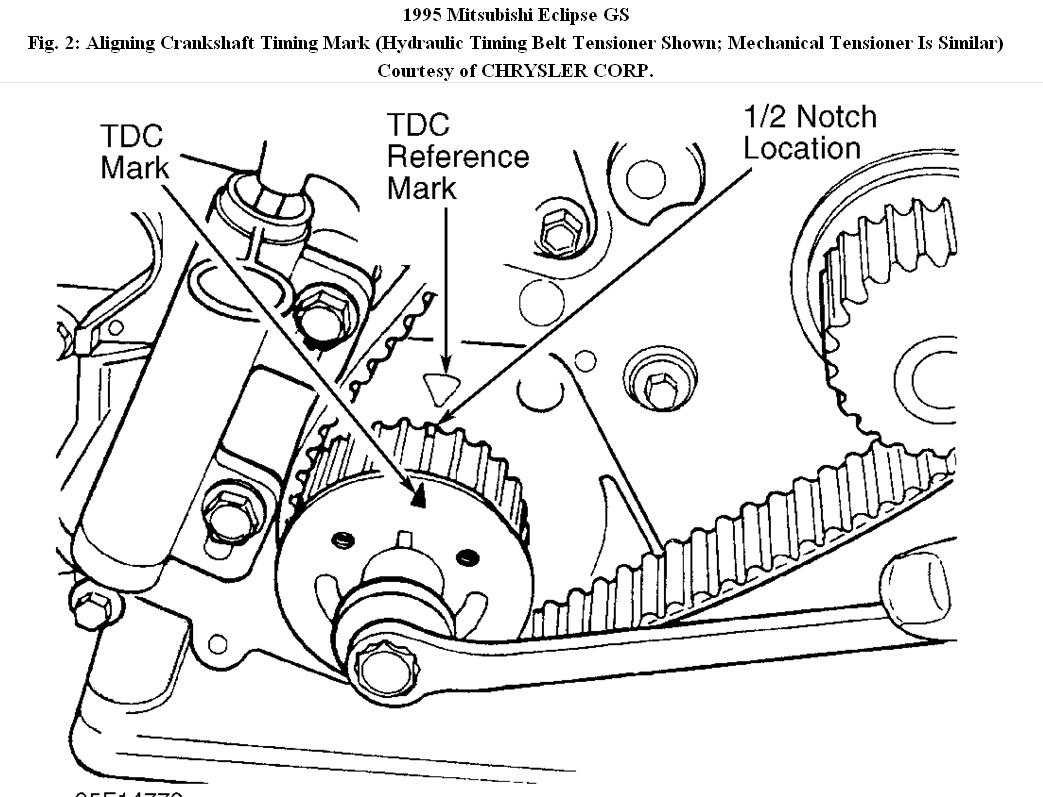
1. Ensure camshaft and crankshaft timing marks are aligned. Rotate crankshaft pulley sprocket 1/2 tooth counterclockwise from TDC location. See Fig. 2 .
2. Install timing belt starting from crankshaft pulley sprocket, go around water pump sprocket, idler pulley, camshaft sprockets, and then around tensioner pulley. Move crankshaft sprocket to TDC to take up belt slack.
3. Remove Allen wrench from timing belt tensioner pulley. Rotate crankshaft clockwise 2 revolutions. Check alignment of camshaft and crankshaft timing marks. If timing marks do not align, remove timing belt and realign timing marks.
4. Continue installation in reverse of removal procedure. Adjust drive belts to proper tension.
Fig. 2: Aligning Crankshaft Timing Mark (Hydraulic Timing Belt Tensioner Shown; Mechanical Tensioner Is Similar)
Removal (Hydraulic Timing Belt Tensioner)
1. Raise and support vehicle. Remove right inner splash shield. Remove center bolt from crankshaft pulley. Use gear puller to remove crankshaft pulley.
2. Remove power steering pump (hoses attached) and mounting bracket from engine. Move out of way.
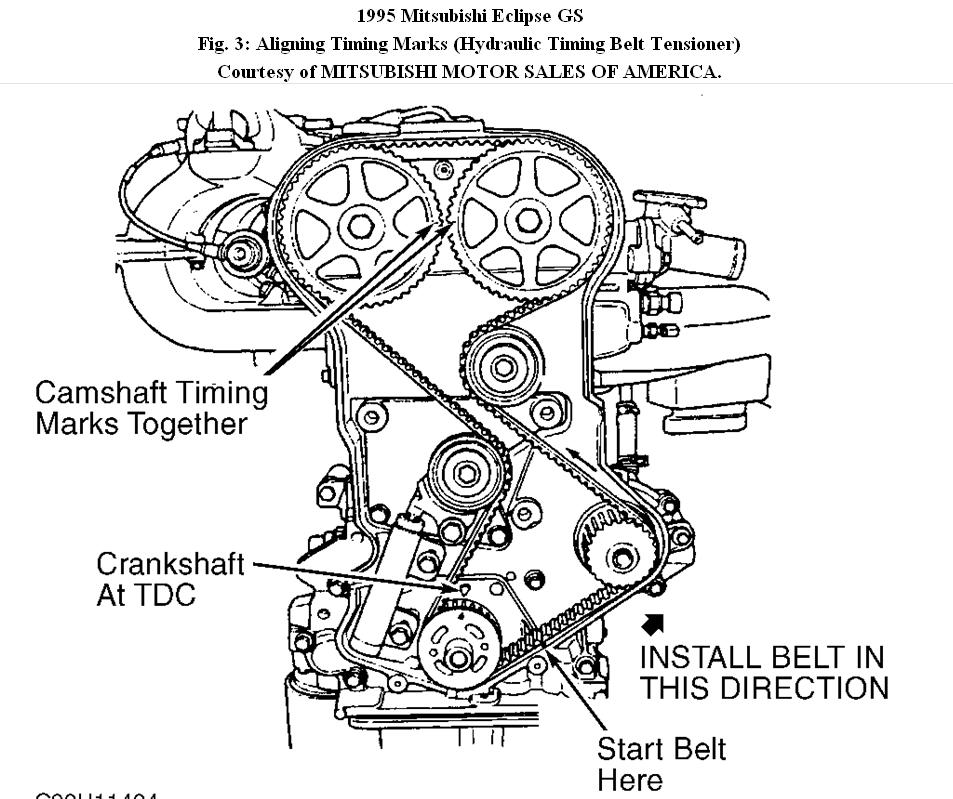
3. Lower vehicle. Place jack under engine for support. Remove right side engine mount. Remove engine mount bracket from front of engine. Remove timing belt cover. Rotate engine clockwise to align the camshaft and crankshaft timing marks. See Fig. 3 .
CAUTION:To prevent pistons from hitting valves, do not rotate camshaft
or crankshaft after removing the timing belt.
4. Loosen timing belt tensioner to remove timing belt. If reusing old belt, mark belt with arrow to indicated direction of rotation. Remove timing belt.
5. Remove tensioner from engine. It will be necessary to compress the center plunger and lock it in place.
6. Place tensioner in a soft-jawed vise. Align the hole in the end of the tensioner center plunger with the hole in the end of the tensioner body. Slowly compress the tensioner, and when holes are aligned, insert a locking pin in the tensioner.
Fig. 3: Aligning Timing Marks (Hydraulic Timing Belt Tensioner)
Timing Belt Tensioner Bracket Precaution
NOTE: The following revised information regarding the tensioner pulley pivot bolt is from Chrysler technical service bulletin 09-06-96; March 29, 1996. Also Mitsubishi technical service bulletin 96-11-004; May 1996.
On models with hydraulic timing belt tensioner, do not loosen, tighten, or remove timing belt tensioner pivot bolt. Bolt is installed at factory with special threadlocking compound that is not reusable. If tensioner pivot bolt is disturbed, entire bracket assembly must be replaced. The tensioner pulley center bolt MAY be removed and installed.
Inspection
Check belt teeth for damage or oil contamination. Inspect belt for glossy, hardened or non-elastic surface. Ensure the belt is not cracked, separated or showing canvas fiber. Inspect all sprockets for damage. Check tensioner pulley and idler pulley for signs of grease leakage or roughness in rotation. Replace components if damaged.
Installation (Hydraulic Timing Belt Tensioner)
1. Ensure camshaft and crankshaft timing marks are aligned. Rotate crankshaft pulley sprocket 1/2 tooth counterclockwise from TDC location. See Fig. 2 .
2. Install timing belt starting from crankshaft pulley sprocket, go around water pump sprocket, idler pulley, camshaft sprockets, and then around tensioner pulley. Move crankshaft sprocket to TDC to take up belt slack. Install timing belt tensioner, but do not final tighten fasteners yet.
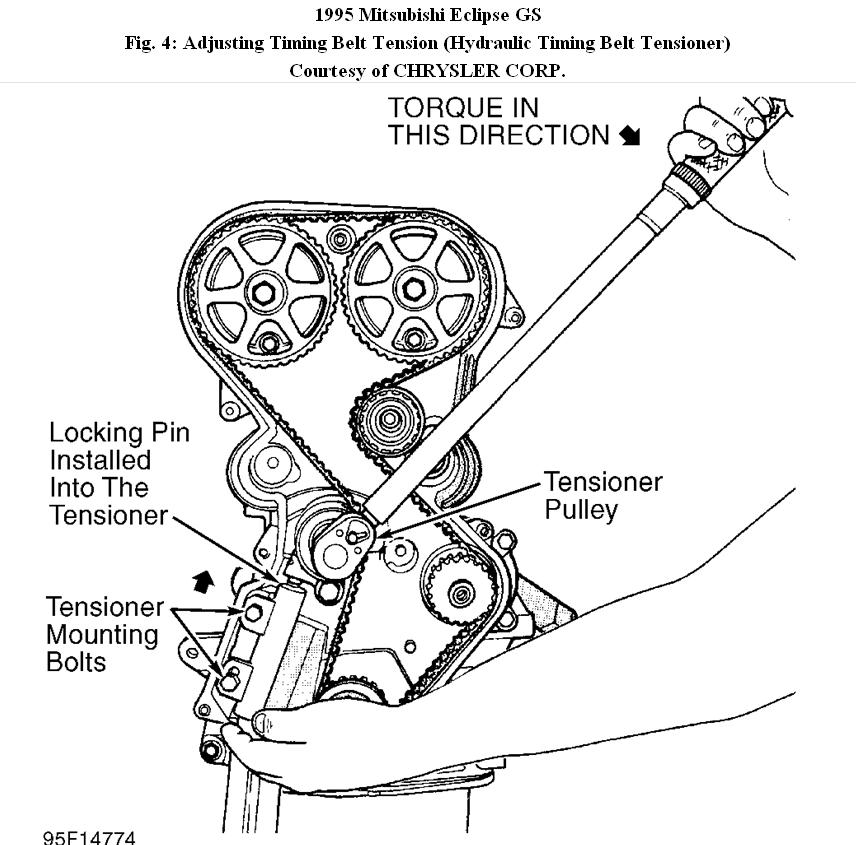
3. With 21 ft. lbs. (28 N.m) of torque applied to tensioner pulley, move tensioner against pulley bracket and tighten bolts to specification. See Fig. 4 .
4. Remove tensioner plunger locking pin. Pretension is correct when locking pin can be removed and installed again.
5. Rotate crankshaft clockwise 2 revolutions and check timing belt alignment marks. Reset belt if marks are not aligned. Install timing belt covers.
6. Continue installation in reverse of removal procedure. Adjust drive belts to proper tension.
Fig. 4: Adjusting Timing Belt Tension (Hydraulic Timing Belt Tensioner)
© 2008 Mitchell Repair Information Co., LLC.
Images (Click to enlarge)
Oct 13, 2017 at 2:26 PM
(Merged)