I finally figured it out with NO HELP from Chiltons Books, Haynes Manuals, Honda Repair Manuals on CD ROM, Internet Searches, Pay as you go Search for Answers sites, Master Mechanics, Junk Yard Mechanics, Logic, Geometry or Physics. None of which made any sense, and I felt like I was in the Twilight Zone, pulled all my hair out, lost several friends who tried to help with this truck and my dog ran away too. Just kidding I still have my Dog.
Since I finally figured it out ( to a point ) I will cut to the chase and explain my findings NOW so maybe you can get on along with your work. BUT I highly recommend that you read on fully, since you have this same vehicle, and you probably will have the same problems that I did. Keep in mind that NO ONE has ever seen this, or would admit to it that I could find. And No One Ever suggested it while I begged everyone I could find for help. I NEVER broke down and sent it to the dealership out of pure stubbornness and PRIDE, not to mention lack of finances. Maybe I should have, but its done now.
PROBLEM:
Engine runs terrible. Falls On its Face. Will Idle, but wont take an accelerator load. Everything changes when it gets hot, destroying any progress that I thought I had made.
I think it jumped timing. I try to time it. Holy bat guano! Did I open up a can of worms!
How the hell do you time this truck? 4 pieces of conflicting information, nothing makes sense, it sounds in time, but the marks are WAY WAY OFF! Must be an electronic control, like an emissions component, TPS, O2 Sensor, Computer, Idle Solenoid, distributor, cap, wires, something! Nothing makes sense, and nothing lines up with my ear when I manually tune it to where it sounds and feels right.
No help from anyone, unless I pay an 800.00 diagnostic charge. My hands are too big to reach anything too! I try EVERYTHING and keep getting the same results. I'm really pissed at Honda, Chiltons, Haynes and Mitchell. I try for 10 months on and off until I cant take it anymore and walk away for weeks at a time, then I try it all again. Same results no matter what I do.
Solution # 1:
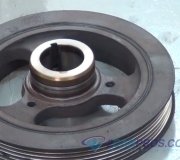
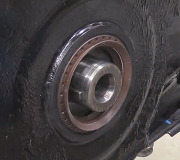
The Harmonic balancer on these engines ( The Bottom Belt pulley that has the timing marks on them) is a TWO PIECE BALANCER. It has an Inner Metal Ring with the Keyed Slot for the crankshaft, then a layer of RUBBER on the outer edge, about ¼ inch thick. Then it has another OUTER RING of METAL with the timing marks ground into them, pressed over the rubber layer of the first ring. The rubber in the center will get hot, melt, and allow the outer ring to spin off its proper axis, making your timing marks 50 to 90 degrees out of sync with the crankshaft position in reality.
Needless to say, you can not set the timing with the timing marks in the wrong position when viewed with a timing light. Mine were about 70 degrees BTDC showing, but the engine was actually in time and sounded good at idle. ( Still would not take acceleration )That's drove me batty, cause it didn't make sense. Needless to say I pulled it all and installed a new timing belt and tensioner. ( Among other components at other times listed further down )
The Timing mark should ACTUALLY BE IN LINE WITH THE KEYED PORTION OF THE INNER RING on the harmonic balancer. ( Specifically the LEFT EDGE of the notch cut for the crankshaft, when the balancer is flat on a shelf, and the key slot if facing you. ( Six O clock Position ) The flat face of the balancer DOWN, the rounded nose UP ) I cut a new mark with a file in the proper position, instead of paying 118.00 for a new balancer from a dealership. I did SEE a new one on the counter at the dealership, and made a mental note of the proper timing mark to transfer that in formation to mine. I spent enough money of this truck, I didn’t need another 118.00 lesson at this point. Screw Honda.
Caused by HEAT in my case, the rubber melted, and the two metal rings spun at different rates, changing my timing marks. Think of a "˜doughnut’ with an inner spinning "˜doughnut hole’. They turned at different rates when melted, and then re- solidified in the wrong spot. Never will line up with the timing index.
ALSO can be caused by using the wrong PULLER to pull the harmonic balancer. YOU MUST USE A HARMONIC BALANCER PULLER, and not a JAW TYPE GEAR PULLER! A Jaw type will pull the outer ring only, and a harmonic balancer puller will pull from the center ring with two bolts M 6 1, 0 X 65mm long, and a couple of washers. If you pull the outer ring only, your gonna end up with 2 harmonic balancer to use as Boat anchors.
OK So that's the first part that you need to know. I tried to cut to the chase so you didn't have to read further. This MAY solve your Initial Problem, but you will still have to pull the lower timing cover to check it. Important information and history follows, so Please Continue Reading.
Solution # 2: Misleading / Contradicting Information:
Breaking the laws of Physics and Geometry.
Men in White Suits with straight jacket in hand.
Ok, so the balancer is now correct, with the timing mark in the right spot on the balancer, thanks to my handy dandy triangle file. Now how DO you set the timing?
Wellll. I have FOUR different pieces of conflicting information on which Cylinder to use.
Chiltons, Haynes and Honda Passport Repair ( Mitchell ) CDROMS. This is where I pulled my hair out, and the dog ate my homework. Full coverage insurance and a fuel leak crossed my mind many times.
Chiltons Says: # 4 Piston TDC Compression ( Chiltons Book # 36100 Page 3-50 in BOLD under Gasoline Models ) Then it says to Use the # 1 Piston on (page 3-52 under 1993-96 2.3 liter engines note 8 )THEN it says on page 3-54 under timing belt inspection In BOLD When the timing marks are aligned on 1994-95 vehicles, NO pistons will be at TDC/compression. When the timing marks are aligned on 1995 ½ vehicles, the # 2 Piston is at TDC/ compression. It repeats the same information on the top of page 3-55
Haynes Says: # 1 Piston TDC Compression ( Page 2A-2 section 3 Haynes Book 47017) then on page 2A-6 section 8 note 4 and 18 it says # 4 Piston TDC/ compression )
Mitchell Says: # 1 Piston TDC compression, hard to use CD Rom, not looking further now,
So what the hell do I use?
# 1, # 2, # 4 or NONE?
Actually I'm still confused.
I ended up using # 1 Piston TDC compression I may still be 180 out on the cam, but it runs great and has lots of power and response now. Ill re- check it after all the grease is out from under my fingernails, and Ive driven it for a week or two. I'm 95% sure its right, but I will re-confirm that at a later date just to be a perfectionist, and try to up my mileage to maximum possible. I'm really just second guessing myself, cause it runs great! I just cant believe that Its finally going again after 10 months.
You do have to adjust the idle speed FIRST, warm the engine up, then disconnect and plug the EGR vacuum line, on top of the EGR and the canister purge line on the charcoal canister must be plugged too, on the passengers side firewall. Also the VSV( Vacuumed switching valve ) if Equipped, must be disconnected. Its a white plug with 2 wires on it under the relay box on the passenger side fenderwell. Unplug it. Read the label under the hood to track it down under emissions control. Little metal bracket with black plastic vacuum lines on it and an electric relay rubber mounted for shock resistance.
My Engine is a 4ZE1 2.6 liter MFI. I used 900 Rpm for idle and 12 deg. BTDC for timing. I used the # 1 Piston for TDC/Compression and used a timing light on # 1 plug wire. I also confirmed that my distributor rotor was pointing at the #1 cap contact in the distributor cap. I also double-checked all my spark plug wires for proper positioning and placement on the cap and the sparkplugs.
I skipped ahead a bit there I Pulled the timing cover, and all the belts and radiator to see the timing belt completely.
I set the # 1 Piston to TDC/ Compression with a compression gauge in the spark plug hole # 1. ( Turning the engine with a wrench, and going around at least 6 times to check it, 2 revolutions each time)
The Bottom crankshaft timing mark (UNDER The Harmonic Balancer- you have to pull the balancer to see the mark-on the crank gear.) Is set to almost 12 O clock. More Like 12:15. There is a line there in the back timing belt housing that you align this mark with. Its just a bit to the right of a bolt, and it looks like a manufactured LINE about 1 inch long. You cant miss it. Its really obvious. You can see it well after pulling the radiator, and looking through the front of the grill kinda low, about license plate height.
Then I made sure my Cam sprocket was lined up at 12 O clock with the index marks on the outer back cover and the cam gear itself. Really obvious again. Cant miss it. Little triangles etched into the gear and back cover housing.
Ok so It got a new belt and tensioner, after I went ahead and did the Water Pump, cause I was in there. Oil pressure has never been a problem, so I left the oil pump alone. I didn't do the front crank seal either, cause I wanted to get this thing diagnosed, or burn it down.
I put it all back together, refilled the radiator, charged the battery and let er rip.
EXACT SAME PROBLEM THAT I STARTED WITH. DIDN'T HELP AT ALL.
Rechecked the timing marks, distributor, wires, codes, bla bla bla.
The engine would start and idle, especially when it was cold. Then I would give it some throttle, and it would fall on its face, hesitate, and run rough and like crap. As soon as I let off the throttle, it would catch back up and run smooth again. To make it run at all I would have to PUMP the throttle to get the RPMs up until it would have enough energy to keep running and taking the fuel Im trying to give it. So I started tinkering with the TPS ( Throttle Positioning Sensor ) I actually replaced it, and tried all the electronic checks, and adjustments humanly possible. Still Nothing. Same Problem. I started reading the CODES from the computer. I kept getting O2 sensor and Lean Exhaust. Replaced the O2 Sensor. Same thing. Checked all the Emissions lines and wires, did electronic tests on all the components of the emissions. All seem Ok. Cleaned the MAF sensor with special MAF sensor cleaner, Same thing. Changed Plugs and Wires and Cap and Rotor Same Thing. Started calling Wrecking yards for replacement Emissions sensors. NO ONE HAS THESE TRUCKS VERY HIGH DEMAND. No Parts available unless you go to the Dealer. I figured up about 1000.00 to replace all the emissions sensors. Started thinking its time to scrap this truck. Bought books, went on line, bought CD ROMs, begged information, bought mechanics beers at the local saloon, had a few myself. I About Gave Up!
I could not find any vacuum leaks, EGR was good, air pump good, wiring good, BUT I could make it run better with throttle body cleaner sprayed into the air intake near the throttle body itself.
Ok Last Chance. Full insurance coverage and a fuel leak is next.
Solution # 3:
Mechanical Part defying Physics, Geometry and Common Sense:
As a Last ditch effort, I bought a fuel pressure gauge and a fuel filter. I disconnected my fuel line between the tank and the filter on the frame rail. Connected the Pressure gauge. Got 14 to 16 PSI. Hummmmm
Sounds right for an old carburetor, But this is MFI injected. Checked the books. 35 to 42 Psi required Hummmm. Not Getting that. Weird. Electric Fuel Pumps usually work or they don't work. I've never heard of one half way working. Removed the old fuel filter ( after the Pressure Gauge ) and backflushed it, Some minor debris, nothing bad no rust, not much resistance, looks good. Replaced it anyway. Reconnected the fuel line, and moved the pressure gauge to the fuel inlet on top of the engine. SAME readings 14 - 16 Psi. Ok Its obviously a bad fuel pump, as each injector needs 7 to 9 Psi just to open the injector. I wasnt getting that. Time to drop the tank. $ 83.00 later, 3 hours of work, some spilled gasoline, and inspecting the tank for debris. ( Very Very Clean Inside ), Im back up and Running.
Immediate pressure at the inlet to the injector rail is 34 psi with the key just set to On, no engine running. With the engine running I can disconnect the fuel pressure regulator valve vacuum line and watch the fuel pressure jump up to 44 Psi. Fuel Pressure regulator is working.
Engine runs STRONG, Smooth, no hesitation, and I did an 80 MPH test run on the highway about 3:00 am. Had Pedal left, but I didn't want to push it too hard.
That finally solved the problem that I've had for 10 months or more. THE DAMN FUEL PUMP!
I have NEVER heard of a fuel pump only putting out ½ pressure unless its was clogged. MINE WASN'T CLOGGED, NO DEBRIS IN THE TANK. Nothing on the inlet screen. Just Plain WEIRD!
All I can figure is that ½ of the armature windings in the fuel pump burnt out, making the pump run at ½ speed. I have never heard of this, as when a fuel pump goes out, it usually just goes DEAD, with no fuel delivery at all.
This explains why it took me soo long to figure it out. I knew I was getting fuel, so the fuel pump was working RIGHT?
I could hear it kick on, the engine got fuel, and the truck would run at idle, and I could rev it up to drive it running like junk and acting like a bad clutch. Still I was getting fuel. Cant Be a Fuel Pump.
So Long Story Short, The truck is fixed and I really hope this helps you fix yours. I would have loved for someone to post something like this on the internet when I was searching and searching and searching.
I took this time to post this as a Pay It Forward for you to enjoy. If this helped you at all, Please feel free to just drop me a line and say it worked for you. 2 words would be great. Ill know what your talking about.
I'm still confused on the cylinder to use, but # 1 Worked perfectly for me. Also I recommend the Mitchell over the Haynes Book or Chilton's Book.
I hope this helps you. I'm happy again with my truck, and I hope you will be too.
Best Regards,
Carl
SPONSORED LINKS
Sunday, April 6th, 2008 AT 2:49 PM