Here are procedures for testing the actuator, which seems to be the cause.
Actuator test.
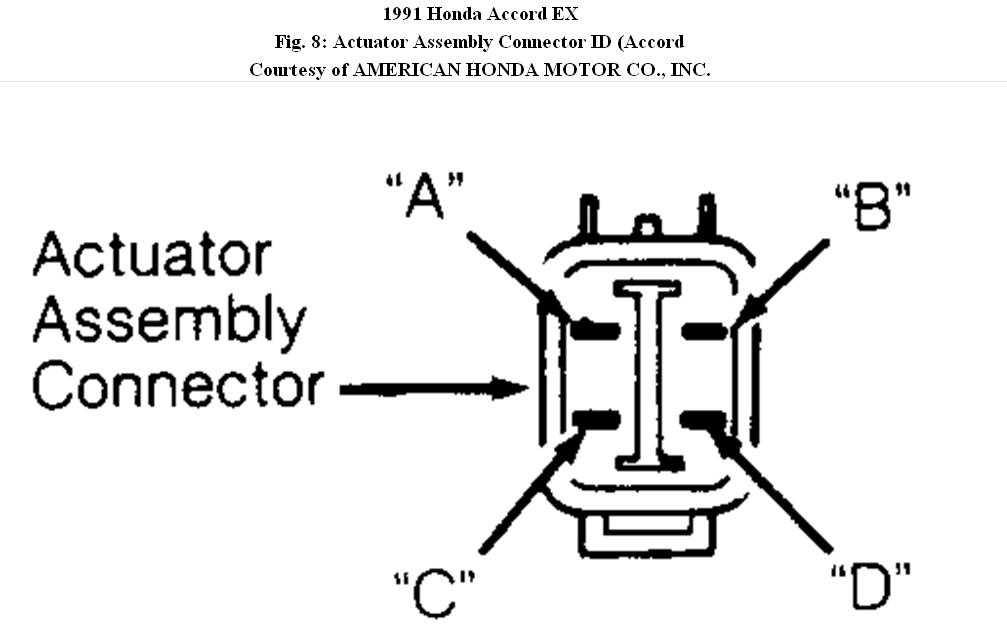
1. Turn ignition off. Disconnect actuator cable from actuator. Disconnect 4-pin connector at actuator. Actuator is located on left side of engine compartment. Using jumper wires, connect battery voltage to terminal "D" of actuator connector and simultaneously ground terminals "A", "B" and "C" of actuator connector. See Fig. 8.
2. Disconnect actuator vacuum line at vacuum check valve. Connect a vacuum pump to actuator vacuum line. Ensure vacuum check valve is between vacuum pump and actuator. Pump vacuum pump.
3. Actuator rod should pull in completely. If actuator rod pulls in completely, go to step 5). If actuator rod pulls in partially or not at all, check for leaking vacuum line. Repair as necessary.
4. If vacuum line is not leaking, check actuator solenoid valve assembly. If actuator solenoid valve assembly tests are okay, actuator solenoid valve assembly is okay electrically, but has a mechanical malfunction. Replace actuator solenoid valve assembly for mechanical malfunction.
5. With voltage still applied to actuator connector, try to pull actuator rod out by hand. If actuator rod cannot be pulled out by hand, go to next step. If actuator rod can be pulled out by hand, replace malfunctioning actuator assembly.
6. Disconnect ground from actuator connector terminal "C". See
Fig. 8. Actuator rod should return to "rest" position. If actuator rod does not return to "rest" position, replace malfunctioning actuator solenoid valve assembly. If actuator rod returns to "rest" position, repeat steps 1) through 6), but when step 6) is reached, disconnect ground from actuator connector terminal "A" instead of "C". See Fig. 8.
7. If actuator rod returns to "rest" position after disconnecting ground from actuator terminal "A", actuator assembly is functioning properly. If actuator rod does not return to "rest" position after disconnecting ground from actuator terminal "A", replace malfunctioning actuator solenoid valve assembly.
Image (Click to make bigger)
Tuesday, January 11th, 2011 AT 2:39 PM