When I realised your model is preOBD-II, I did some research and came up with this.
ABS/TCS TROUBLE CODES
The Bosch Anti-Lock Brake and Traction Control System includes the ability to display any one of 17 diagnostic trouble codes in the event of a system malfunction.
The Electronic Brake Control Module (EBCM) can display trouble codes only when the Diagnostic Service Mode has been entered.
There also 3 BCM trouble codes and 1 PCM code that are ABS related.
NOTE:
The EBCM can store only one trouble code at a time. If conditions are such that 2 trouble codes would be displayed, only the lowest code will be stored. ABS/TCS trouble codes are erased whenever the EBCM loses power due to disconnection of the battery cable or EBCM.
ENTERING ABS/TCS DIAGNOSTIC SERVICE MODE
NOTE:
The following procedure deals only with the aspects of entering diagnostic Service Mode which are required for diagnosis of the Anti-Lock Brake and Traction Control System. See Fig. 25 and Fig. 26.
1. Ignition On
Ignition must be on to enter diagnostic Service Mode.
2. Release Parking Brake
Be sure that the parking brake is fully released prior to beginning trouble code diagnosis. If there is any doubt regarding whether or not the parking brake switch may be causing the BRAKE lamp to turn on, disconnect the harness connector at the parking brake pedal switch.
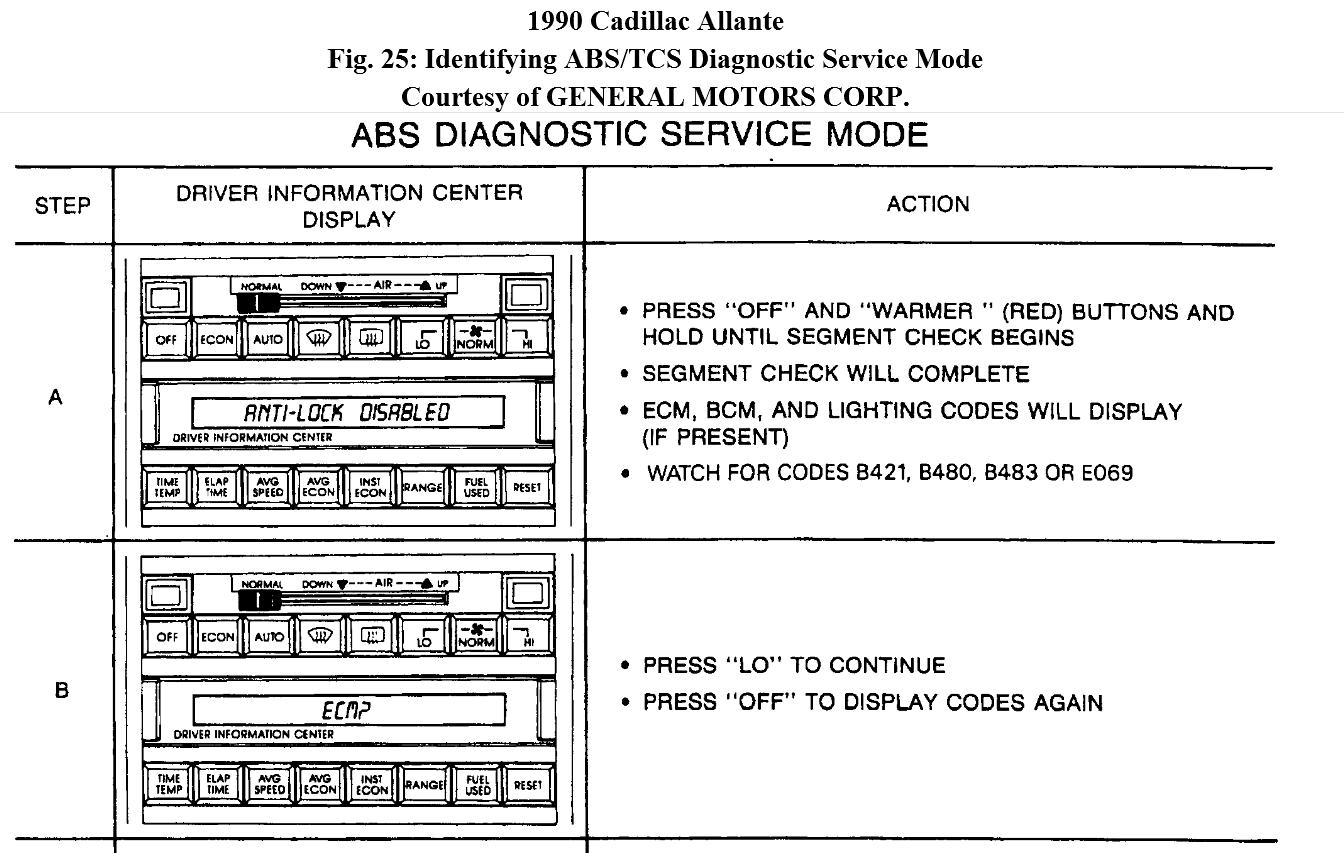
3. Entering Service Mode
Press the OFF and WARMER buttons on the climate control panel
simultaneously and hold until segment check begins on the instrument panel cluster (ICP) and Climate Control/Driver Information Center (CCDIC). See Fig. 25, step A.
NOTE:
If one or more LED segments do NOT light up during the Segment Check, stop here. See SELF DIAGNOSTIC SYSTEM CHECK in BODY COMPUTER MODULE article under COMMUNICATION DEVICES in ACCESSORIES & EQUIPMENT. Non-functional segments can lead to
incorrect diagnosis.
4. Segment Check
The segment check will cause the ICP and CCDIC to illuminate and cycle all displays. The segment check takes approximately 5 seconds to complete.
5. Code Display
After the segment check is completed, any trouble codes which have been stored by the PCM and BCM will be displayed.
PCM Codes
PCM code E069 is relevant to ABS/TCS diagnosis. Be alert to the presence of this code during this phase of diagnosis. PCM trouble codes will be displayed first. If no PCM trouble codes are present, the NO PCM CODES message will appear on the CCDIC. PCM codes are prefixed with an E (i.E. E013, E022).
BCM Codes
BCM codes B421, B480 and B483 are relevant to ABS/TCS diagnosis. Be alert to the presence of these codes during this phase of diagnosis. BCM trouble codes will be displayed next. If no BCM codes are present, the NO BCM CODES message will appear. BCM codes are prefixed with a 'B' (i.E. B110, B420, etc.).
Lighting Codes
Lighting trouble codes will be next. Lighting code format is similar to PCM and BCM codes except that the prefix L is used. Lighting codes are not relevant to ABS diagnosis.
Restraint Codes
Restraint codes will be displayed last. Restraint code format is similar to
PCM and BCM codes except that the prefix R is used. Restraint codes are not relevant to ABS diagnosis.
All codes will be accompanied by a CURRENT or HISTORY designation. HISTORY indicates that the failure was not present the last time the code was tested for and CURRENT indicates that the fault still exists. If BCM codes B421, B480, B483, or E069 are present, note if they are designated CURRENT or history before proceeding with diagnosis.
If the LO button on the CCP is depressed at any time during the display of PCM or BCM diagnostic codes, the code display will be bypassed. If the RESET button is depressed at any time during the display of codes, the system will exit diagnostic service mode and resume normal vehicle operation.
6. Selecting ABS Test Mode
After trouble codes have been displayed, the computer system allows any one of 4 systems to be selected for testing. At this point, the CCDIC displays the first available system as indicated by the 'PCM' message 3 responses are possible.
L Begin output of ABS/TCS diagnostic codes. Proceed to Step 7 if ABS/TCS diagnosis is desired.
L Display PCM and BCM trouble codes again by pressing the OFF button. This should be done if it is desired to review the code display. See Fig. 25, Step B.
L Exit diagnostic mode by pressing the RESET button. This will resume
normal vehicle operation.
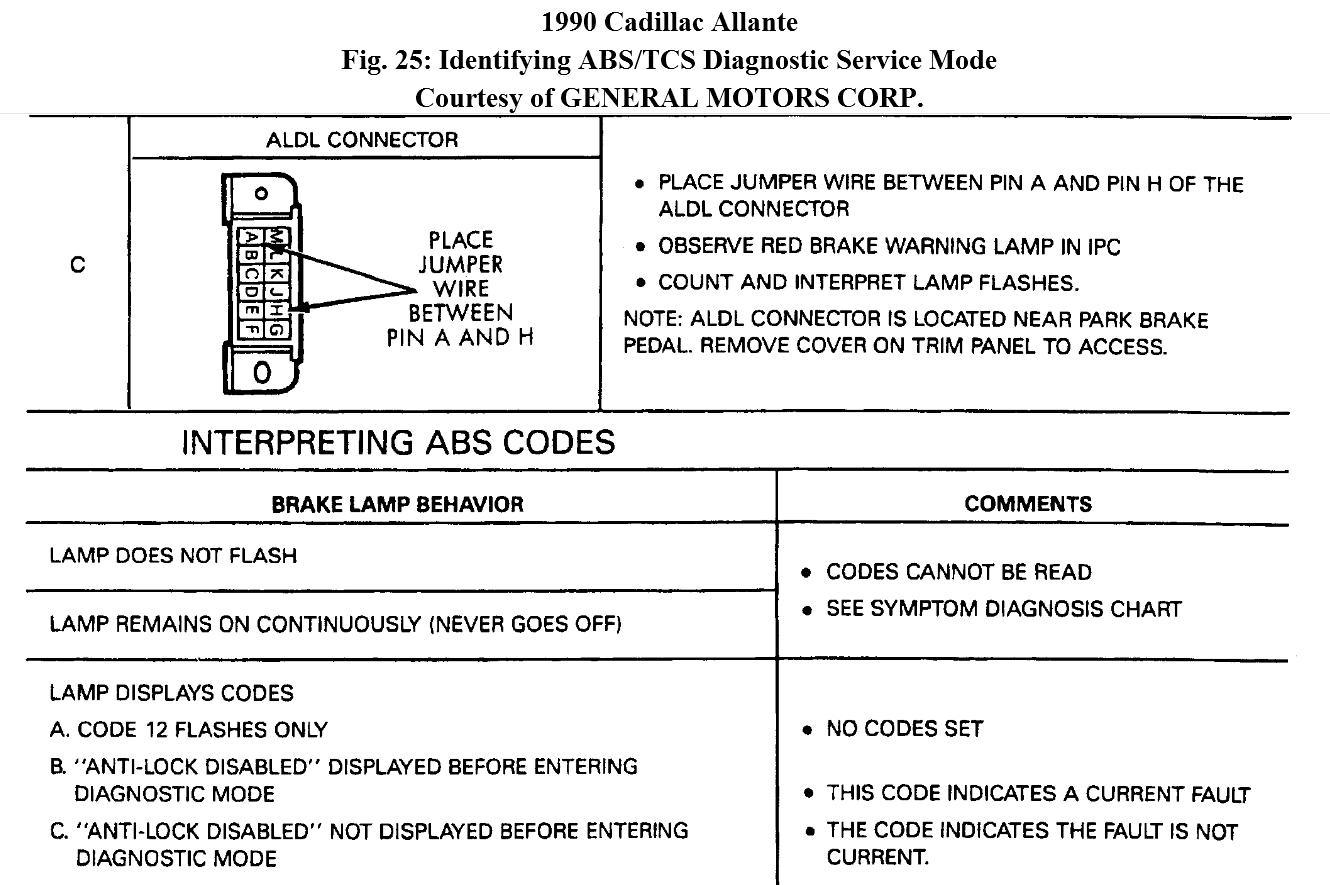
7. Displaying ABS/TCS Codes
To read EBCM flash codes, the must remain in diagnostic mode. To begin the flash code sequence, place a jumper wire between pin A and pin H of the local ALDL connector. The ALDL connector is located in the trim panel near the park brake pedal. See Fig. 25, Step C.
Once the jumper is in place, observe the Red BRAKE warning lamp on the IPC and count lamp flashes should be interpreted as described as described below.
8. Interpreting Lamp Flashes
The EBCM may display any one of 17 trouble codes through the lamp sequence. Trouble codes consist of 2 digits, the BRAKE lamp will flash the first digit, followed by a one second delay, then the second digit will be flashed 3 times. The number of times that the lamp flashes is equivalent to the value of the digit. To avoid misinterpretation of code display, the following information must be carefully reviewed. See Fig. 26 as a reference.
If The Brake Lamp Only Flashes Code 12
No codes are present. Attempt to duplicate the complaint or use symptom diagnosis methods as directed by appropriate diagnostic procedure.
If The Brake Lamp Remains On Continuously Throughout The
Diagnostic Procedure
Verify that on-board diagnostic mode has been entered by pressing OFF and WARMER. On-board diagnostics must be entered when displaying ABS/TCS fault codes. Since the BCM commands the BRAKE lamp to turn on, displaying trouble codes is not possible unless the BRAKE light is off before grounding ALDL pin H. The BCM shuts off the lamp when on-board diagnostic mode is entered.
See symptom diagnosis information as directed by the ABS/TCS
FUNCTIONAL CHECK.
9. Count lamp flashes for initializing sequence. The flash code sequence begins with an initialization sequence which represents Code 12.
L Wait for the first digit of the code initialization. The lamp will flash on for
approximately one second. This flash represents a 1. The lamp will pause (remain off) for approximately one second after flashing the first digit. It will then flash the second digit of the trouble code.
L When the lamp turns off, wait for the second digit of the code initialization. The lamp will quickly flash twice. These flashes represent the digit 2. Code 12 is not a diagnostic code associated with an ABS/TCS fault. This lamp sequence or Code 12 will repeat 2 more times.
L After Code 12 has been displayed 3 times, diagnostic code readout will
begin. If no codes are stored, the readout of the Code 12 initialization
sequence will begin again. The display of only Code 12, indicates no
ABS/TCS codes are stored by the EBCM.
10. Count lamp flashes for any stored codes.
L When the initialization Code 12 has finished, any stored codes will then be displayed. Codes consist of lamp flashes which correspond to a 2-digit trouble code.
LThe stored code will also be displayed three times. For example, a Code 21 Right Front Speed Sensor Fault, will be displayed as two lamp flashes, a one second delay and then one flash. This code sequence will be displayed 3 times.
L Once codes have been read out, the flash sequence will begin again starting with the Code 12 initialization sequence. Codes will continue to flash until the ALDL jumper has been removed.
LSee Fig. 26. Code 21 is shown as an example.
11. Record the trouble code.
12. Exit Service Mode
After interpreting ABS/TCS diagnostic codes, remove the ALDL jumper and exit Service Mode by depressing the RESET button. This will return the computer system to normal operation.
13. Return to the appropriate diagnostic procedure.
Images (Click to make bigger)
Thursday, February 28th, 2013 AT 12:35 PM