A manual transmission is similar but not quite the same as an automatic transmission installation when removing or installing it, this job is a prerequisite when doing such services as a clutch replacement. This guide is for rear wheel drive vehicles, we feature a front wheel drive manual transmission removal in the video below this guide.
What Goes Wrong?
A manual or standard transmission is trouble free for the most part, made of mostly mechanical parts it does not rely on electronics or sensors to operate, most of the time the manual transmission is removed to perform a clutch replacement service. High mileage or extreme usage can cause the transmission to wear, requiring a rebuild due to worn out Syncors, internal shift linkages or broken gears.
What's the Cost?
The labor charge will vary due to the manufacturers' design but in general it will range from 9.0 to 12.0 hours to remove and replace the unit. The price or the rebuild or repair will vary depending on the problem the transmission is having. Unless the vehicle is at a transmission shop most normal service shops including the dealer will just install a rebuilt unit obtained from an outside source. Many places sell rebuilt units which will range from $800 to $1,400 US that is why more and more people are doing the R&R themselves. If exact times or procedures are needed you can ask our experts to supply you with the information (free), or consult an online resource such as AllData DIY (pay), this guide and video will be sufficient in most cases.
SPONSORED LINKS
Let's Jump In!
To start the vehicle will need to be lifted onto jack stands on level ground with the battery disconnected to help prevent electrical short circuits while the job is being done, the transmission also needs to be left in neutral. The exhaust system may or may not need to be removed before the transmission can be unbolted. This can be determined by evaluating the room needed to accompany the transmission removal, in the example below the exhaust system needed to be removed.
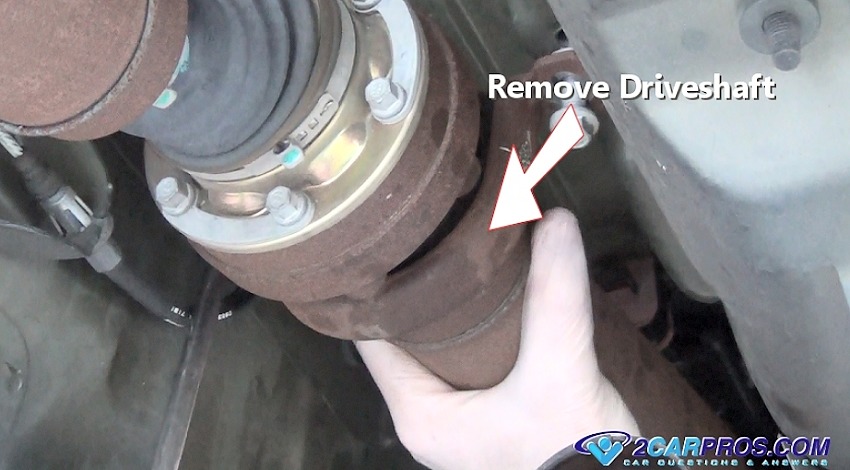
Unbolt the driveshaft at the differential and center support and it should slide
out of the rear of the transmissions in most cases, in this case the
driveshaft needed to be unbolted
at the transmission as well, as the driveshaft comes loose keep your hands on it.
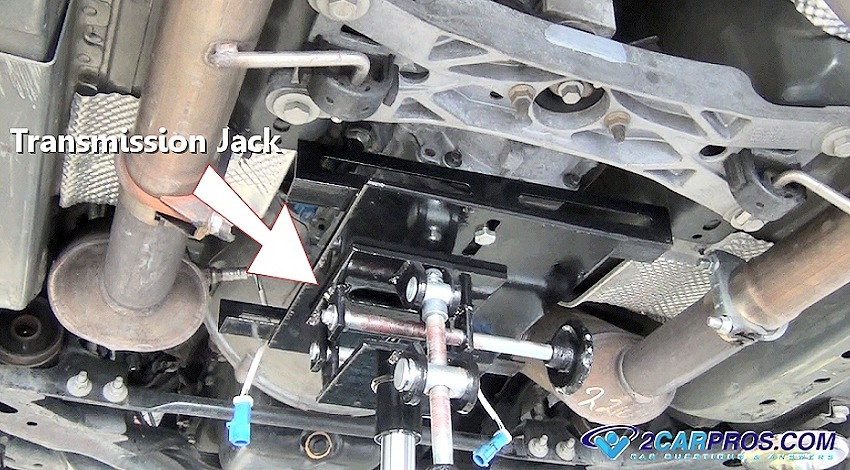
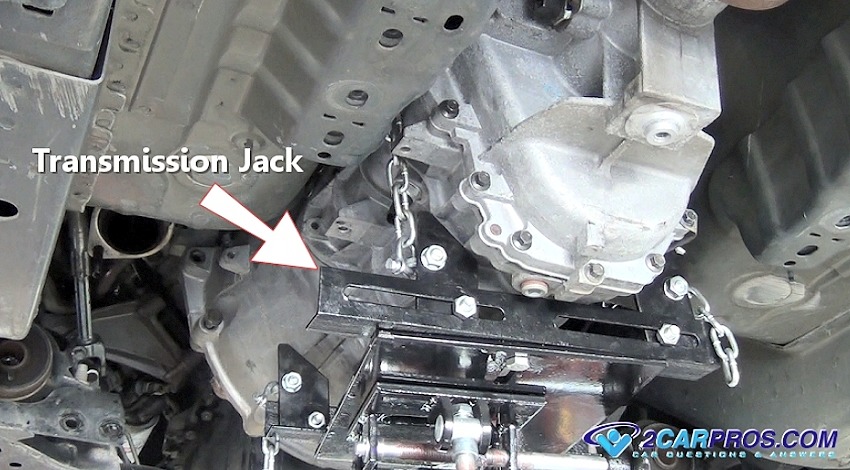
Position a transmission jack under the transmission case and raise it slightly,
enough to lift the weight off the transmission mount. In this example you can see
a full range jack because the vehicle is on a lift needed to film, you can rent
a floor style jack from the local parts store for a small amount.
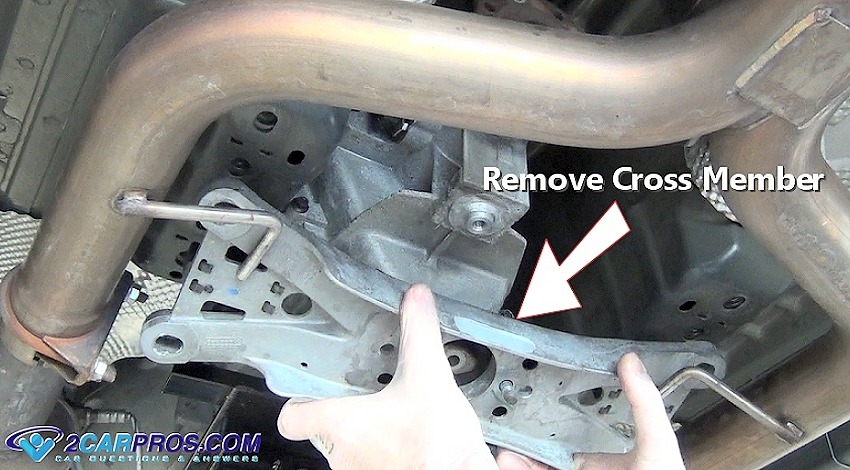
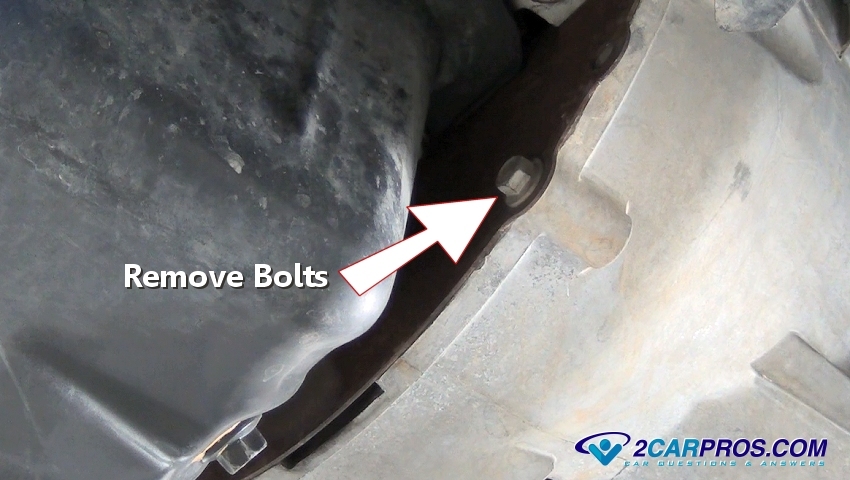
Remove the transmission crossmember mounting bolts, this will allow the transmission
to rest on the jack which is needed to lower the unit while holding the transmission
steady.
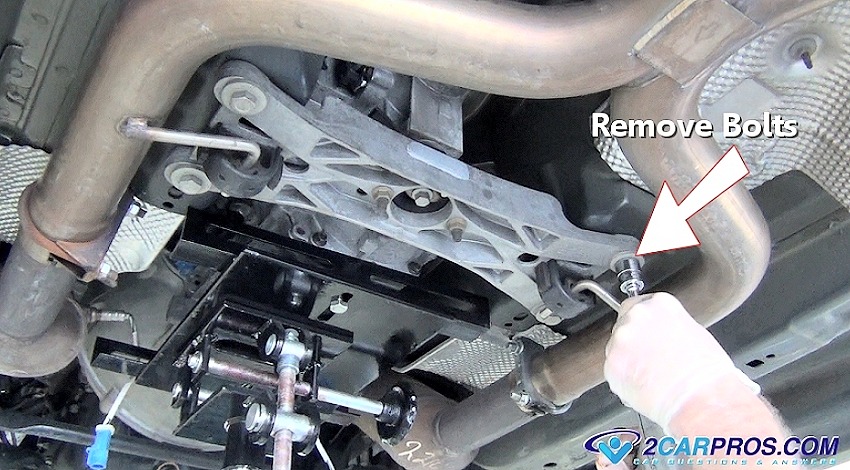
Locate and remove the transmission crossmember bolts or nuts to the rear transmission
mount, it will become loose so keep your hands on it so it does not fall. The jack
is now holding the weight of the transmission.
SPONSORED LINKS
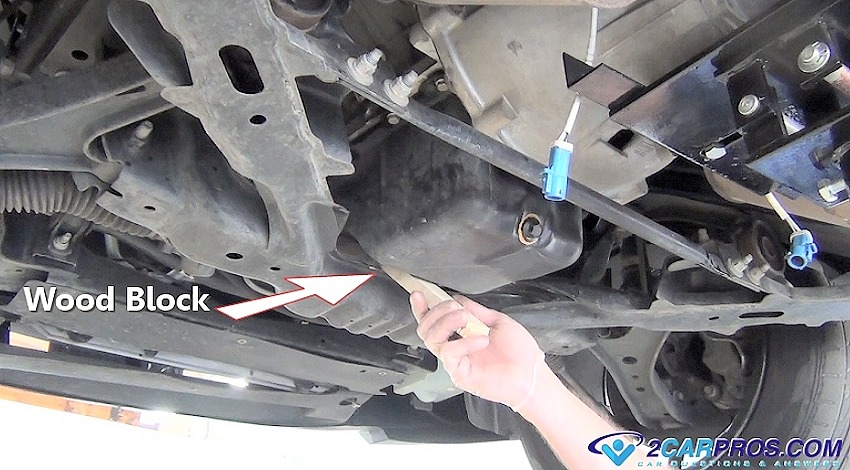
Once the transmission is removed the engine will need to be supported. If the
exhaust system was removed, here we use a wood block to sandwich between the engine
pan and frame, a small jack will work or any means needed to keep the engine from
dropping backwards, the wood will compress slightly.
With the transmission lowered slightly remove all wiring connectors such as the
vehicle speed sensor and reverse light switch.

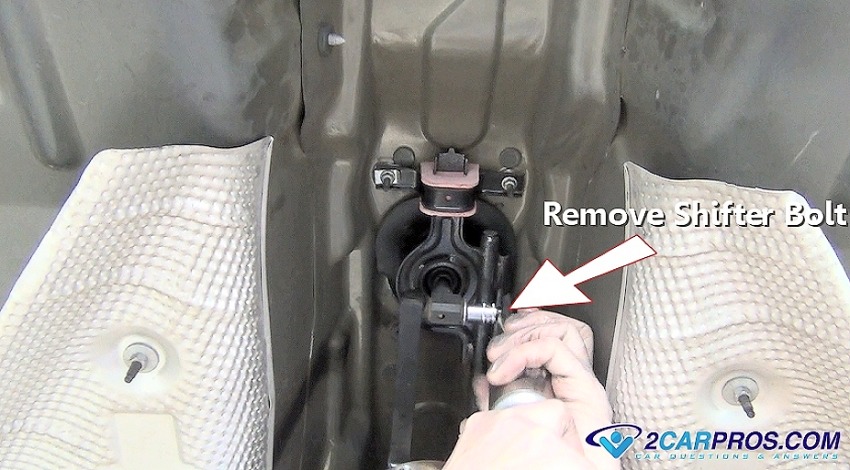
Remove the shifting linkage, this will vary, for example some transmissions have
a plate where the shifter enters the transmission, this must be removed from inside
the car or from the top of the tail housing.
On this particular design the starter motor is bolted to the bell housing which
needs to be removed, this is why we disconnected the battery in step 1.
Remove the starter motor
mounting bolts and gently set it to the side.

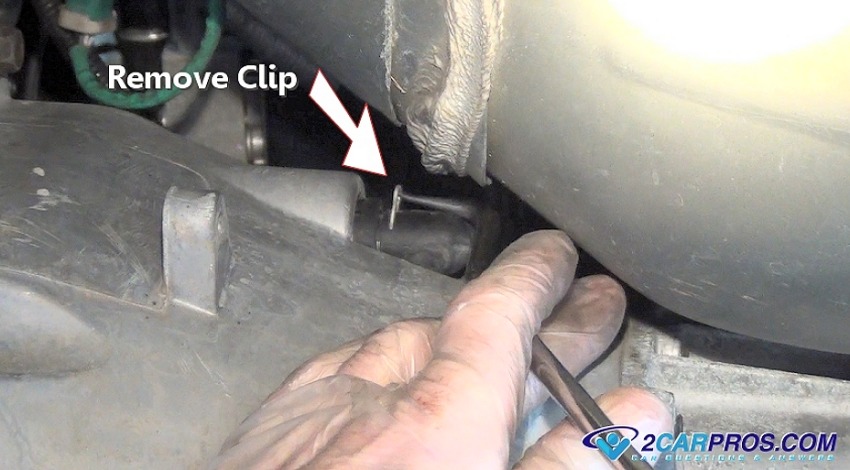
Use a pick or small screwdriver to gently pry the retainer clip from the clutch
hydraulic line at the bell housing, if an externally mounted secondary cylinder
or clutch cable is used, unbolt or unclip from the transmission.
SPONSORED LINKS
Gently grasp the line and twist back and forth to pull it from the slave cylinder,
fluid will start to leak, insert a rubber cap to stop the fluid.

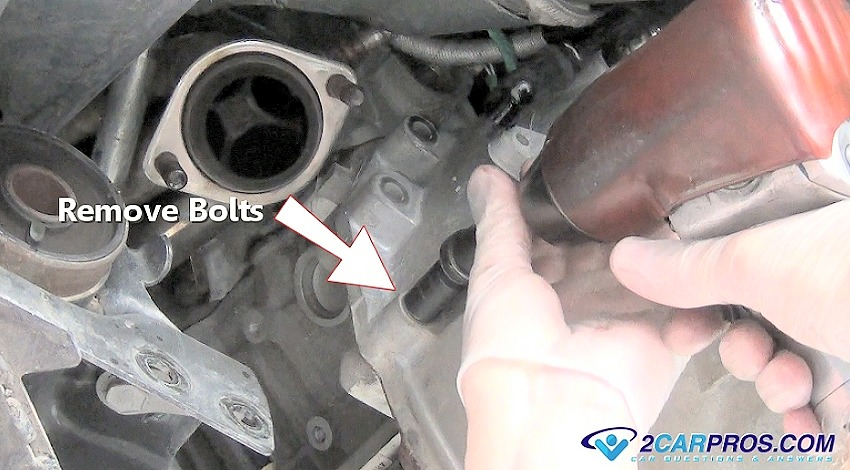
Locate and remove the engine plate or dust shield bolts from the bell housing.
At this point everything on and around the transmission has been removed or disconnected
except for the main engine to bell housing mounting bolts, the upper bolts can be
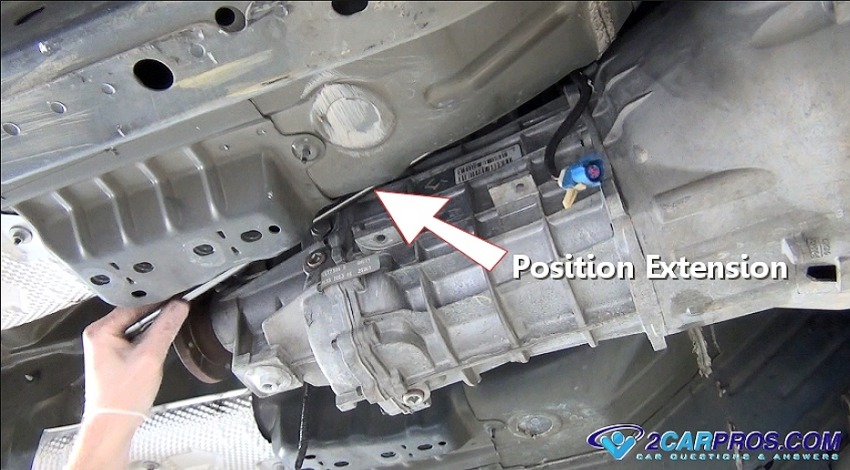
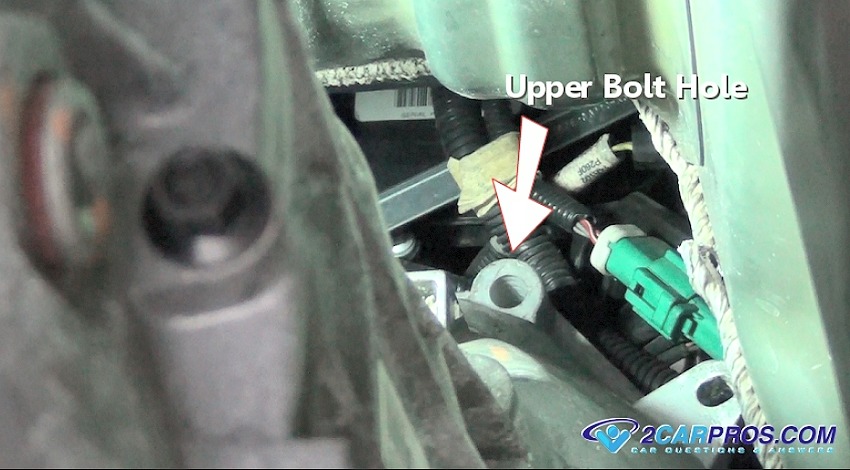
difficult to remove unless a long extension with a universal is used.
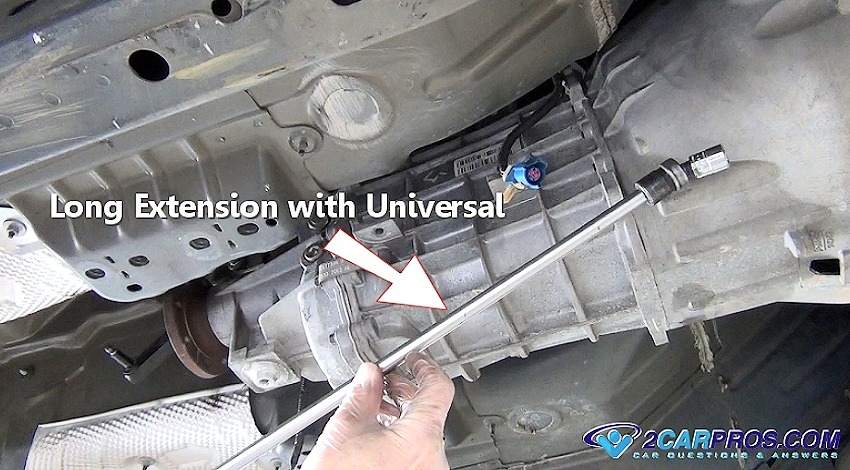
Guide the extension over the top of the transmission to gain access to the upper
bell housing bolts and remove the bolts completely.
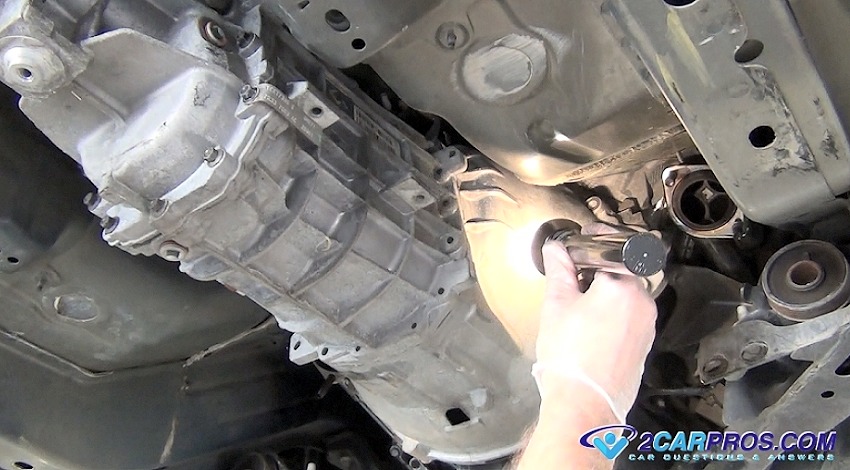
Continue to remove the transmission bell housing bolts until all but the bottom
two bell housing bolts remain, use a flashlight to double check.
Securely reposition the transmission jack underneath the transmission and attach
the safety chains around the case to avoid it from slipping off the jack.
SPONSORED LINKS
With the transmission securely supported by the jack, remove the last two bell
housing bolts.
Watch the Video!
Please watch this video of the job being done, then continue down the guide to glean additional helpful information, pan and filter guide below with video.
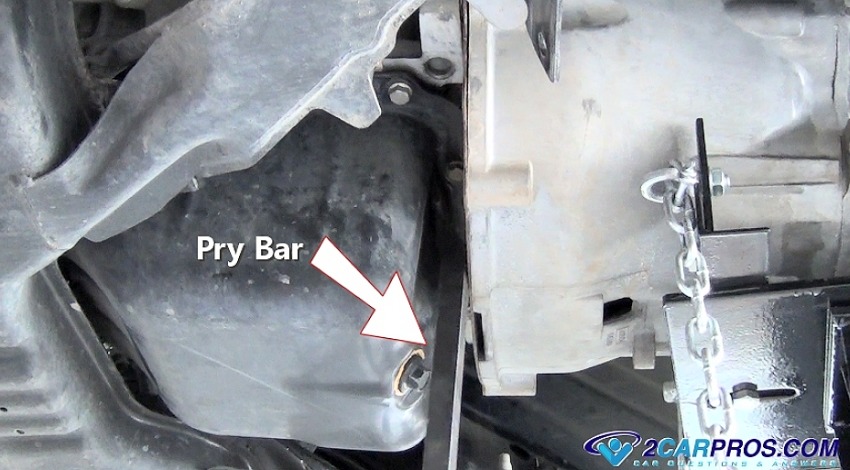
Even after all of the bolts have been removed, the housing could be stuck on
the alignment dowels mounted in the engine block along with the input shaft inside
the clutch disc, use a large pry bar and gently wedge it between the engine and
transmission, apply pressure to "pop" it loose from the engine, further work the
pry bar to fully separate. The transmission must be at a "neutral position" to separate,
in other words the jack cant be too high or low, this creates a bind which will
make the removal more difficult.
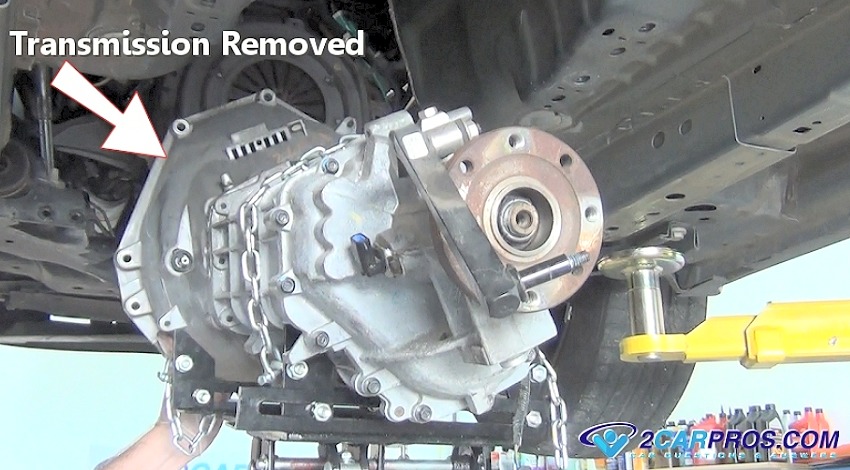
The transmission will then be loose behind the engine, keep the transmission
steady on the transmission jack as you begin to lower it.

Slowly lower the transmission while keeping it steady, with a helper remove the
transmission from the jack, it is now ready for a rebuilt unit or to have the original
unit repaired.
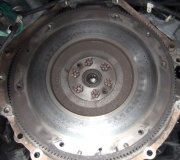
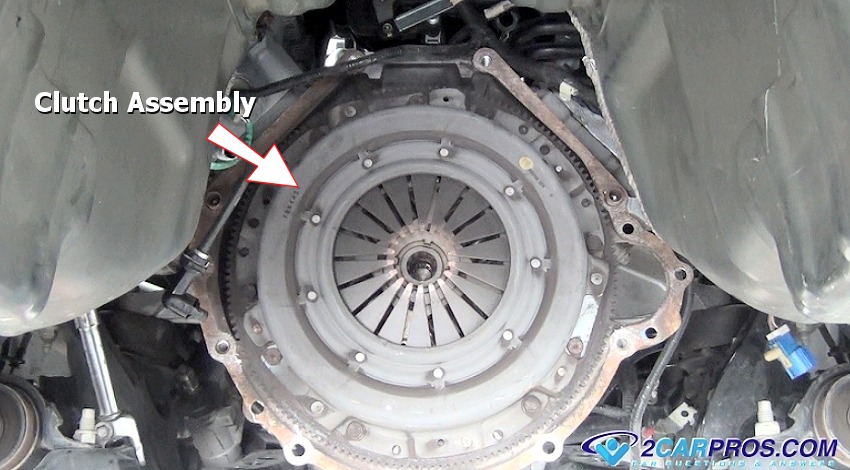
At this point the clutch will be exposed so a
new clutch can be installed or the
replacement of the engine
rear main seal, throwout bearing,
pilot bearing or
flywheel. Also, if the oil pan gasket
is leaking now is the time to change that as well.
After repairs have been made or new/rebuilt transmission is ready position it
on the jack, slowly raise the unit back into position behind the engine.

SPONSORED LINKS
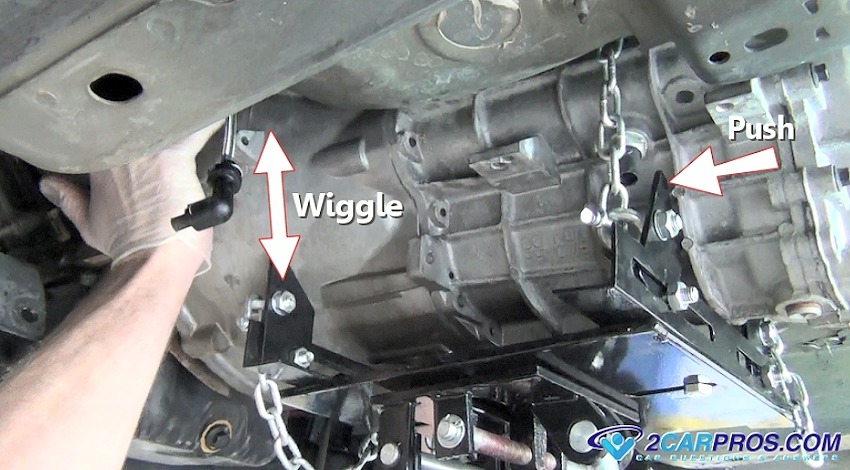
When bringing the transmission up to the engine and while the installation is
in progress, keep the gap between the engine and transmission equal, clear all wiring
harnesses and vacuum lines etc. from between the engine and bell housing, this is
a common problem. Do not allow the transmission to "hang" on the engine at this
point, it could bend the clutch disc which will cause it to not disengage.

Push toward the engine while wiggling the transmission into position, the gap
will close as the input shaft pushes through the clutch disc. If the transmission
doesn't want to go into position, back the transmission up and slightly rotate the
input shaft, repeat.
Once the input shaft is fully in the clutch disc, the gap between the engine
and transmission will begin to close.
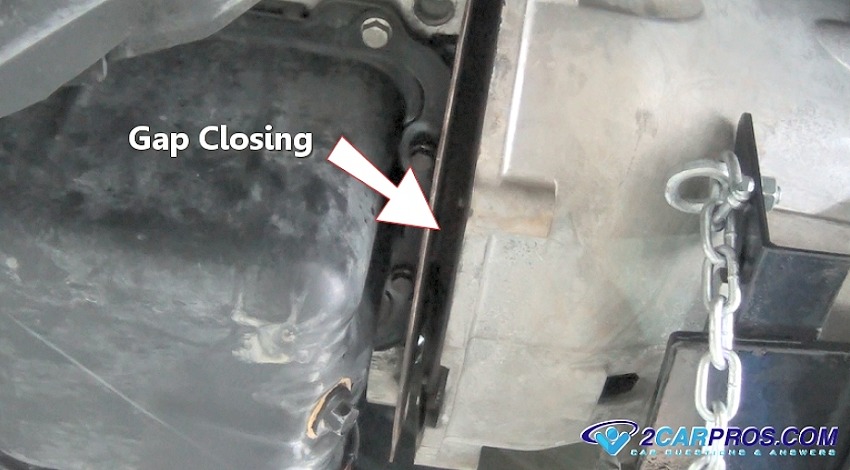
While keeping the gap even, install one mounting bolt on each side and slowly
tighten (evenly) to close the gap completely.
SPONSORED LINKS
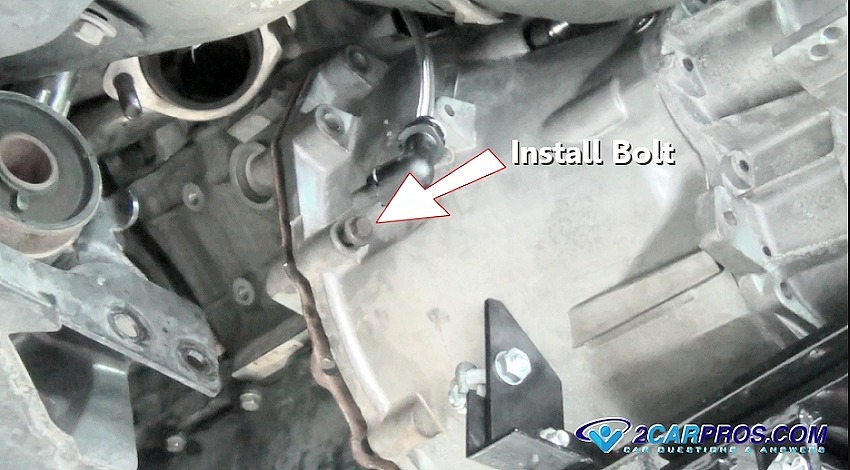
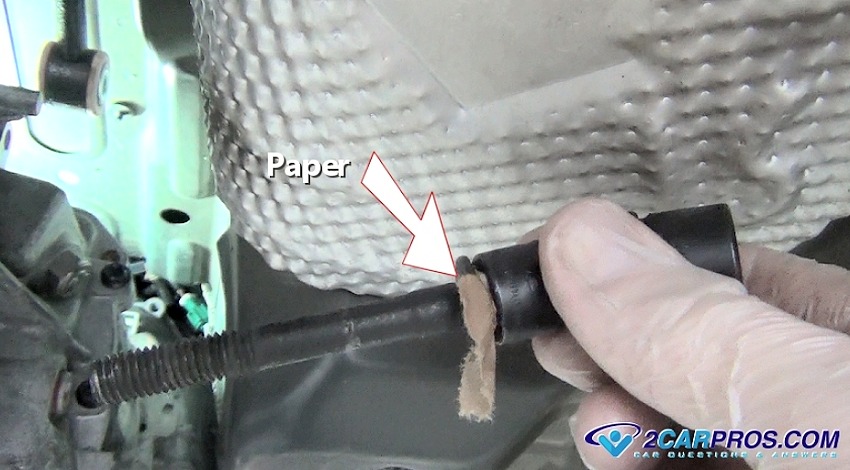
The upper transmission bolt holes can be difficult to access.
An old automotive trick is to add a small piece of paper to wedge the bolt into
the socket which will hold the bolt while installing.
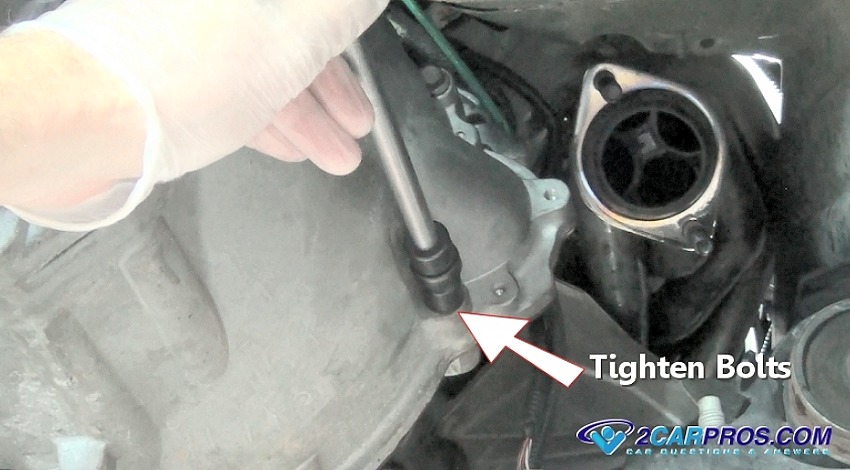
Continue to install and tighten and bell housing bolts evenly, once completed
finish by tightening the bolts to the correct torque, in this case it is 34 foot
pounds.
Once all bell housing and engine plate mounting bolts have been installed and
tightened, remove the rubber cap from the hydraulic clutch line and push it back
onto the secondary cylinder, reinstall retainer clip before installation.

Reinstall the starter motor and attach wiring and positive battery cable, tighten
the mounting bolts to spec, in this case 24 foot pounds of torque.

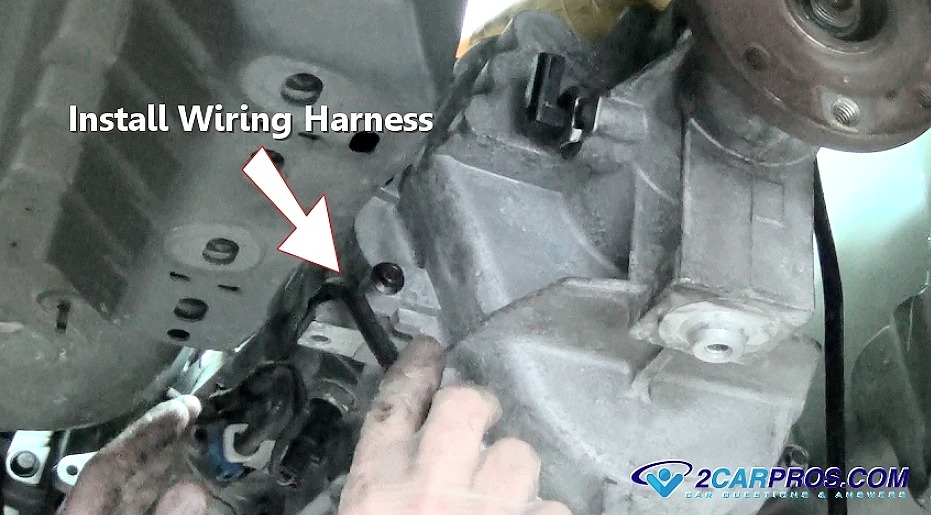
Reroute and install the transmission wiring harness and connectors to the reverse
light switch and vehicle speed sensor.
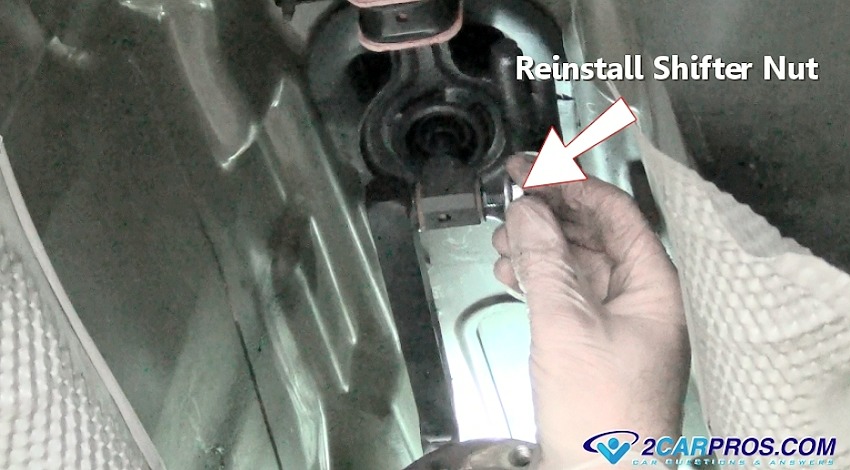
Reinstall shifter mounting nuts and bolts.
SPONSORED LINKS
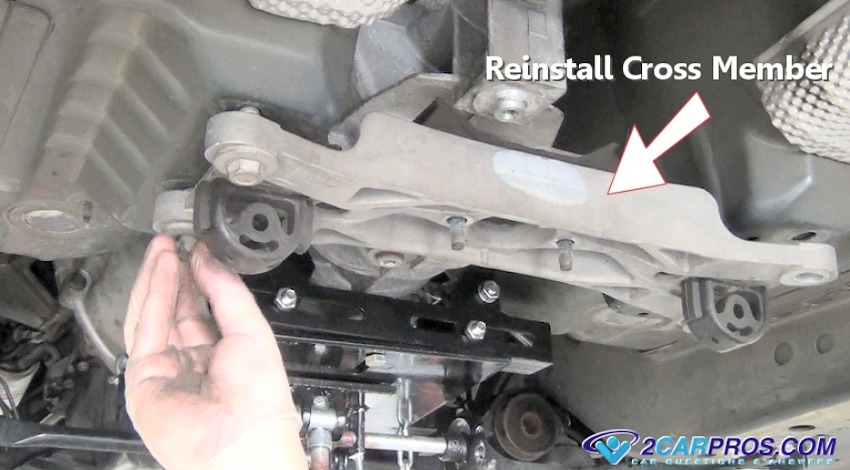
Raise the transmission jack up into position and install the transmission cross
member and the mounting bolts, tighten to spec, in this case it is 36 foot pounds
of torque.
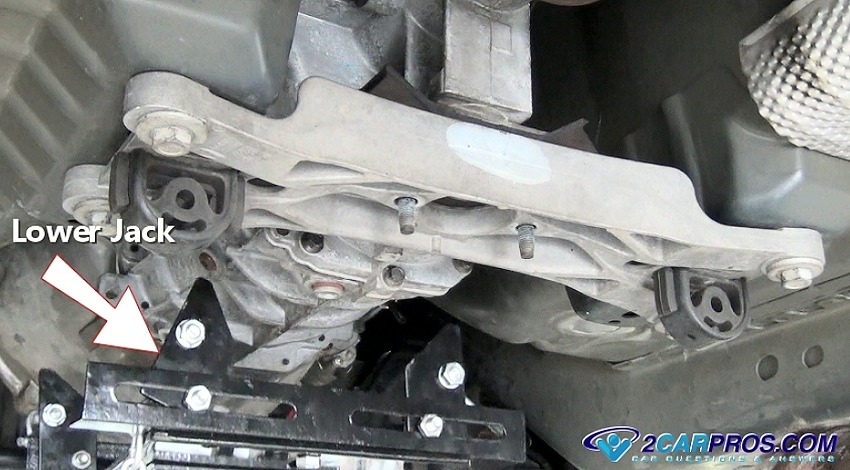
Once all cross member bolt are tight, lower the jack while guiding the transmission
mount into place.
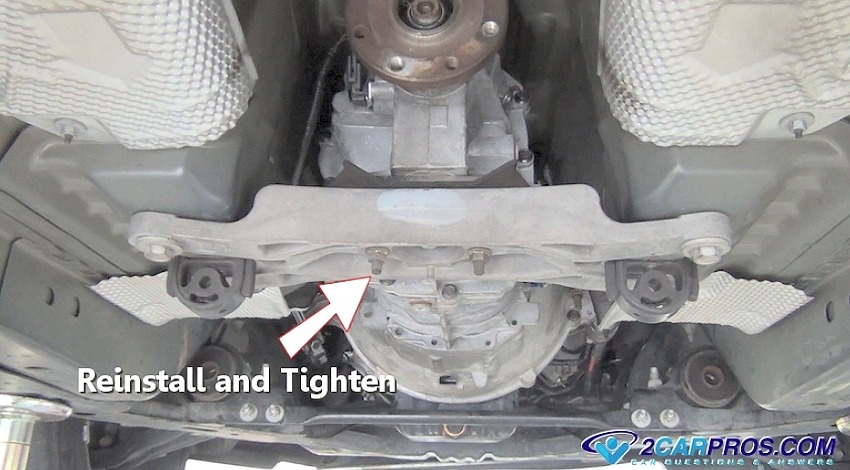
Reinstall the transmission mounting nuts and bolts, tighten to spec which in
this case is 34 foot pounds of torque.
Reinstall the driveshaft by installing front mounting bolts, or sliding the yoke into the transmission, finish by tightening the differential flange mounting bolts. Reinstall the exhaust system including gaskets and hangers. Use a flashlight and inspect for any missing nuts, bolts or connectors, check and refill the transmission fluid. Lower the car and reconnect the battery, there might be a small spark while connecting, if a large spark occurs, recheck the connections at the starter.
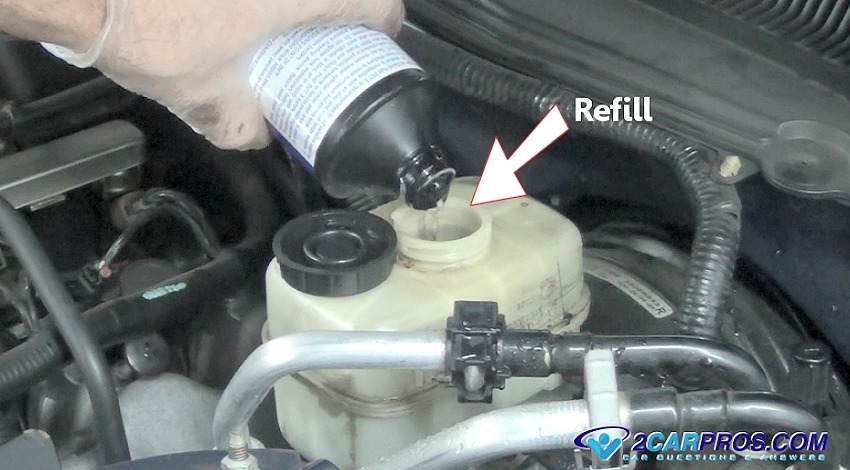
Locate the clutch fluid reservoir and refill, some vehicles use the brake master
to supply fluid to the primary clutch cylinder.
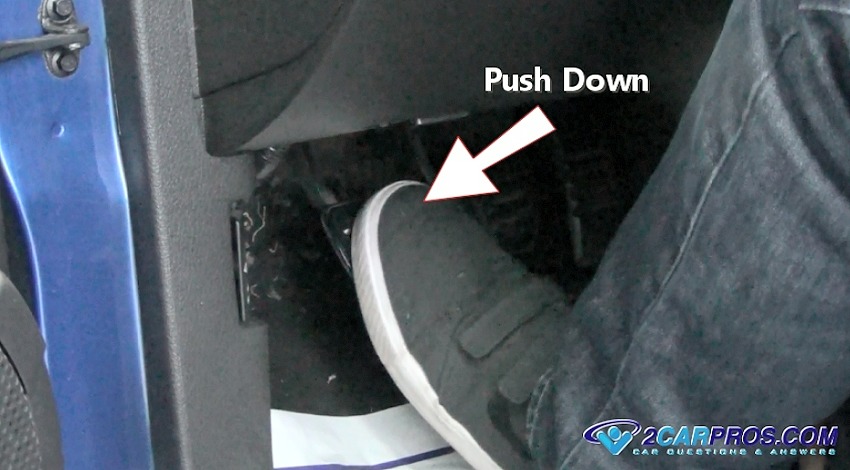
Most hydraulic clutch systems are self bleeding, just pump the clutch pedal until
normal pedal operation returns, this can take up to ten minutes. The vehicle is
ready for its first test drive, listening for any strange noises or sounds which
can be an indication of a problem.
Front Wheel Drive Manual Transmission Removal Video
How to remove a front wheel drive manual transmission
SPONSORED LINKS
Questions?
Our certified technicians are ready to answer car repair questions for free. We hope you saved money and learned from this guide. We are creating a full set of car repair guides. Please subscribe to our 2CarPros YouTube channel and check back often for new videos which are uploaded regularly.
Article published 2022-03-08